NC-30 basement install photos

  • Active since 1995, Hearth.com is THE place on the internet for free information and advice about wood stoves, pellet stoves and other energy saving equipment.

    We strive to provide opinions, articles, discussions and history related to Hearth Products and in a more general sense, energy issues.

    We promote the EFFICIENT, RESPONSIBLE, CLEAN and SAFE use of all fuels, whether renewable or fossil.
Status
Not open for further replies.

Black Jaque Janaviac

Feeling the Heat
Hearth Supporter
Dec 17, 2009
451
Ouisconsin
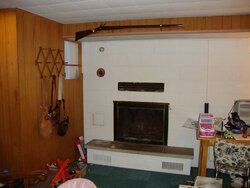
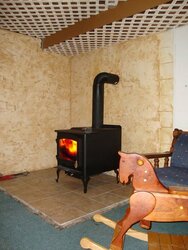
OK. I've reached a point where I'm calling my woodstove project "done . . .for now". Someday I will sandblast all the walls and parge them and finish them as the Tuscan plaster style you see in the final photo. However, my primary goal was to get the stove in and running, do as much as practical to help the heat move upstairs, and return the stoveroom to "liveable".

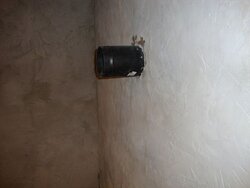
The room had a fireplace integrated into the cinderblock wall, plus the room to the left had a boiler with a 6-inch fluepipe going through a big square hole in the wall and into a thimble in the concrete block. The domestic hot water had a 3-inch flue doing the same. I disconnected these when I put in a boiler that had direct vent. So there sat the thimbles looking ugly.

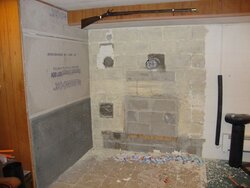
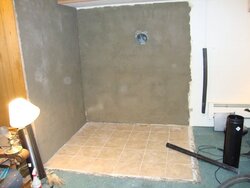
I removed the hearth-step, cut out some of the steel fireplace liner, filled the fireplace opening with block, chiseled a hole in the block for the flue liner, installed a SS Flex-King liner, laid down porcelain tile, replaced the wood panel section w/ cement board, skip troweled parge over cinder block wall and cement board, removed tongue-and-groove ceiling, painted floor joists, painted lattice, hung lattice from floor joists, painted and glazed parge. Oh I insulated the sill after removing the ceiling on the soffit.

Anyway, a before picture followed by work-in-progress and "done'. Ooops. I guess I shouldn't call it done since I will be laying carpet tiles flush to the porcelain tile but that's only a few minutes of work.
 

Attachments

  • fireplace.jpg
    fireplace.jpg
    42.6 KB · Views: 518
  • before parge.jpg
    before parge.jpg
    44.2 KB · Views: 520
  • fresh parge.jpg
    fresh parge.jpg
    36.7 KB · Views: 519
The skip-trowel texture and drying parge (the hardest part was giving the mortar and parge enough time to cure before painting.)
 

Attachments

  • drying parge.jpg
    drying parge.jpg
    26.6 KB · Views: 489
  • skip trowel texture.jpg
    skip trowel texture.jpg
    25.8 KB · Views: 510
Looking very nice.

Nice work.
 
Very Nice.

Been meaning to start finishing the little portion mine is in. But I have been waiting.on Winter to do it.. Ain't had much of one. :lol:

The lattice is different. Hides the unsightly floor joists, but still allows some heat transfer through the floor. Love it.
 
That sure does change the looks of that corner. I like it. Nice job on the trowel work. What product did you use for the final plaster look?
 
That's coming along nicely! Look forward to the finished product!

Ray
 
Jags, the "plaster" is just Quikrete mortar mix. Then sealed, then two coats of satin basecoat, followed by the glaze. Then I wiped the glaze off with a wet rag - that left the deep spots darker. Up close it looks better when you can see the shine. It may not be the best skip-troweling, but A) it's my first experience with such a technique and B) it accomplished my goal of completely hiding the fact that there was once a fireplace and two thimbles there. I decided to go with mortar mainly because I had about 3/4 bag left over after filling in the fireplace opening.

The lattice work looks like a neat idea only poorly executed. Garden lattice panels are not constructed to exact dimensions like drywall. Therefore they don't necessarily match up real nicely. Now that I've learned from my first attempt, I would align the panel edges to meet up with each other and let the gaps be along the edge of the wall. The gaps are easier to cover along the wall than in the middle of the ceiling. However, it's a basement, not a living room. Also, I would cut the lattice into 4x4 square sheets instead of the 4x8 sheets they come as. Using square sheets allows you to twist them 90*. The way the lattice is put together there is one set of diagonal laths that are closer to your eye. If you don't plan exactly which side of the lattice to paint ahead of time (I didn't) you may end up with those diagonals running in the wrong direction. If the lattice was in a 4x4 square you need only to turn it 90* and you can make adjustments to creat a "herringbone" effect. All-in-all it worked pretty well. The heat is up against the floorboards but you have to "look closely" to see them.
 
Props to you for undertaking that project...takes a lot of determination to rip something out that's functional. You're really going to appreciated the heat output.
 
Nice install. Also nice to see a proper lookin' shootin' iron ; )

Enjoy!
Mike
 
Looks good, now hang the gun back up and it wll look great ;)
 
I hesitate to put my gun right over the stove - I would think the dry heat would not be good for the stock.
 
Status
Not open for further replies.