New hearth almost done!

  • Active since 1995, Hearth.com is THE place on the internet for free information and advice about wood stoves, pellet stoves and other energy saving equipment.

    We strive to provide opinions, articles, discussions and history related to Hearth Products and in a more general sense, energy issues.

    We promote the EFFICIENT, RESPONSIBLE, CLEAN and SAFE use of all fuels, whether renewable or fossil.
Status
Not open for further replies.

sportbikerider78

Minister of Fire
Jun 23, 2014
2,493
Saratoga, NY
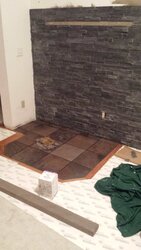
I've been dreaming of completing this project since I moved to this home 2 years ago. There was a very ugly tile hearth with a skim coated block wall behind it. Very boring.
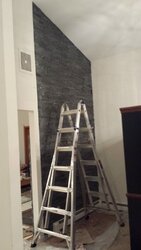
The skim coat wall will now be covered to the ceiling in real slate and will feature a limestone mantel that I just had cut the other day. It is not in yet but you can see the 48" space for it. Not that big, just enough to break up the wall.
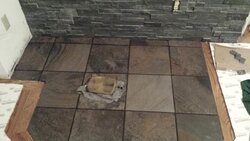
The porcelain tile (that looks like colored slate) is now done for the hearth and I used some dark grout (charcoal color) on it last night. The white you see is just the padding from under the carpet, since it is pulled back to keep it clean. I will have to make a trim piece to better transition from hearth tile to hardwood flooring.
 

Attachments

  • 20151022_222000.jpg
    20151022_222000.jpg
    82.5 KB · Views: 245
  • 20151022_200405.jpg
    20151022_200405.jpg
    62.6 KB · Views: 255
  • 20151022_222022.jpg
    20151022_222022.jpg
    122.2 KB · Views: 231
Looks great! How thick is the slate on the wall? What's your plan for supporting the mantel?
 
Gonna look nice. Englander going there right?
 
I really like the gray wall!
 
  • Like
Reactions: sportbikerider78
Thanks guys. Yup...30NC is going there.

The slate thickness varies from 3/8 to over 1" in places. I'd say the avg thickness is about 1/2.

The mantle will be glued into place with a really strong masonry polyurethane adhesive. Think liquid nails but for masonry and good to 400F. I doubt it will ever see 150F.
I will glue it in place and use 2x4's for a temp support during the 24 hr cure time.

My mason did an amazing job cutting the place for the mantle perfectly level. It will actually rest in there without being held by hand.

Once it is cleaned, pipe is in place and stove is placed...I'll post up some more pics.
 
Looks great! That 30's going to look right at home.
 
I'm getting there. Being out of town on the weekends is setting me back on projects.
Mantle in. Getting the pipe level. Right now, it looks like I will not need to adjust at all from front to back, so I can return my 2 45degree sections I bought and just get a 2' section. Save $40 bucks right there.

A before (with pellet stove) and current pic with englander.


20150706_194102.jpg
20151105_072056.jpg
 
Looking good. Have to get a picture with a fire going in that bad boy.
 
Looking good. Have to get a picture with a fire going in that bad boy.
I'm with ya there...but its 70 degrees out! Not that I'm complaining. :)

This Saturday it will get down colder at night. I have inlaws in town but they will be out of the house for the afternoon. I think I will break the stove in then.
 
  • Like
Reactions: Ash
All set now. It would have taken 20 days to get someone over to install my pipe...so I did it myself. Not that big of a deal.
I'm loving the englander so far. I smoked out the inlaws breaking the paint in...they made a big 'to do' about that. I was sipping Buffalo Trace and chucking to myself while it was 45 degrees outside, and with 2 doors, 2 windows and a fan it was still 70 degrees inside. :)


20151106_200009.jpg


20151107_194718.jpg

See those secondaries kicking in?
20151107_195459.jpg
 
  • Like
Reactions: Highbeam
Status
Not open for further replies.