
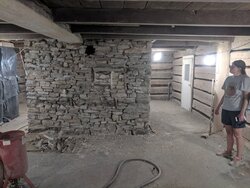
My wife and I are fixing up a very old log house. There is a huge fireplace in the kitchen and another in the basement, neither of which have been used in at least a century. The fireplaces are arranged back to back and run up seperate flues to a point where they converge. We are planning to put a wood stove in the living room, which has an old stove pipe hole, but it's too small for double wall pipe and wouldn't meet clearances to the floor joists on the ceiling which we're leaving exposed. We had a chimney sweep lined up to install the liner for us but he backed out at the last minute. A few questions: 1. Are we better off putting the new hole as high as we can and still meet clearances for a double wall pipe, or use single wall at it's highest allowable point. The single wall will throw off more heat, but there will be less of it in the room, so is it 6 of one and half dozen of the other? The ceilings are fairly low so there won't be a whole lot of pipe either way. 2. The stone wall is about 18 inches thick, and the original mortar seems to just be a primitive clay- lime mixture. We will be repointing it. Any advice on putting a new hole in? The flue is 15 inches deep and only extends maybe a foot to the right of the existing hole, and about 2.5 feet to the left. We're planning to carefully use a rotary hammer to take stones out one at a time, but I've never done this and I'm nervous about causing too much damage, particularly on the inside of the chimney where it would be next thing to impossible to repair 3. After the hole is in, we just grout in a terracotta thimble and install the tee through that right? No metal thimble since the wall is non combustible? 4. The house is 1800 square feet and will be well insulated when we're done. What size stove should we be looking at? I'd like to be able to hold a fire overnight but don't want to cook us out either. Leaning towards the Englander 1800 sf right now. We're mostly just doing it for supplemental heat at this point, and to hopefully cut the oil bill down some, but probably won't be burning it full time. Thanks in advance!
Not your typical chimney
- Thread starter ady5008
- Start date
-
Active since 1995, Hearth.com is THE place on the internet for free information and advice about wood stoves, pellet stoves and other energy saving equipment.
We strive to provide opinions, articles, discussions and history related to Hearth Products and in a more general sense, energy issues.
We promote the EFFICIENT, RESPONSIBLE, CLEAN and SAFE use of all fuels, whether renewable or fossil.
You are using an out of date browser. It may not display this or other websites correctly.
You should upgrade or use an alternative browser.
You should upgrade or use an alternative browser.
Ashful
Minister of Fire
Old house nut here. What year was this place built? That will dictate what your existing bedding and pointing mortars (which are often two different materials) were.
In my case, two of my fireplaces were cooking fireplaces, plenty big enough to house a stove. So I set a stove in each (presently BK Ashford 30’s), ran a double-wall pipe up to about 8 feet off the floor, and transitioned to an insulated liner at a block-off plate. Block-off plate is held in place by perf angle anchored into the stone.
If this place is truly “old”, the bedding mortar should be just clay or mud, dug up from the back yard. There will be no lime in it, unless it was built very close to a lime kiln, as the transportation costs for lime were astronomical in the days of ox carts. The pointing mortar would have likely been lime mixed with sand excavated from your back yard or a local creek, but it looks like your pointing mortar is gone.
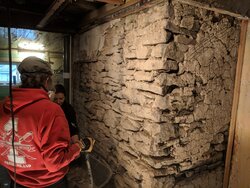
My first order of business would be getting that structure pointed, as it looks rather precarious, complete collapses of structures like this are not uncommon, once the pointing is gone. Get some sand (I prefer brown) and some white lime, and start pointing bottom-up. If you need to remove any old pointing, do so only in small sections, to avoid removing too much existing stability. Only consider putting another hole in the wall after it’s pointed and cured.
Note, lime mortar takes a long time to set up and achieve strength. For this reason, many masons today like to mix a small amount of Portland into the mortar, as Portland sets up fast. I’ve been using 2 parts lime to 5 parts brown sand, going traditional on my place, but 1/2 to 1 part of Portland would help it build strength faster.
Can you show a view of the fireplace opening?
In my case, two of my fireplaces were cooking fireplaces, plenty big enough to house a stove. So I set a stove in each (presently BK Ashford 30’s), ran a double-wall pipe up to about 8 feet off the floor, and transitioned to an insulated liner at a block-off plate. Block-off plate is held in place by perf angle anchored into the stone.
If this place is truly “old”, the bedding mortar should be just clay or mud, dug up from the back yard. There will be no lime in it, unless it was built very close to a lime kiln, as the transportation costs for lime were astronomical in the days of ox carts. The pointing mortar would have likely been lime mixed with sand excavated from your back yard or a local creek, but it looks like your pointing mortar is gone.
My first order of business would be getting that structure pointed, as it looks rather precarious, complete collapses of structures like this are not uncommon, once the pointing is gone. Get some sand (I prefer brown) and some white lime, and start pointing bottom-up. If you need to remove any old pointing, do so only in small sections, to avoid removing too much existing stability. Only consider putting another hole in the wall after it’s pointed and cured.
Note, lime mortar takes a long time to set up and achieve strength. For this reason, many masons today like to mix a small amount of Portland into the mortar, as Portland sets up fast. I’ve been using 2 parts lime to 5 parts brown sand, going traditional on my place, but 1/2 to 1 part of Portland would help it build strength faster.
Can you show a view of the fireplace opening?
Old house nut here. What year was this place built? That will dictate what your existing bedding and pointing mortars (which are often two different materials) were.
In my case, two of my fireplaces were cooking fireplaces, plenty big enough to house a stove. So I set a stove in each (presently BK Ashford 30’s), ran a double-wall pipe up to about 8 feet off the floor, and transitioned to an insulated liner at a block-off plate. Block-off plate is held in place by perf angle anchored into the stone.
If this place is truly “old”, the bedding mortar should be just clay or mud, dug up from the back yard. There will be no lime in it, unless it was built very close to a lime kiln, as the transportation costs for lime were astronomical in the days of ox carts. The pointing mortar would have likely been lime mixed with sand excavated from your back yard or a local creek, but it looks like your pointing mortar is gone.
My first order of business would be getting that structure pointed, as it looks rather precarious, complete collapses of structures like this are not uncommon, once the pointing is gone. Get some sand (I prefer brown) and some white lime, and start pointing bottom-up. If you need to remove any old pointing, do so only in small sections, to avoid removing too much existing stability. Only consider putting another hole in the wall after it’s pointed and cured.
Note, lime mortar takes a long time to set up and achieve strength. For this reason, many masons today like to mix a small amount of Portland into the mortar, as Portland sets up fast. I’ve been using 2 parts lime to 5 parts brown sand, going traditional on my place, but 1/2 to 1 part of Portland would help it build strength faster.
Can you show a view of the fireplace opening?
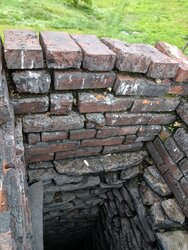
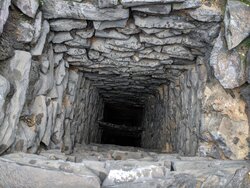
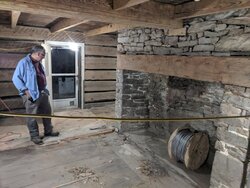
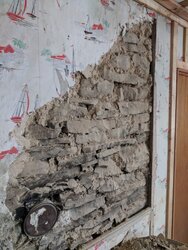
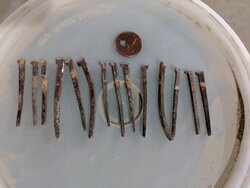
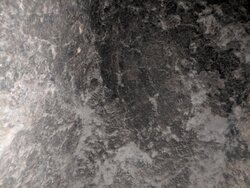
Hmm, I just assumed there was lime mixed in- it definitely looks like clay. The floor nails appear to be early cut nails which would date it to 1790-1830. Beyond that we don't really know. It appears to have been bedded and encased in clay, then a thin layer of horsehair plaster coated all that. The white mortar you see in the fireplace is the only place we've seen it. We chipped all the plaster off, chipped the mortar back 2" or so from the face and sandblasted. Need to start repointing soon. I attached some pictures showing the plaster/mortar, the top of the chimney, as well as the kitchen fireplace which you might find interesting. The top of the chimney, from the roofline up will be taken down and relaid. I'd rather have the stove in the living room than the kitchen. The kitchen is smaller and would probably get very warm especially when cooking. Plus it's nice to sit on the couch and watch the fire.
Attachments
Last edited:
Ok from what I can see the brick on top needs taken down and relaid. The inside of the chimney needs pointed and parged and the stonework needs repointed as well.
Ok from what I can see the brick on top needs taken down and relaid. The inside of the chimney needs pointed and parged and the stonework needs repointed as well.
The inside, like all the way to the bottom? Not trying to be smart, I want to know. How do you repoint the inside?
Yes all the way. In it's current state it looks to be structurally unsound. As far as how to do it. There are a few options. There are systems where masonry products can be sprayed on the inside of the chimney which I would not use in your case. Those products will be to hard for your old masonry and it won't get very good penetration regardless. How large is the flue opening? Most of these are large enough to fit in. Which in that case you either build wooden scaffolding up from the bottom as you go or work in a harness hanging from the top. Neither of those options are very pleasant but from the limited amount I can see from the pics it needs done.The inside, like all the way to the bottom? Not trying to be smart, I want to know. How do you repoint the inside?

And no I don't want to do it lol. I see you are central PA as well
Yes, Bloomsburg area. Where the flue is divided it's only 15 inches deep. I can't imagine trying to repoint stone in there. Above the divider it could be doable with a harness but it sure wouldn't be fun.
Being that small the spray coatings are probably the only optionYes, Bloomsburg area. Where the flue is divided it's only 15 inches deep. I can't imagine trying to repoint stone in there. Above the divider it could be doable with a harness but it sure wouldn't be fun.
Being that small the spray coatings are probably the only option
You think it still needs repointed, even with an insulated liner?
It is about structural integrity not containing heat.You think it still needs repointed, even with an insulated liner?
It is about structural integrity not containing heat.
That's what I thought, just wanted to make sure.
spudman99
Feeling the Heat
I was just speaking with a local chimney sweep, he has a product whereby they drop in a plastic form down the chimney (they come in different sizes and don't ask how they do it, they know). A slurry type product is then poured in between the plastic form and the existing chimney which self levels and seeps into the voids. It then hardens and forms a smooth interior chimney that is UL approved.
I don't known if this is a possible solution but it may be worth considering.
I don't known if this is a possible solution but it may be worth considering.
I would be afraid the weight of a wet pour in liner may blow out that structure in the condition it is in. I have also been less than impressed with the durability of those linersI was just speaking with a local chimney sweep, he has a product whereby they drop in a plastic form down the chimney (they come in different sizes and don't ask how they do it, they know). A slurry type product is then poured in between the plastic form and the existing chimney which self levels and seeps into the voids. It then hardens and forms a smooth interior chimney that is UL approved.
I don't known if this is a possible solution but it may be worth considering.
brickie
Member
I wonder if a product similar to surewall or Blockbond would strengthen your chimney?
In the seventies, this was used infrequently on projects.
It could be troweled on or sprayed. Here's a video I found.
Kind of amateurish, but it might work.
https://www.drystacked.com
In the seventies, this was used infrequently on projects.
It could be troweled on or sprayed. Here's a video I found.
Kind of amateurish, but it might work.
https://www.drystacked.com
Ashful
Minister of Fire
If the place is as old as you suspect, and in central PA, the bedding mortar likely has no lime or cement in it. It is typically just mud, and that's not slang "mud", it's literally mud dug up from the back yard.
Thankfully you're only dealing with a chimney and not a full wall, but this is a very precarious situation. I have seen walls around here collapse in that condition, you may be one good rain storm away from washing out enough of that bedding mortar (mud) to cause a collapse. Guys who've been doing this awhile will normally only strip a small section and point as they go, never strip a full wall.
If it were mine, I'd be covering that chimney top with a scrap of plywood, and putting 100% of my energy and resources on getting the exterior pointed ASAP. Figure out how you're going to repoint or pour the interior after the exterior is stable.
In my case, I just left the interior alone, and slid a liner up there. Mine is much older than yours, but also more substantially thick, and possibly in better condition. It's almost 50 feet tall, so even finding someone to work on mine is a challenge.
BTW, do you have the Henry Mercer small book on dating your house by nails and hinges? It might be useful, if you believe you have found some original nails.
If the place is as old as you suspect, and in central PA, the bedding mortar likely has no lime or cement in it. It is typically just mud, and that's not slang "mud", it's literally mud dug up from the back yard.
Thankfully you're only dealing with a chimney and not a full wall, but this is a very precarious situation. I have seen walls around here collapse in that condition, you may be one good rain storm away from washing out enough of that bedding mortar (mud) to cause a collapse. Guys who've been doing this awhile will normally only strip a small section and point as they go, never strip a full wall.
If it were mine, I'd be covering that chimney top with a scrap of plywood, and putting 100% of my energy and resources on getting the exterior pointed ASAP. Figure out how you're going to repoint or pour the interior after the exterior is stable.
In my case, I just left the interior alone, and slid a liner up there. Mine is much older than yours, but also more substantially thick, and possibly in better condition. It's almost 50 feet tall, so even finding someone to work on mine is a challenge.
BTW, do you have the Henry Mercer small book on dating your house by nails and hinges? It might be useful, if you believe you have found some original nails.
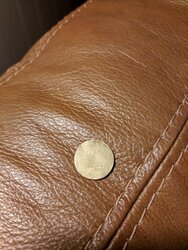
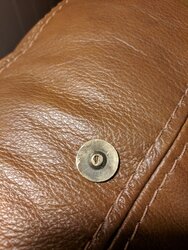
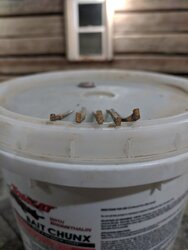
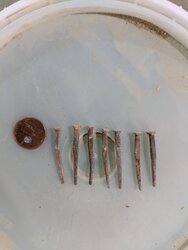
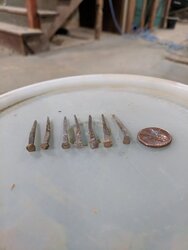
I will have to get that book! So far I just used this guide for the nails: https://www.detecting.us/tips-faqs/nails-dating-sites/ Most of the nails that I've gotten a good look at were actually the lathe nails. I only found a few nails that appear to be hand wrought pounded in random places on the logs or beams. The door to the basement also appears to have rose head nails in the battens. The ones on the first floor were L-head cut nails, no two seem to be identical. The grain is crosswise in the nail, and where burrs are visible, they are on opposite sides of the nail. There was only one room upstairs that was ever plastered, and it had the rounder head cut nails in the pictures. This upstairs room had been whitewashed prior to the plaster being put in. Downstairs there was no white behind the plaster. None of the plaster was put in before the logs had time to dry though. I found a brass button in the crack of a log behind the plaster. According to a guide I found this spun back brass button dates to 1760-1785.
Attachments
Ashful
Minister of Fire
I’ll have to double-check my copy when I get home tonight, but I *think* this is the book. It looks like there is one seller with a copy for $13 on Amazon. It’s a short paperback, not more than 30 pages.
THE DATING OF OLD HOUSES. A Paper Read by Dr. Henry C. Mercer, of Doylestown, Pa. At a Meeting of The Bucks County Historical Society At New Hope, Bucks County, Pa., October 13, 1923. Amazon product ASIN B005O7J0IM
I had the same trouble as most, lots of work happened in my house over the course of almost 300 years. I kept finding nails that were newer than the age indicated by the historical literature and local records that existed on my house, and it took a long time to start finding confirmation of it’s supposed age.
Any new news on the chimney interior pointing? I suspect that your great-grandfather would have just sent your 10-year old grandfather in to do the job.")
THE DATING OF OLD HOUSES. A Paper Read by Dr. Henry C. Mercer, of Doylestown, Pa. At a Meeting of The Bucks County Historical Society At New Hope, Bucks County, Pa., October 13, 1923. Amazon product ASIN B005O7J0IM
I had the same trouble as most, lots of work happened in my house over the course of almost 300 years. I kept finding nails that were newer than the age indicated by the historical literature and local records that existed on my house, and it took a long time to start finding confirmation of it’s supposed age.
Any new news on the chimney interior pointing? I suspect that your great-grandfather would have just sent your 10-year old grandfather in to do the job.
I’ll have to double-check my copy when I get home tonight, but I *think* this is the book. It looks like there is one seller with a copy for $13 on Amazon. It’s a short paperback, not more than 30 pages.
THE DATING OF OLD HOUSES. A Paper Read by Dr. Henry C. Mercer, of Doylestown, Pa. At a Meeting of The Bucks County Historical Society At New Hope, Bucks County, Pa., October 13, 1923. Amazon product ASIN B005O7J0IM
I had the same trouble as most, lots of work happened in my house over the course of almost 300 years. I kept finding nails that were newer than the age indicated by the historical literature and local records that existed on my house, and it took a long time to start finding confirmation of it’s supposed age.
Any new news on the chimney interior pointing? I suspect that your great-grandfather would have just sent your 10-year old grandfather in to do the job.
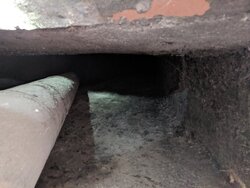
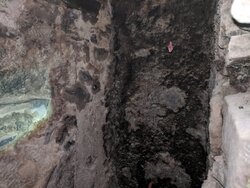
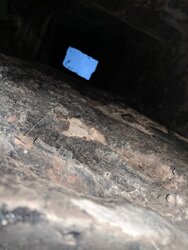
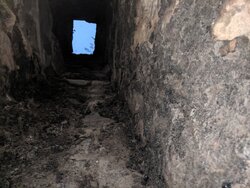
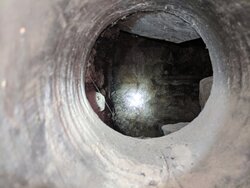
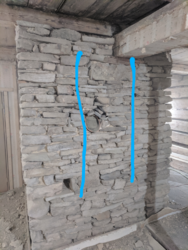
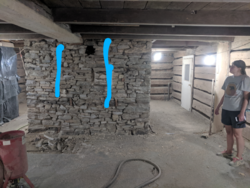
I did some looking through old stove pipe holes on the second floor tonight. The pictures are attached. The original parging appears to still be intact at that level. As near as I can tell, the division between the two flues ends near the floor of the attic or maybe a little higher. In the earlier picture looking down the chimney, it looked like most of the parging/pointing down to the divider was gone. We have a mason coming in the next week or so to take down the top of the chimney and re-lay it. I'll ask him his opinion. He's someone I would definitely trust on it. Also gauging the thickness of the walls through the holes, the faces of the chimney where the fireplaces are are about 18 inches thick, but the sides are more like 30 plus inches. The blue lines in the pictures represent the flue. Not to argue with you, but with the parging still intact inside, and the condition I'm seeing of the mud where we've chipped it out I'm having a hard time seeing that there's any danger of collapse, at least up to the attic. On a separate note, do you have any pictures of your house/chimney?
Attachments
-
 IMG_20191002_185106.jpg199.4 KB · Views: 139
 -
 IMG_20191002_185245.jpg212.3 KB · Views: 146
 -
 IMG_20191002_185515.jpg124.4 KB · Views: 166
 -
 IMG_20191002_190341.jpg169.9 KB · Views: 146
 -
 IMG_20191002_184654.jpg131.3 KB · Views: 158
 -
 IMG_20191002_190418.jpg183.7 KB · Views: 149
 -
 IMG_20191002_184744.jpg216.3 KB · Views: 160
 -
 IMG_20191002_184917.jpg264 KB · Views: 150
 -
 IMG_20191002_184944.jpg107.8 KB · Views: 150
 -
 IMG_20191002_185106.jpg199.4 KB · Views: 136
 -
 IMG_20191002_184654.jpg131.3 KB · Views: 138
 -
 IMG_20191002_184744.jpg216.3 KB · Views: 154
 -
 IMG_20191002_184917.jpg264 KB · Views: 132
 -
 IMG_20191002_184944.jpg107.8 KB · Views: 141
 -
 1977076159.png1.1 MB · Views: 183
 -
 356054695.png1.4 MB · Views: 146
Yes that looks very different from what we saw in the first pics. Not nearly as bad as I thoughtI did some looking through old stove pipe holes on the second floor tonight. The pictures are attached. The original parging appears to still be intact at that level. As near as I can tell, the division between the two flues ends near the floor of the attic or maybe a little higher. In the earlier picture looking down the chimney, it looked like most of the parging/pointing down to the divider was gone. We have a mason coming in the next week or so to take down the top of the chimney and re-lay it. I'll ask him his opinion. He's someone I would definitely trust on it. Also gauging the thickness of the walls through the holes, the faces of the chimney where the fireplaces are are about 18 inches thick, but the sides are more like 30 plus inches. The blue lines in the pictures represent the flue. Not to argue with you, but with the parging still intact inside, and the condition I'm seeing of the mud where we've chipped it out I'm having a hard time seeing that there's any danger of collapse, at least up to the attic. On a separate note, do you have any pictures of your house/chimney?
I did some looking through old stove pipe holes on the second floor tonight. The pictures are attached. The original parging appears to still be intact at that level. As near as I can tell, the division between the two flues ends near the floor of the attic or maybe a little higher. In the earlier picture looking down the chimney, it looked like most of the parging/pointing down to the divider was gone. We have a mason coming in the next week or so to take down the top of the chimney and re-lay it. I'll ask him his opinion. He's someone I would definitely trust on it. Also gauging the thickness of the walls through the holes, the faces of the chimney where the fireplaces are are about 18 inches thick, but the sides are more like 30 plus inches. The blue lines in the pictures represent the flue. Not to argue with you, but with the parging still intact inside, and the condition I'm seeing of the mud where we've chipped it out I'm having a hard time seeing that there's any danger of collapse, at least up to the attic. On a separate note, do you have any pictures of your house/chimney?
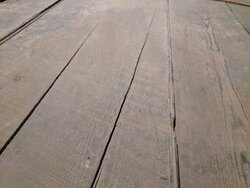
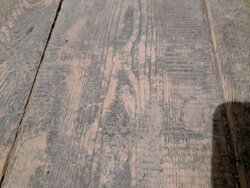
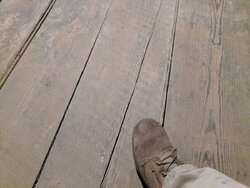
I attached the pictures of the plank by mistake, but since I did, are those man powered pit saw marks? Most of the planks in the house have what I think are mechanical pit saw marks which I have attached, but there are a few with these large diagonal marks. I attached a picture of each type here.
Attachments
Ashful
Minister of Fire
I agree. If we had seen these photos first, I would have given a very different opinion, the first round of photos made it look like all of the parging or pointing was gone.
I'm no chimney pro, but if this were mine, I'd leave that parging alone, and just re-point the exterior. You're already taking care of the brick courses up top, and can address the missing interior pointing from above at that time.
There are likely hundreds of photos of my house and multiple chimneys on this forum, to the point where the regulars are probably getting tired of seeing them. I have five chimneys containing nine flues, although I am only presently using one flue each in four of the chimneys, two being for wood stoves. Three of the four were recently shown in this post:
 www.hearth.com
The one of which I was speaking earlier is this one, which like yours is stone, and also has a brick replacement above the roofline. It measures 5 feet by 8 feet exterior, and I could likely crawl up thru it. There are three thimbles tied into it, one from the basement in a separate flue that joins the main flue at second floor level, and then fireplace and thimble on first floor, and another thimble on second floor. I'm just using it as a mechanical chase for an insulated liner. That fireplace is shown in this thread:
www.hearth.com
What's not shown there is the chimney, which I'll attach here.
First, a view of either side of the fireplace, after I removed the failing interior stucco in the firebox, although you can see it remains above the lintel and above the lockers on either side.


Here's a photo taken in the 4th floor attic, showing where the chimney transitions from stone to brick. This appears to be a later repair or cosmetic change, not original.

Here's a view of that chimney from the back of the house. You can also see the chimney for the other stove in the old summer kitchen (now a sun room) to the left, which contains another wood stove.

I'm no chimney pro, but if this were mine, I'd leave that parging alone, and just re-point the exterior. You're already taking care of the brick courses up top, and can address the missing interior pointing from above at that time.
On a separate note, do you have any pictures of your house/chimney?
There are likely hundreds of photos of my house and multiple chimneys on this forum, to the point where the regulars are probably getting tired of seeing them. I have five chimneys containing nine flues, although I am only presently using one flue each in four of the chimneys, two being for wood stoves. Three of the four were recently shown in this post:
Show me your mantel and hearth
Hi all, getting my fp25 installed Oct. 10 and looking for ideas on mantels and hearth. I will post all pics of the build soon. TIA
The one of which I was speaking earlier is this one, which like yours is stone, and also has a brick replacement above the roofline. It measures 5 feet by 8 feet exterior, and I could likely crawl up thru it. There are three thimbles tied into it, one from the basement in a separate flue that joins the main flue at second floor level, and then fireplace and thimble on first floor, and another thimble on second floor. I'm just using it as a mechanical chase for an insulated liner. That fireplace is shown in this thread:
Stove for large fireplace, max heat
Hi, I’m looking to put a wood stove into this fireplace, the house was built in 1775 and would like something that fits the house. The dimensions of the fire place are 78”x36”x27” I have a wood stove insert in the living room that heats that area but I’m looking to generate a lot of heat with...
What's not shown there is the chimney, which I'll attach here.
First, a view of either side of the fireplace, after I removed the failing interior stucco in the firebox, although you can see it remains above the lintel and above the lockers on either side.
Here's a photo taken in the 4th floor attic, showing where the chimney transitions from stone to brick. This appears to be a later repair or cosmetic change, not original.
Here's a view of that chimney from the back of the house. You can also see the chimney for the other stove in the old summer kitchen (now a sun room) to the left, which contains another wood stove.
I attached the pictures of the plank by mistake, but since I did, are those man powered pit saw marks? Most of the planks in the house have what I think are mechanical pit saw marks which I have attached, but there are a few with these large diagonal marks. I attached a picture of each type here.
The diagonal marks were likely cut on a circular saw mill and the others on an older reciprocating sash type mill. Circular saw mill technology began replacing the older sash mills in the 1800s.
Yes that looks very different from what we saw in the first pics. Not nearly as bad as I thought
That is a relief
Similar threads
- Replies
- 12
- Views
- 2K
- Replies
- 14
- Views
- 895
- Replies
- 2
- Views
- 915
- Replies
- 12
- Views
- 1K