P43 Combustion blower and ESP questions

  • Active since 1995, Hearth.com is THE place on the internet for free information and advice about wood stoves, pellet stoves and other energy saving equipment.

    We strive to provide opinions, articles, discussions and history related to Hearth Products and in a more general sense, energy issues.

    We promote the EFFICIENT, RESPONSIBLE, CLEAN and SAFE use of all fuels, whether renewable or fossil.

huskerdooo

New Member
Oct 2, 2020
19
Orange, Connecticut
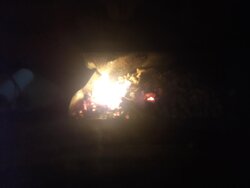
My P43 will not light, even when doing a manual start. I am able to use gel and have a fire going, but it never goes beyond that.

Is the combustion blower multi-speed? Seems to me that under normal conditions after the igniter gets some pellets lit, the combustion blower ramps up.

The combustion blower is running, but I am wondering if it should pick up in speed.

I am thinking that if what I said is true, then I might have an ESP issue in that it does not detect the heat from the manual light-up?

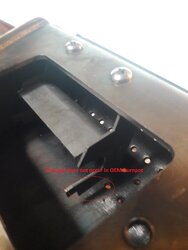
I was going to get another ESP probe to try out. Mine is totally clean (in fact, I am wondering if I broke it because I just cleaned it). To replace it, do I need to remove the controller card?

TIA,
Seth
 
If your combustion blower is spinning, it’s working, and as far as I know it’s one speed. Check that the flapper on your air intake moves freely, on any of the stoves I’ve refurbished I’ve put a magnet to keep it open. Also check the burn pot holes are not plugged.
 
The flap is open and air goes through. It seems that it cannot fully open, and it opens as a 45 degree angle? I put my finger on it and it is opened as much as it physically can.

I put in freshly purchased pellets to take that out of the mix. I got it to barely light and burn on one side...it spills pellets off the burn pot.

Attached is a picture of the burn and flapper.

The stove did work 3 days ago. Since then I replaced the burn pot, igniter, and cleaned the ESP (by removing it).

I checked the fines cover and it is tight and sealed. I cannot think of any way the burnpot/gasket interface could be leaking. The only thought that I have today was whether I needed to take the small circle pre-punched hole out of the gasket, e.g. the small one that would be on the right side that is about 1/2 in diameter.

Also, today I cleaned the exhaust pipe and pipe leading to roof. That was pretty clear from last years cleaning.
 

Attachments

  • burn.jpg
    burn.jpg
    35.1 KB · Views: 164
  • flapper.jpg
    flapper.jpg
    106.2 KB · Views: 176
Last edited:
Should I have the holes (in red below) open? I might have installed the gasket without punching these out...not sure it makes a difference. Also, is the gasket one time use, or can I remove the burnpot still?

TIA again,
Seth
 

Attachments

  • gasket.png
    gasket.png
    36.8 KB · Views: 123
Is it just me or does it seem there is a lot of ash
around that air INTAKE?
Me thinketh that stove needs a good cleaning intake to the chimney cap
 
It did work 3 days ago... and burned fine.

That said, I have never cleaned in that area, so that is the result of 70 tons of burning over 11 years.

I have cleaned just about everything else very well, starting at burn pot access to chimney cap. And I redid the cleaning today from the stove output to cap with a rotating brush, then blasted it with a leaf blower to clear everything.

After reading some posts on a different site, I am thinking I needed to remove the gasket knockouts shown.
 
Not sure about the gasket holes. In the photo of your burn pot, has your stove always lit on the right side like that? If so disregard, if not, it’s either, not pushing air through the burn pot holes or the igniter is weak...there have been bad igniters straight out the box
 
I believe it always started on the left, but then it would start to burn all the way to the right too.

Since it is a new burn pot, the holes are all open. They actually look a little larger in diameter than the original holes in the old burn pot.

I guess next step is to put back the old burn pot to see if that still works?
 
Well, it does look like a lack of air to me. Changing the burn pot back could help as long as it’s not damaging the gasket. Is the combustion motor spinning as usual? An photos of the stove side of the combustion fan? Blades etc?
 
It looks different than my original picture, after I removed the knockouts. The left side looks like a totally normal burn, not lazy at all, but only an inch wide, all the way to the left. I shut down the stove for the night (need to make sure all semi-burned pellets than fell in pan are out before I go to sleep). Tomorrow I will reinstall the original burn pot. The gasket seems to be a woven fiberglass pad. Much different than what the original was...and much thicker.

I will take some photos tomorrow after I swap out the burn pot again. Thank you.
 
  • Like
Reactions: Washed-Up
When my P43 did the very same thing I found the correction by accident. It was the latch that holds the pellet storage lid down. It had worked itself loose and and as result air was being drawn through the box instead of the fresh air intake. I know it sounds funny and it did it even when the box was full. There is a little nut on the plastic latch that was loose. As soon as I tightened it up the box sealed tightly and the problem went away.
YMMV
Ron
 
  • Like
Reactions: Washed-Up
I reinstalled the original burn pot and it seems to burn much better, but not as good as it did originally.

I noticed when I removed the new burn pot that the aftermarket gasket was compressed to the burn pot surface, leaving the over the fire passage possibly restricted with the thickness of the non-compressed gasket. (See photo). I ordered the true Harman OEM over the fire gasket to see if this fixes the problem.

When I reinstalled the old burn pot, I flipped the gasket in the hope that the raised area would be less restrictive if faced the opposite way.

I will make an update post after I reinstall with the new gasket. If it works, maybe it will help others to avoid this issue in the future.

Photos show my used gasket and possible issue, over the fire OEM gasket, and the popular aftermarket one.
 

Attachments

  • gasket.jpg
    gasket.jpg
    75.2 KB · Views: 143
  • 20180905_104340.png
    20180905_104340.png
    399.2 KB · Views: 136
  • amp_gasket.jpg
    amp_gasket.jpg
    7.8 KB · Views: 124
Update:

The new gasket did not help.

I took some measurements of the burn pot and its construction is different than the OEM one.

As you can see in the attached pictures, the inside dimensions are quite different. The first picture show the distance between the igniter area and the burn pot floor to be close to 2.5 inches whereas the OEM one is 2 inches. It is essentially impossible for the igniter to work that far away, and there seems to be some other things going on that affect the flow of air.

Even with the new gasket it is impossible to manually light the stove because of the air flow differences.

If anyone is interested, the aftermarket PN was 1-10-00675-AMP, from Pellet Stove Parts 4 Less.

I did contact them and they said I could try using a Harman adjustable igniter cradle, but that would be another 80 bucks, making the total for aftermarket about equal to an OEM one on sale. I would suggest people stay away from an aftermarket part, or make sure that it is returnable after it is installed.

I am up to 6 removal and installs of the burn pot and igniter now. I just ordered an OEM one instead. I will update the forum on the results. That will be install number 7.
 

Attachments

  • 20201024_172759.jpg
    20201024_172759.jpg
    120.3 KB · Views: 140
  • 20201024_172748.jpg
    20201024_172748.jpg
    116.8 KB · Views: 149
  • Like
Reactions: Washed-Up
1 The aftermarket gasket will work fine,with the punch outs removed.The newer burn pot has air channels going up to the flame diverter,is called the "fluted" pot,and that is what the holes are for.If your stove was running properly,it would be fine.
2 Yes,combustion motors on Harmans do change speed,just most people never notice it,and they only do it at certain times.
3 The measurement differences you are showing are meaningless.The critical thing is,the "cradle" holding the igniter has to be flush against the inside of the burn pot,mostly metal to metal.Lots of people put the retainer bar on upside down,then it hits,and creates a gap for 2/3 of the cradle,creating no start and intermittent starts.This is because the air needs to be drawn through the cradle,to get the heat from the element.
4 Burn pots warp,stoves warp.Untold secret of Harman stove techs,if burn pot has to come off,they always put 2 gaskets behind it.
5Really sounds like you may have a low draft issue.Air leak at a gasket,restricted flue,restricted intake,dirty or damaged impeller on the combustion blower,OR
6 I suspect 1 of 2 things,control board not providing proper voltage to blower(extremely rare), or a weak old motor.When they get weak,or have dry bushings/bearings,they run slower.
 
  • Like
Reactions: Washed-Up
Thanks for your reply.

1. Agree. The gasket without the extra over the fire air channels works fine with my old burn pot. I do believe my original OEM gasket did have these over the flame air channels cut out, and the original gasket was a little thinner.
2. That is what it has always sounded like. It seems like the air is turned down until the ESP detects some heat from the pellets being lit. It is very subtle.
3. The cradle is flush. From the 2 bolt mounting point, the cradle cantilevers towards the burn pot surface. The extra distance offsets the igniter from being against the burn pot surface. See photo...if the distance was the same as the OEM one, the cradle would be up against the burn pot surface as needed, and as you described. Note: The cradle and igniter are from my original burn pot. That igniter is 10 years old and still works perfectly in my old burn pot.
4. My burn pot cracked between some of the holes under the igniter and the burn pot surface has formed a bump going towards the burn side. The new and old burn pot has no warps or gaps (checked on planer).
5/6. I have now re-installed the original burn pot twice and the stove works perfectly with the old cracked one installed. I do not believe any other component is compromised. The combustion blower is one year old.

Note: Photo shows the gap. If the mounting surface to burn pot floor was the same as OEM (see pictures in previous post), this would sit flush like the OEM burn pot and would probably work.
 

Attachments

  • gap.jpg
    gap.jpg
    64.6 KB · Views: 134
  • Like
Reactions: Mt Bob
Thanks for your reply.

1. Agree. The gasket without the extra over the fire air channels works fine with my old burn pot. I do believe my original OEM gasket did have these over the flame air channels cut out, and the original gasket was a little thinner.
2. That is what it has always sounded like. It seems like the air is turned down until the ESP detects some heat from the pellets being lit. It is very subtle.
3. The cradle is flush. From the 2 bolt mounting point, the cradle cantilevers towards the burn pot surface. The extra distance offsets the igniter from being against the burn pot surface. See photo...if the distance was the same as the OEM one, the cradle would be up against the burn pot surface as needed, and as you described. Note: The cradle and igniter are from my original burn pot. That igniter is 10 years old and still works perfectly in my old burn pot.
4. My burn pot cracked between some of the holes under the igniter and the burn pot surface has formed a bump going towards the burn side. The new and old burn pot has no warps or gaps (checked on planer).
5/6. I have now re-installed the original burn pot twice and the stove works perfectly with the old cracked one installed. I do not believe any other component is compromised. The combustion blower is one year old.

Note: Photo shows the gap. If the mounting surface to burn pot floor was the same as OEM (see pictures in previous post), this would sit flush like the OEM burn pot and would probably work.
Yep,right there is your starting/ignition problem.
 
Perhaps Harman changed suppliers,and stuff got made wrong.I am looking at the "adjustable" cradle,and do not quite understand it,a Harman factory tech would now.Seems it was originally made for the Allure,but now they are listing it for more models.Looks to me like you install it,use the extension to bend cradle up to seat against the pot,then break off the tab?However,like you,I feel should not have to buy another part to make new pot work.
 
I stared at the adjustable cradle for a while and could not make sense of it. Hopefully the OEM one I ordered will work out without using the cradle adjuster. The folks I purchased it from said that it wouldn't be necessary to use a cradle adjuster...but we will soon see.

I will share what I find out in a later post.
 
There is mention (and I have experience) with a dirty fines box. That assembly regulates the pellets falling onto the auger by using a slotted plate that moves back and forth. That box needs to be vacuumed, and make sure the tang that moves the plate is engaged. If the box gets excessively dirty it will decrease your feed rate and make it appear your fan is not performing well.
 
K,surprised no one has replied. The new cradle is for the new replacement burn pots. The new pots are built different, The "new" cradle is for the new burnpots, Have a great eevening.
 
Update:
I received my new Harman OEM burn pot. The dimensions, depth, etc, are exactly like my old burn pot.

Installed it and it worked perfectly, with the original Harman non-adjustable cradle that came with my P43 when new. The new pot has some pretty crude welds in the deep pocket near the auger that needs to be scraped, so I'll have to see how that goes.

So, my problem was the aftermarket burn pot 1-10-00675-AMP was not constructed correctly.

I used both types of gaskets shown in my earlier posts. Both seemed to work perfectly well with my old burn pot. The Harman OEM gasket I am using now has the over the flame cut outs. I am actually not 100% sure if my original gasket had the cut outs or not.

But my conclusion is that either type of gasket should work, with or without the over the flame cutouts.

One thing I did find was that I would recommend that anyone installing a new burn pot measure the new one carefully, especially the inside dimensions. Since my original burn pot was 10 years old before it started cracking, it might be worth the extra money to just get an OEM one.

Also, after installing a new one, I would recommend that for the first few weeks you should go back and retorque the 4 burn pot bolts. I believe the gasket loses some of its elasticity over time as it compresses into shape, causing the bolts to be loosen. I was very surprised on how mine loosened up so much. If you need to take the burn pot off, you will need a new gasket to get one on. After being installed for 2 weeks, the gasket I had on there would be unusable for a reinstall.

Thanks for everyone's responses here.
Cheers, Seth