RE: How I light a fire from a cold start

  • Active since 1995, Hearth.com is THE place on the internet for free information and advice about wood stoves, pellet stoves and other energy saving equipment.

    We strive to provide opinions, articles, discussions and history related to Hearth Products and in a more general sense, energy issues.

    We promote the EFFICIENT, RESPONSIBLE, CLEAN and SAFE use of all fuels, whether renewable or fossil.
Status
Not open for further replies.

firefighterjake

Minister of Fire
Hearth Supporter
Jul 22, 2008
19,588
Unity/Bangor, Maine
I had some free time and the camera the other day so I decided to take a series of pics showing what I do to get a fire going in the Oslo from a cold start.

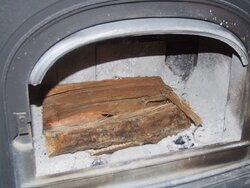
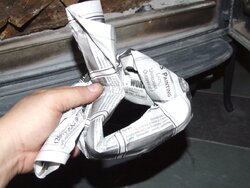
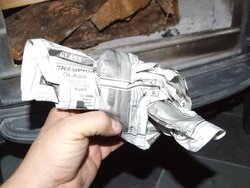
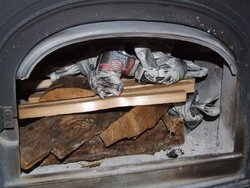
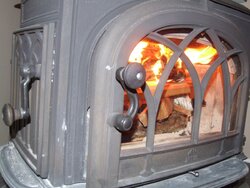
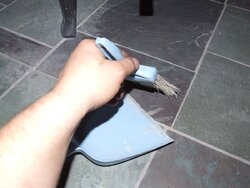
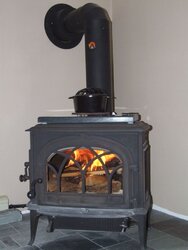
Pictures 1-2: I've already cleaned out the ash pan and the front glass to make the stove look pretty . . . although I probably could have cleaned off the stove front a bit better after looking at some of these pics. Oh well . . . at this point it's a little cool in the house (funny how the body gets used to it being 70 degrees all the time and when the temps dip down to 64 or 66 degrees suddenly you feel cold.) In any case, I start out by adding two medium-sized splits east-west . . . I've left 1-2 inches of ash in the firebox and cleaned a little furrow down the middle in front of the doghouse (with the air intake).
 

Attachments

  • start1.jpg
    start1.jpg
    177.8 KB · Views: 1,178
  • start2.jpg
    start2.jpg
    145.6 KB · Views: 1,189
Picture 3: I've added a couple more splits on top . . . on the medium to small size. If the splits are small enough I'll stack them like Lincoln Logs or in this case, kind of at an angle.

Picture 4: On top of this I lay down some small kindling . . . either slabwood I've split up, eastern white cedar split up or recently I've been using some 40+ year old boards from an old camp I tore down . . . the bigger boards went into my new wood shed . . . the smaller boards are now kindling. In this picture I also had a small end from a slab that I had cut up -- it was just a bit too long -- figured I might as well toss this on to the pile as well.


Attachments

  • start3.jpg
    start3.jpg
    155.4 KB · Views: 1,171
  • start4.jpg
    start4.jpg
    147.6 KB · Views: 1,144
Picture 5: This is where I am sure Hog is ashamed of me since I now make the "Vanessa Bows" . . . I didn't realize until after I took the pic that the one ad shown here pretty much describes me to a T. :)

Picture 6: Bow completed.

Picture 7: I now place the bows on top of the kindling . . . oops, one slid off to the side. Oh well, I'll just leave that there. Occasionally I'll add in a small piece of cardboard to boot . . . the arsonist's secret weapon . . . but honestly, usually I don't need to add in the cardboard.


Attachments

  • start5.jpg
    start5.jpg
    130.7 KB · Views: 1,141
  • start6.jpg
    start6.jpg
    121.7 KB · Views: 1,138
  • start7.jpg
    start7.jpg
    160.1 KB · Views: 1,146
Picture 8: Gentlemen, we have ignition. Fire is started . . . I'm old school and I use kitchen wooden matches . . . well, maybe not so old school that I'm using flint and steel . . . but I don't do the torch or fancy-schmancy lighter. In fact, I kind of take pride in only using one match to get the whole she-bang started . . . yeah, I have no life and have to revel in what small accomplishments I can fancy for myself.

Picture 9: I have a decent draft, but I always leave the door open ajar . . . just slightly ajar. I could do this with the side door of course, but since I have a corner install using the side door is not allowed and of course I always follow the manufacturer's recommendations. ;)


Attachments

  • start8.jpg
    start8.jpg
    171.9 KB · Views: 1,158
  • start9.jpg
    start9.jpg
    135.2 KB · Views: 1,127
Picture 10: Well while the temp is coming up I figure I might as well tidy things up a bit on the hearth.

Picture 11: The kindling is going and starting to char the splits underneath.

Picture 12: Things are starting to cook . . . based on what I'm seeing here it's time for me to take a look at the flue temp and stove top temp and close the door.


Attachments

  • start10.jpg
    start10.jpg
    122.4 KB · Views: 1,108
  • start11.jpg
    start11.jpg
    114.7 KB · Views: 1,136
  • start12.jpg
    start12.jpg
    97.4 KB · Views: 1,118
Picture 13: I decide to take a short break and eye-ball the stove from the comfort of my easy chair . . . and no, before anyone asks, the angle of the camera is making the stove pipe appear to be tilting downwards as in fact it has a slight upwards angle per code.

Picture 14: Here's where Firefighterjake decides to go all prilly-frilly by adding some "rose garden" potpourri into the steamer . . . and yes, I don't care if you think it's girly-girly . . . I like the smell . . . at least it covers up my stink.

Picture 15: I love my probe thermometer. At this point I am clearly beyond the creosote making temps and so I have already begun to dial back the air control . . . typically I lower it to the halfway point and then to the quarter point and then if the secondaries are firing I'll even close it off completely.


Attachments

  • start13.jpg
    start13.jpg
    62.1 KB · Views: 1,128
  • start14.jpg
    start14.jpg
    109.7 KB · Views: 1,109
  • start15.jpg
    start15.jpg
    76.7 KB · Views: 1,155
The end: Well, not really . . . for me the goal of my first cold start fire is to produce some coals . . . it seems to me that I can get some secondary action (you can see the start of some of this in this picture) with the first fire, but I always have much more success in having more secondary action on the reload. With this fire I'll dial down the air control to a quarter (or perhaps all the way as long as the fire doesn't stall out. Since I haven't loaded the firebox to the gills with a lot of big wood (most of the firebox is taken up by kindling and small-medium sized splits) it doesn't take that long (well maybe an hour or so) to get to the point where I can reload on the fresh bed of coals . . . with the reload I'll open the air up a bit, get the stove top up to 450-500 and then shut it back down . . . typically at this point I'll have better secondaries and since I'm now using medium-large splits or rounds I'll get a much longer burn time.

Oops . . . I just realized . . . I didn't take the final pic . . . sorry guys . . . maybe this is one of those to be continued type of stories.

The photo I posted here ended up being one taken earlier in the sequence . . . not too much before though.
 
Nice picture sequence, but I'm a little disappointed because of the missing pictures at the end???
I thought for sure once you had the stove nice and hot you were gona end with a picture of your lovely wife "wearing an over-sized T shirt" beside the fire. ;-)

Sorry, it must be the caveman in me...... :red:
 
Carbon_Liberator said:
Nice picture sequence, but I'm a little disappointed because of the missing pictures at the end???
I thought for sure once you had the stove nice and hot you were gona end with a picture of your lovely wife "wearing an over-sized T shirt" beside the fire. ;-)

Sorry, it must be the caveman in me...... :red:


Excellent sequence, one final picture
and this will replace the dry Vanessa video.
 
That's very helpful Jake. I'm going to give that a shot and see what happens. I'm using some really small kindling...almost tinder. I'm thinking that's why I have to keep loading to get the fire established. It would be nice to be able to "set it and forget it" for a little while. I'll give the bigger kindling a shot and report back.

What's that on top of your Oslo? Soapstone?
 
Nice pics, thanks for posting.

I'm looking forward to trying the different starter fires...

Kenny
John 3:16
 
Carbon_Liberator said:
Nice picture sequence, but I'm a little disappointed because of the missing pictures at the end???
I thought for sure once you had the stove nice and hot you were gona end with a picture of your lovely wife "wearing an over-sized T shirt" beside the fire. ;-)

Sorry, it must be the caveman in me...... :red:

Oops, sorry about that CL . . . I forgot to attach the pic.

As you can see the pic is of the fire burning brightly . . . it was either that or a pic of me wearing nothing but Speedos since my wife was sound asleep in bed as she has been fighting the flu. ;) :)
 
kenny chaos said:
Carbon_Liberator said:
Nice picture sequence, but I'm a little disappointed because of the missing pictures at the end???
I thought for sure once you had the stove nice and hot you were gona end with a picture of your lovely wife "wearing an over-sized T shirt" beside the fire. ;-)

Sorry, it must be the caveman in me...... :red:


Excellent sequence, one final picture
and this will replace the dry Vanessa video.

And that final pic will be wearing nothing but Speedos? ;)

Actually, what I should have done is waited, done the reload and then got a nice pic of the secondaries and the Bowel of Hades look.
 
Skier76 said:
That's very helpful Jake. I'm going to give that a shot and see what happens. I'm using some really small kindling...almost tinder. I'm thinking that's why I have to keep loading to get the fire established. It would be nice to be able to "set it and forget it" for a little while. I'll give the bigger kindling a shot and report back.

What's that on top of your Oslo? Soapstone?

I'm not quite sure if this is a top-down fire or a modified version . . . all I know is it works for me and I am consistently getting a good fire going with one match.

As mentioned in the last pic . . . this fire is typically a short-lived fire . . . the main goal is to get to the coaling stage at which point I use larger splits and rounds and I achieve better secondaries and a much longer lasting fire.

And yes . . . that's a soapstone slab on top of my Oslo . . . my latest addition.
 
firefighterjake said:
kenny chaos said:
Carbon_Liberator said:
Nice picture sequence, but I'm a little disappointed because of the missing pictures at the end???
I thought for sure once you had the stove nice and hot you were gona end with a picture of your lovely wife "wearing an over-sized T shirt" beside the fire. ;-)

Sorry, it must be the caveman in me...... :red:


Excellent sequence, one final picture
and this will replace the dry Vanessa video.

And that final pic will be wearing nothing but Speedos? ;)

Actually, what I should have done is waited, done the reload and then got a nice pic of the secondaries and the Bowel of Hades look.


You in speedos would be fine.
Thank-you in advance for your cooperation in this matter.
 
kenny chaos said:
firefighterjake said:
kenny chaos said:
Carbon_Liberator said:
Nice picture sequence, but I'm a little disappointed because of the missing pictures at the end???
I thought for sure once you had the stove nice and hot you were gona end with a picture of your lovely wife "wearing an over-sized T shirt" beside the fire. ;-)

Sorry, it must be the caveman in me...... :red:


Excellent sequence, one final picture
and this will replace the dry Vanessa video.

And that final pic will be wearing nothing but Speedos? ;)

Actually, what I should have done is waited, done the reload and then got a nice pic of the secondaries and the Bowel of Hades look.


You in speedos would be fine.
Thank-you in advance for your cooperation in this matter.

Oh Kenny, I couldn't do that to the membership here . . . everyone would end up getting sick . . . it would be a worse epidemic than H1N1. :)
 
firefighterjake said:
[
Oh Kenny, I couldn't do that to the membership here . . . everyone would end up getting sick . . . it would be a worse epidemic than H1N1. :)


I don't believe I'd be out of line suggesting
that I speak for the majority when I say
we would take our chances.
C'mon, do it.
 
Great photos, Jake. I've been thinking about a probe thermometer since you mentioned it in another thread. What temp (on the probe) do you usually start to shut it down?
Also, will try the top down.
 
kenny chaos said:
firefighterjake said:
[
Oh Kenny, I couldn't do that to the membership here . . . everyone would end up getting sick . . . it would be a worse epidemic than H1N1. :)


I don't believe I'd be out of line suggesting
that I speak for the majority when I say
we would take our chances.
C'mon, do it.

OK, ya got me Kenny . . . I don't even own any Speedos. I'm more of a boxer man myself. :)
 
potter said:
Great photos, Jake. I've been thinking about a probe thermometer since you mentioned it in another thread. What temp (on the probe) do you usually start to shut it down?
Also, will try the top down.

Yeah, I love my probe thermometer . . . I honestly feel as though it really helps me burn better.

I typically start to cut back the air when I see the probe thermometer reach 450 . . . my wife likes to start cutting it back once it reaches 400 . . . I always figure once I cut back the air the temp may drop a bit as less heat will be going up the flue . . . plus I figure these thermometers aren't really calibrated and so the numbers are just rough estimates. That said, I also keep track of the stove top temp since my goal is to have the stove top temp 450-550 degrees and have the flue temp 400-450 before I start to cut back the air . . . with both of these numbers in hand so to speak you should be able to get some good secondary action.
 
firefighterjake said:
(funny how the body gets used to it being 70 degrees all the time and when the temps dip down to 64 or 66 degrees suddenly you feel cold.) .[/i]

boy is that the truth
 
Great post Jake.

Bottom line is that it doesn't make much difference how you do it so long as you get the wood to burning. So do it top down, modified, bottom up or even sideways if you want; just get that fire going and do it as easy as you can.
 
Great Pictures, I plan on employing this technique the next time I fire up the Quad. It is supposed to be 27f tomorrow night so it looks like when I get home from work I'll fire it up. BTW man I wish I had your free time!!! Must be like when I was on Brunswick's fire dept. 24 on and 48 off!

LOL kidding but great pics and illustration.

Steve
 
Excellent tutorial Jake,
Wonder why you don't use the side door . It looks like you have the clearance to open it.
 
My favorite pic is definitely "tidying up a bit".
Classic!!
 
Status
Not open for further replies.