
Hello
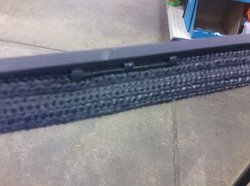
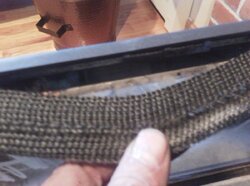
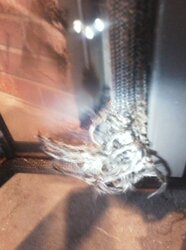
The original gasket was in good shape but the bottom right hand corner where the two ends come together was really frayed and failed the dollar bill test! See pic 5 below! The new stoves have anti-fray tape in that corner only. The new gaskets have ant-fray tape for all 4 corners!
Has anyone done this?
It is a little tricky. First I had to get the special gasket Part # is Napoleon Wolf Steel W 562-0022
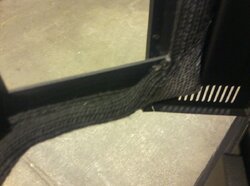
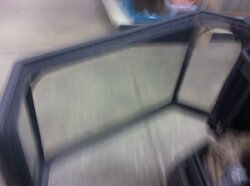
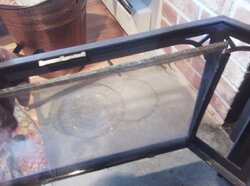
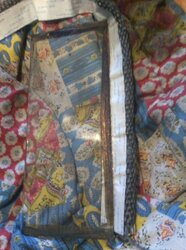
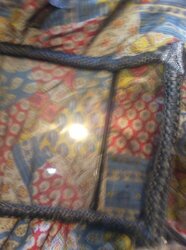
Clean the glass good before removal to make it easier. The gasket is self stick, but sticks to the glass only. The old gasket and glass must be removed very carefully so the glass does not break. To do this, you must carefully bend the metal tabs outward so the old glass and gasket can be removed easily. The 3 sided glass is 3 separate panes with a metal channel that hold them together at the proper angle. You must remove the old gasket from the glass by carefully pulling the gasket's sticky side off the glass. Then starting in the lower right hand corner, remove the tape on the sticky side of the new gasket and put the new gasket's thin edge on the glass and wrap it around so the round rope part is on the inside of the glass. Carefully stick the new gasket to the glass and go around the corners until you get the the lower right hand corner and cut the gasket with scissors to fit. Then apply the anti-fray tape to each of the 4 corners by peeling and sticking the tape kiddy corner across the gasket and fold over to the front side. Then carefully put the whole glass and gasket assembly back into the door and bend the metal tabs back into place.
See pics below and good luck!
The original gasket was in good shape but the bottom right hand corner where the two ends come together was really frayed and failed the dollar bill test! See pic 5 below! The new stoves have anti-fray tape in that corner only. The new gaskets have ant-fray tape for all 4 corners!
Has anyone done this?
It is a little tricky. First I had to get the special gasket Part # is Napoleon Wolf Steel W 562-0022
Clean the glass good before removal to make it easier. The gasket is self stick, but sticks to the glass only. The old gasket and glass must be removed very carefully so the glass does not break. To do this, you must carefully bend the metal tabs outward so the old glass and gasket can be removed easily. The 3 sided glass is 3 separate panes with a metal channel that hold them together at the proper angle. You must remove the old gasket from the glass by carefully pulling the gasket's sticky side off the glass. Then starting in the lower right hand corner, remove the tape on the sticky side of the new gasket and put the new gasket's thin edge on the glass and wrap it around so the round rope part is on the inside of the glass. Carefully stick the new gasket to the glass and go around the corners until you get the the lower right hand corner and cut the gasket with scissors to fit. Then apply the anti-fray tape to each of the 4 corners by peeling and sticking the tape kiddy corner across the gasket and fold over to the front side. Then carefully put the whole glass and gasket assembly back into the door and bend the metal tabs back into place.
See pics below and good luck!
Attachments
-
 1017121127.jpg128.9 KB · Views: 2,185
 -
 1017121127a.jpg122.5 KB · Views: 2,150
 -
 1017121127b.jpg91.4 KB · Views: 2,086
 -
 1018121506.jpg112.3 KB · Views: 2,150
 -
 1018121507.jpg82.8 KB · Views: 2,132
 -
 1018121518.jpg115.2 KB · Views: 2,094
 -
 1018121519.jpg125 KB · Views: 2,105
 -
 1018121522.jpg146.3 KB · Views: 2,111
 -
 1018121531.jpg115.4 KB · Views: 2,115
 -
 1018121540.jpg164.5 KB · Views: 2,010