Roof Flashing Advice

  • Active since 1995, Hearth.com is THE place on the internet for free information and advice about wood stoves, pellet stoves and other energy saving equipment.

    We strive to provide opinions, articles, discussions and history related to Hearth Products and in a more general sense, energy issues.

    We promote the EFFICIENT, RESPONSIBLE, CLEAN and SAFE use of all fuels, whether renewable or fossil.

KJamesJR

Feeling the Heat
Jan 8, 2018
362
New Hampshire
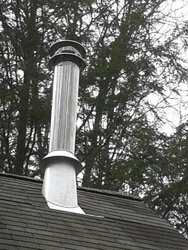
I'm looking for some advise for the adhesive typically recommended for the chimney roof flashing and storm collar. Something I could pick up at the hardware store along with some other bits and pieces for my install. I was thinking of using a Black Jack type rubber cement, however I already have a full tube of silicone in the closet.

I also noticed on the instructions not to nail the down the area of roof flashing that is exposed. To only nail in the area inserted under the shingles. I've seen installs where there are nails on the exposed portion of the roof flashing. I would think we cant just rely on the adhesive to keep the roof flashing from uplifting in a strong wind. Maybe I'm wrong?

I did notice the adjustable roof bracket calls for lag screws into the rafter. Which is creating a larger hole than a couple of roofing nails? Curious as to why we cant set a couple nails into the flashing.
 
Last edited:
Silicone is what is typically used. Don't forget to do the storm collar too.
 
For the most part very little sealer or adhesive should be used. I only use it on the storm collar on the bottom edge of the flasing i use 2 roofing screws with rubber washers to hold it down. The rest should need no sealer if the shingles are done correctly
 
I have put on many flashings and I never run it on top of several rows of shingles. I always nail down the bottom edge and dab a little silicone over the heads. If you do it the way that video shows the wind will drive rain under the vertical flashing edge.
 
I have put on many flashings and I never run it on top of several rows of shingles. I always nail down the bottom edge and dab a little silicone over the heads. If you do it the way that video shows the wind will drive rain under the vertical flashing edge.
I agree i just prefer roofing screws. Nails with a dab of sealant are just fine though.
 
That guy screwed up. He should have cut two more rows of shingles so that they fall on top of the flashing. At least he managed to provide the correct one inch or so gap between the shingles and the cone.

The only sealant you need is silicone one the storm collar. Clear is best because you can see the reflective metal beneath it.

Do not nail the bottom of the flashing down such that the nails are not covered by the shingles. It is shoddy work to have exposed fasteners anywhere on the roof except at the very tippy top. We have rain and wind in the PNW. It will not lift or move as long as the flashing is nailed down under the shingles. Remember, under the flashing up to the chimney is roofed as well.
 
  • Like
Reactions: AlbergSteve
Okay so it seems like people have mixed opinions on how to fasten roof flashing.

Is there a brand of silicone that I should use, or is regular silicone (which is what I currently have) good enough? Does it need to be a high temp silicone for the storm collar to chimney pipe?
 
Okay so it seems like people have mixed opinions on how to fasten roof flashing.

Is there a brand of silicone that I should use, or is regular silicone (which is what I currently have) good enough? Does it need to be a high temp silicone for the storm collar to chimney pipe?
It does not need to be high temp
 
  • Like
Reactions: Highbeam
I used 3 inch roofing screws with rubber washers for my roof brace. Roofing nails are not long enough to penetrate through the bracket, shingles, plywood and finally into the rafters. Plus I would fear a nail could pull out to easily in the event of high winds.
 
  • Like
Reactions: webby3650
Before attaching the foot bracket for the brace I gently lifted the shingle and drilled a test hole to make sure I had a rafter under it. This why if I missed (which I did) I could fill it with silicone and the shingle will also cover it.
 
  • Like
Reactions: AlbergSteve
There’s no need for lag bolts. Gasketed pole barn screws are plenty.
Only the tail of the flashing should show, not 3/4 of it like the video.... sometimes it sits very flat, other times it’s pulled up some and then gasketed screws are acceptable to hold it down.

We often use some black jack sealant in a caulking gun to seal behind the flashing where it meets the shingles on low pitch roofs. On a few occasions, roofing aggregate and other debris have built up in this location causing a leak. As a preventative we seal it on low pitch roofs.
You should really try through the roof or geocell. They are way better than blackjack
 
This is how I've always done flashings. Stoves, furnace flues, plumbing vents. Never had a problem. No goop anywhere except the nails at the lower edge and they are back under the shingles. If a lower pitch you should leave a fingers worth of gap around the bell so the water will drain, like was mentioned. This is a 10/12.
 

Attachments

  • pipe1.jpg
    pipe1.jpg
    183 KB · Views: 530
  • Like
Reactions: AlbergSteve
This is how I've always done flashings. Stoves, furnace flues, plumbing vents. Never had a problem. No goop anywhere except the nails at the lower edge and they are back under the shingles. If a lower pitch you should leave a fingers worth of gap around the bell so the water will drain, like was mentioned. This is a 10/12.
Not always. I promise you! That gap can become filled with junk and cause a leak. We do probably close to 100 a year. Maybe more?
 
You should really try through the roof or geocell. They are way better than blackjack
I’ve used geocell, it’s good stuff. It’s not really acting as a sealant in this location though, it’s just filling the little gap so other crap can’t buildup there.
 
Not always. I promise you! That gap can become filled with junk and cause a leak. We do probably close to 100 a year. Maybe more?

You wouldnt believe how many arguments have transpired over gap vs. no gap. LOL. I have seen the crack of a no gap job get filled with pine fluff and leak. Amazing that it finds it's way there and sticks. The theory is that a finger's gap will allow the rain to wash debris down the roof. I say do what works for you. I say people that have trees looming over their roof are asking for trouble no matter what.
 
This is how I've always done flashings. Stoves, furnace flues, plumbing vents. Never had a problem. No goop anywhere except the nails at the lower edge and they are back under the shingles. If a lower pitch you should leave a fingers worth of gap around the bell so the water will drain, like was mentioned. This is a 10/12.
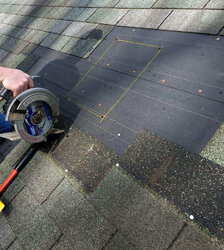
That looks pretty clean. So you cut the hole as you normally would, cut a channel in the shingles for the flashing to slide up in, then pry the shingles on the side up four courses deep?
 
I guess my roof bracket kit came with four 2” lag screws. I think I’ll just add silicone underneath the lag screws before I drive them through.
 
That looks pretty clean. So you cut the hole as you normally would, cut a channel in the shingles for the flashing to slide up in, then pry the shingles on the side up four courses deep?
You could, but I have never been shy of just removing shingles. If you do as you suggest, you will need to pop out some nails that may get in your way. I find it easy to do it this way when some matching shingles are available. Which they were in my case. I use a cake spatula to separate the tar strip very carefully.
 

Attachments

  • pipe2.jpg
    pipe2.jpg
    301.5 KB · Views: 301
You could, but I have never been shy of just removing shingles. If you do as you suggest, you will need to pop out some nails that may get in your way. I find it easy to do it this way when some matching shingles are available. Which they were in my case. I use a cake spatula to separate the tar strip very carefully.
Ohh, you’re gettin way too involved with that roof! There’s a much easier way to do It. When you do it everyday you come up with some very innovative ways to streamline the process.
 
  • Like
Reactions: bholler
I guess my roof bracket kit came with four 2” lag screws. I think I’ll just add silicone underneath the lag screws before I drive them through.
Skip it! Use some pole barn screws with a little roofing cement under the bracket.
 
  • Like
Reactions: AlbergSteve
Ohh, you’re gettin way too involved with that roof! There’s a much easier way to do It. When you do it everyday you come up with some very innovative ways to streamline the process.
Easier yes. Better no that is by far the best way i have found to do it. It really only takes 30 mins as long as the shingles are in decent shape. And i have yet to have a call back on shingles. And i have done hundreds
 
  • Like
Reactions: Ludlow
Ohh, you’re gettin way too involved with that roof! There’s a much easier way to do It. When you do it everyday you come up with some very innovative ways to streamline the process.

I put that roof on. I can tear it apart if I want to! LOL.
I had to put the pipe in first and bring the flashing down over it. The cathedral bucket clamp didnt fit through the flashing hole. Since I'm very comfortable with shingles I just did what comes easy for me. How would you do it when the clamp on the pipe doesnt fit through the flashing?
The pipe i use doesnt have a clamp i can just drop it right down. But i still pull shingles as you did