Subaru Check Engine Light on and Error Code is P0440 - What needs to be fixed? - Finally a Fix Found

  • Active since 1995, Hearth.com is THE place on the internet for free information and advice about wood stoves, pellet stoves and other energy saving equipment.

    We strive to provide opinions, articles, discussions and history related to Hearth Products and in a more general sense, energy issues.

    We promote the EFFICIENT, RESPONSIBLE, CLEAN and SAFE use of all fuels, whether renewable or fossil.
Status
Not open for further replies.

Don2222

Minister of Fire
Feb 1, 2010
9,117
Salem NH
Hello

This is the printout from AutoZone for a 1999 4 Door Wagon Subaru Legacy 4 Cylinder
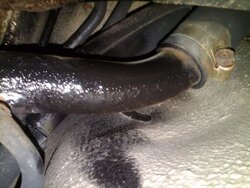
There was an exhaust leak but that was fixed. The code was reset and then the light came back on after 25 miles when the car was on the highway going 60 MPH

Does anyone know what the fix might usually be?
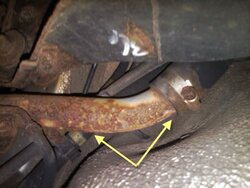
Was it a rusted Gas Filler Tube and how was it fixed?

Tue Apr 12 20:46:49 2011
AutoZone'#5028
517 S BROADWAY
SALEM, NH 03079

OEM Number to Cross: P0440
CATALOG PART. PRICE
WARRANTY CORE
Troubleshooting P0440
OEM Brand: Domestic
0.00
Definition
EVAP (evaporative emission system) small leak/no
flow condition
Explanation
The evaporative emission system is monitored for
it's ability to hold vacuum.
Probable Cause
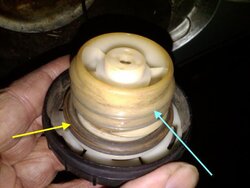
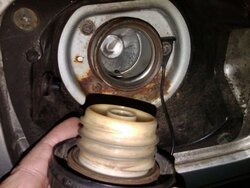
1.- Defective or loose fuel cap
2.- EVAP canister or hose cracked-not connected
3.- Purge or vent solenoid defective
4.- Vacuum leak at engine
Prices and availability are subject to change
THIS IS NOT A RECEIPT

Gas Vapor Check on Key start Video
You tube video on this error >> http://www.youtube.com/watch?v=7IX_lxYDAA0

A Subaru Tech stated that 95% of the time, this error is caused by a rusted up Gas Tank Filler Tube
See Video >> http://www.youtube.com/watch?v=_T-Bjp8_rgw

Many problems are do to the LDP (Leak Detection Pump) vacuum pump solenoid, but a small leak can be in a rusty gas tank filler neck!
http://wn.com/EVAP_System_Operation << This video shows Subaru EVAP system with LDP
 

Attachments

  • GasTankFillerPipeSC.jpg
    GasTankFillerPipeSC.jpg
    29.1 KB · Views: 4,055
What year is the car?

The generic OBD II code P0440 is an EVAP control system malfunction, so there could be other causes (wiring, electrical components) besides a leak.

Its pretty easy to tell if your filler neck is rusted out, just crawl under and take a look. I had a hole in one about the size of half dollar. I patched it with a metal square and some JB Weld. If that is the problem, it should be fixed for the obvious reasons, but also it is an entry point for road dust, dirt, and grit to enter the fuel system.
 
homebrewz said:
What year is the car?

The generic OBD II code P0440 is an EVAP control system malfunction, so there could be other causes (wiring, electrical components) besides a leak.

Its pretty easy to tell if your filler neck is rusted out, just crawl under and take a look. I had a hole in one about the size of half dollar. I patched it with a metal square and some JB Weld. If that is the problem, it should be fixed for the obvious reasons, but also it is an entry point for road dust, dirt, and grit to enter the fuel system.

Hello homebrewz

Thanks for the reply. It is a 1999 Legacy and I just photographed the filler pipe where it meets the rubber hose and goes into the gas tank. Was your leak in this picture or closer to the filler cap??

Also found this Troubleshoot printout on the web
AR: DTC P0440 — EVAPORATIVE EMISSION CONTROL SYSTEM
MALFUNCTION —
I DTC DETECTING CONDITION:
I Two consecutive driving cycles with fault
I TROUBLE SYMPTOM:
I Gasoline smell
CAUTION:
After repair or replacement of faulty parts, conduct CLEAR MEMORY and INSPECTION MODES.
<Ref. to 2-7 [T3D0].> and <Ref. to 2-7 [T3E0].>
I WIRING DIAGRAM:
B2M1831
10AR1 : CHECK ANY OTHER DTC ON DISPLAY.
: Is there any other DTC on display?
: Inspect the relevant DTC using “10.
Diagnostics Chart with Trouble Code for
LHD Vehiclesâ€. <Ref. to 2-7 [T1000].>
: Go to step 10AR2.
10AR2 : CHECK FUEL FILLER CAP.
1) Turn ignition switch to OFF.
2) Open the fuel flap.
: Is the fuel filler cap tightened
securely?
: Tighten fuel filler cap securely.
: Go to step 10AR3.
222
2-7 [T10AR0] ON-BORAD DIAGNOSTICS II SYSTEM
10. Diagnostic Chart with Trouble Code for LHD Vehicles
AR: DTC P0440 — EVAPORATIVE EMISSION CONTROL SYSTEM
MALFUNCTION —
I DTC DETECTING CONDITION:
I Two consecutive driving cycles with fault
I TROUBLE SYMPTOM:
I Gasoline smell
CAUTION:
After repair or replacement of faulty parts, conduct CLEAR MEMORY and INSPECTION MODES.
<Ref. to 2-7 [T3D0].> and <Ref. to 2-7 [T3E0].>
I WIRING DIAGRAM:
B2M1831
10AR1 : CHECK ANY OTHER DTC ON DISPLAY.
: Is there any other DTC on display?
: Inspect the relevant DTC using “10.
Diagnostics Chart with Trouble Code for
LHD Vehiclesâ€. <Ref. to 2-7 [T1000].>
Is there any other DTC on display?
: Inspect the relevant DTC using “10.
Diagnostics Chart with Trouble Code for
LHD Vehiclesâ€. <Ref. to 2-7 [T1000].>
Is there any other DTC on display?
: Inspect the relevant DTC using “10.
Diagnostics Chart with Trouble Code for
LHD Vehiclesâ€. <Ref. to 2-7 [T1000].>
: Go to step 10AR2.
10AR2 : CHECK FUEL FILLER CAP.
1) Turn ignition switch to OFF.
2) Open the fuel flap.
: Is the fuel filler cap tightened
securely?
: Tighten fuel filler cap securely.
: Go to step 10AR3.
222
2-7 [T10AR0] ON-BORAD DIAGNOSTICS II SYSTEM
10. Diagnostic Chart with Trouble Code for LHD Vehicles
Is there any damage to the seal
between fuel filler cap and fuel filler
pipe?
: Repair or replace fuel filler cap and fuel
filler pipe.
: Go to step 10AR4.
10AR4 : CHECK DRAIN VALVE OR VENT
CONTROL SOLENOID VALVE.
1) Connect test mode connector.
OBD0005B
2) Turn ignition switch to ON.
NOTE:
Drain valve or vent control solenoid valve operation
check can also be executed using Subaru
Select Monitor. For the procedure, refer to “COMPULSORY
VALVE OPERATION CHECK MODEâ€.
<Ref. to 2-7 [T3F0].>
B2M1873A
B2M0925B
: Does drain valve or vent control solenoid
valve produce operating sound?
: Go to step 10AR5.
: Replace drain valve or vent control solenoid
valve.
223
ON-BORAD DIAGNOSTICS II SYSTEM [T10AR4] 2-7
10. Diagnostic Chart with Trouble Code for LHD Vehicles
10AR5 : CHECK PURGE CONTROL SOLENOID
VALVE.
NOTE:
Purge control solenoid valve operation check can
also be executed using Subaru Select Monitor. For
the procedure, refer to “COMPULSORY VALVE
OPERATION CHECK MODEâ€. <Ref. to 2-7
[T3F0].>
B2M1039B
: Does purge control solenoid valve
produce operating sound?
: Go to step 10AR6.
: Replace purge control solenoid valve.
10AR6 : CHECK PRESSURE CONTROL
SOLENOID VALVE.
NOTE:
Pressure control solenoid valve operation check
can also be executed using Subaru Select Monitor.
For the procedure, refer to “COMPULSORY
VALVE OPERATION CHECK MODEâ€. <Ref. to 2-7
[T3F0].>
B2M1874A
B2M0923E
: Does pressure control solenoid valve
produce operating sound?
: Go to step 10AR7.
: Replace pressure control solenoid
valve.
10AR7 : CHECK EVAPORATIVE EMISSION
CONTROL SYSTEM LINE.
Turn ignition switch to OFF.
: Does fuel leak in fuel line?
: Repair or replace fuel line.
: Go to step 10AR8.
10AR8 : CHECK CANISTER.
: Is there any damage at canister?
: Repair or replace canister.
: Go to step 10AR9.
224
2-7 [T10AR5] ON-BORAD DIAGNOSTICS II SYSTEM
10. Diagnostic Chart with Trouble Code for LHD Vehicles
10AR9 : CHECK FUEL TANK.
: Is there any damage at fuel tank?
: Repair or replace fuel tank.
: Go to step 10AR10.
10AR10 : CHECK ANY OTHER MECHANICAL
TROUBLE IN EVAPORATIVE
EMISSION CONTROL SYSTEM.
: Are there holes, cracks, clogging or
disconnections of hoses or pipes in
evaporative emission control system?
: Repair or replace hoses or pipes.
: Contact with SOA service.
NOTE:
Inspection by DTM is required, because probable
cause is deterioration of multiple parts.
225
ON-BORAD DIAGNOSTICS II SYSTEM [T10AR10] 2-7
10. Diagnostic Chart with Trouble Code for LHD Vehicles
__________________
1953 Harley FLE
1969 Camaro SS
1990 Cadillac Fleetwood
1994 Suzuki RF900R
1998 Subaru OBW
2000 Harley FLHTCI

Pics show that O-Ring gasket (Yellow Arrow) and threads (Blue Arrow) on Gas Cap are in good condition!
 

Attachments

  • GasCap1sc.jpg
    GasCap1sc.jpg
    31.9 KB · Views: 3,399
  • GasCap2sc.jpg
    GasCap2sc.jpg
    42.4 KB · Views: 2,602
Mine was on a '97 Hyundai. It was in about the same place. You're looks pretty rusty. I wouldn't be surprised if there was a pinhole of rust somewhere. Its best to just replace the pipe.. they shouldn't have to drop the tank for that.
 
homebrewz said:
Mine was on a '97 Hyundai. It was in about the same place. You're looks pretty rusty. I wouldn't be surprised if there was a pinhole of rust somewhere. Its best to just replace the pipe.. they shouldn't have to drop the tank for that.

Thank-you so much for the quick reply homebrewz :)

I just checked all the engine vacuum lines for small leaks and quess what I found?

A larger vacuum line lying on the engine right under the Air Intake housing!

So I just connected it back in to the bottom side of the Air Intake housing.

Would this cause the P0440 code to come on while I was on the highway doing 60 MPH?
 

Attachments

  • Disconnected VacLineFromAirIntake!sc.jpg
    Disconnected VacLineFromAirIntake!sc.jpg
    17 KB · Views: 1,589
No problem, hope this helps.

You can poke around on the fill pipe with a screwdriver and see if any holes develop. In a pinch, the area can be cleaned with a wire brush and small holes can be filled with JB Weld. I used a metal patch and JB Weld. I would not encourage any activity that would make any sort of spark, of course! There may also be some lines coming off of the filler neck going to EVAP equipment which may be worn.

Yes, it would be a good idea to inspect the vacuum lines coming off of the EVAP equipment.. canister, various vales, and whatnot. Replace any cracked or worn hoses.
 
homebrewz said:
No problem, hope this helps.

You can poke around on the fill pipe with a screwdriver and see if any holes develop. In a pinch, the area can be cleaned with a wire brush and small holes can be filled with JB Weld. I used a metal patch and JB Weld. I would not encourage any activity that would make any sort of spark, of course! There may also be some lines coming off of the filler neck going to EVAP equipment which may be worn.

Yes, it would be a good idea to inspect the vacuum lines coming off of the EVAP equipment.. canister, various vales, and whatnot. Replace any cracked or worn hoses.

Thanks again for the extra tips, I will ck the EVAP lines tomorrow. Did you see my new pic on the Air Intake line? Would that do it?
 
I think that might do it. Hopefully it will be that simple. You might need to put some small hose clamps on that hose so it doesn't come loose again. Drive it as you normally would and see if the check engine light goes off. If not, it may need to be reset with a scan tool.
 
homebrewz said:
I think that might do it. Hopefully it will be that simple. You might need to put some small hose clamps on that hose so it doesn't come loose again. Drive it as you normally would and see if the check engine light goes off. If not, it may need to be reset with a scan tool.

Hello

Yes, I know the reset routine. Take the positive battery terminal off for 1 min to turn the Check Eng Light (CEL) off. This puts the computer in the "Not Ready" state. If emisions are checked at this time it will fail and the printout will say not "Not Ready".

Resetting the Catalyst and EVAP are usually the hardest to clear!!

The Subaru dealer stated that they reset the computer after the fix is done.

Here is one way for the driver to do the EVAP Monitor reset routine
http://www.subaruoutback.org/forums/66-problems-maintenance/25714-obd-monitors-not-ready-help.html
1. Make sure the fuel tank is between one-quarter and three-quarters full; half a tank is ideal.

2. Start the engine and immediately drive the vehicle for at least 15 minutes at a speed greater than 50 mph. During the warmup, try to avoid sudden acceleration, hard braking and/or lane changes.

3. Drive the vehicle at a steady 55 mph for three more minutes. During this stage of the drive cycle, it's crucial that you keep throttle angle changes to a minimum.

4. Bring the vehicle back to the shop, hook up the scan tool and look at the status of the readiness monitors. Repeat the drive cycle, if necessary.

Other than that, for me, varied driving helped. I did it in 15-20 minute cycles, 5 min stop and go to the freeway, 15 minutes at about 65 on the freeway and 5 minutes back to the house.

Sometimes the emissions test place can give you a temp pass If all the systems had to be ready.

2. Here is another EVAP Monitor reset routine
For 1999 Subaru Legacy evap monitor reset see >> http://www.2carpros.com/questions/1999-subaru-legacy-evap-monitor-reset

It's not a matter of miles. It will reset when the computer has been through every scenario that it's programmed for.

READINESS CODE RESETTING PROCEDURE (GENERIC DRIVE CYCLE)

READINESS MONITORS AND DRIVE CYCLES
"Readiness Monitors" are indicators that demonstrate whether or not emission system components are being monitored (checked) by the OBD-II system. If a monitor is set to "Ready" the monitor is checking its assigned component and, if no DTC's are present, the vehicle should pass an emissions test.

NOTE: If the appropriate number of Readiness Monitors (codes) are not flagged as "Ready", in most cases, the vehicle can not pass an emissions test. See State and Federal Laws.

The status of all readiness monitors is reset to "Not Ready" :

* Each time DTC's are cleared
* The battery is disconnected
* The ECM is disconnected

The status of all readiness monitors is reset to "Ready" :
After DTC's are cleared and the appropriate drive cycle(s) is successfully completed

EPA Federal Test Procedure

Manufactures are required to validate monitors during the first 23 minutes (1372 seconds) of the Federal Test Procedure Drive Cycle.

EPA Urban Dynamometer Driving Schedule

Completing the Drive Cycle successfully one (1) time should reset most drive cycle monitors to a "Ready" status. However, there are "two trip" monitors, which require that the drive cycle be successfully completed two (2) times, to achieve a "Ready" status. Furthermore, systems which use averaging, may require the drive cycle to be completed more than 2 times.

Verify the status of the readiness monitors with the appropriate function of your scan tool.

NOTE: Certain vehicles have known OBD-II Readiness issues. Please be sure to review TSB's for special circumstances and or exceptions to readiness monitor resetting procedures.

BEFORE BEGINNING THE DRIVE CYCLE
Check the status of the Readiness Monitors, check for DTC's, correct faults, clear DTC's before beginning the Drive Cycle.

BEGIN DRIVE CYCLE
The vehicle should be driven approximately 7.5 miles within a period of approx. 23 minutes (1372 seconds) from a cold start. However, due to manufacture variations, it is necessary to perform only as much of the Drive Cycle as is necessary to reset the required monitors to a "Ready" status. Operate the throttle smoothly to obtain best results. Do not shut the engine off during the drive cycle.

CAUTION: Obey all traffic laws and drive in a safe manner!

NOTE: Extreme driving conditioning such as very high/low temperatures, rough roads and high altitudes may prevent some monitors from attaining a "Ready" status.

Step 1: (Engine Cold) Start engine, idle 20 seconds. Accelerate gradually and drive at 20-25 mph for 1 minute, varying speed.

Step 2: Accelerate gradually to 32 mph within 35 seconds. Decelerate to 0 mph in 10 seconds. Idle for 40 seconds.

Step 3: Accelerate at part throttle to 25 mph in 10 seconds. Cruise at 17-25 mph for 15 seconds. Accelerate gradually to 57 mph in 45 seconds. Cruise at 50-56 mph for 1 minute. Decelerate gradually to 0 mph in 40 seconds. Idle for 15 seconds.

Step 4: Accelerate at part throttle to 36 mph and maintain for 10 seconds. Decelerate to 0 mph in 15 seconds. Idle for 5 seconds.

Step 5: Accelerate to 30 mph and back to 0 mph within 30 seconds. Idle for 20 seconds.

Step 6: Accelerate to 36 mph in 20 seconds. Drive at 35 mph for 20 seconds. Decelerate to 0 mph in 15 seconds. Idle 5 seconds.

Step 7: Accelerate gradually to 26 mph and decelerate to 0 within 40 seconds. Idle 15 seconds.

Step 8: Accelerate to 27 mph in 40 seconds. Decelerate to 0 mph in 10 seconds. Idle 25 seconds.

Step 9: Accelerate to 26 mph in 15 seconds, maintain speed for 10 seconds, decelerate to 0 mph in 10 seconds. Idle 15 seconds.

Step 10: Accelerate to 23 mph in 20 seconds, decelerate to 0.5 mph in 10 seconds (no complete stop). Accelerate to 28 mph and back to 0 mph (momentary stop 1 second) within 35 seconds.

Step 11: Accelerate gradually to 34 mph in 45 seconds. Vary speed between 34 and 19 mph for 2 minutes. Decelerate from 25 to 0 mph in 25 seconds. Idle for 5 seconds.

Step 12: Accelerate to 29 mph in 15 seconds, decelerate gradually to 0 mph in 45 seconds. Idle for 30 seconds.

Step 13: Accelerate gradually to 28 mph and back to 0 mph (momentary stop 1 second) within 50 seconds. Accelerate gradually to 27 mph and back to 0 mph within 55 seconds. Idle for 15 seconds.
 
Reset Continued

Step 14: Accelerate to 24 mph and back to 0 mph within 18 seconds. Idle for 10 seconds. Accelerate gradually to 22 mph and back to 0 mph within 50 seconds. Idle for 8 seconds.

Step 15: Accelerate gradually to 30 mph within 50 seconds. Decelerate to 0 mph in 10 seconds. Idle for 25 seconds.

Step 16: Accelerate to 23 mph and back to 0 mph within 30 seconds. Idle for 10 seconds.

Step 17: Repeat steps 1 - 16 once again. Recheck the status of the "Readiness Monitors".

NOTE: Remember, clearing DTC's or interrupting power to the ECM after the readiness monitors have been reset to "Ready" will require that the Drive Cycle be repeated.

Completing the Drive Cycle successfully one (1) time should reset most drive cycle monitors to a "Ready" status. However, there are "two trip" monitors, which require that the drive cycle be successfully completed two (2) times, to achieve a "Ready" status. Furthermore, systems which use averaging, may require the drive cycle to be completed more than 2 times. It is necessary to perform only as much of the Drive Cycle as is necessary to reset the required monitors to a "Ready" status.

END DRIVE CYCLE

3. Subaru dealer Koeppel Subaru in Queens. >> http://www.2carpros.com/questions/1999-subaru-legacy-evap-monitor-reset

A woman in the service department there said I could drive until I'm blue in the face and the monitors will still read incomplete unless I complete the following drive pattern: accelerate to 50 MPH, drive for at least 3 minutes without braking, decelerate to 30 MPH, then accelerate again to 50 MPH, and drive for at least 3 minutes again without braking. If I end up having to brake, then I have to start all over again. I did ask her whether I should then check the OBD before keying off, and she said, it didn't matter, once the monitors are ready they will stay ready -- so I could drive the pattern at night when traffic is lighter and then just bring it to my mechanic the next day

Hello

Well I took a wire brush and scraped off some of the filler neck rust. No holes fortunately. So I grabbed the can of Black Spray Rustoleum and painted the area for better protectection.

Then I put a screw down radiator type clamp on the disconnectred hose and re-connected. I drove the car 31 miles and at 55 MPH last night and so far no CEL !!


Link to Federal EPA document readiness exceptions (page 5)

http://www.epa.gov/otaq/regs/im/obd/.../420f08009.pdf

Read Appendix D

http://epa.gov/otaq/regs/im/obd/r01015.pdf
 

Attachments

  • GasTankFillerPipeSanded&Paintedsc.jpg
    GasTankFillerPipeSanded&Paintedsc.jpg
    46.5 KB · Views: 1,421
If the code comes back the best thing to do is have the evap loss system smoke tested. It will tell you where the leak is.
 
jrandall said:
If the code comes back the best thing to do is have the evap loss system smoke tested. It will tell you where the leak is.

Thanks jrandall for your advice.

So far the list of probable causes in the order of expense with the cheapest fix first is as follows:

1. Gas cap must be on tight and not cross treaded
2. All vacuum lines around engine and around EVAP system near gas tank must be tight.
In my case it is possible someone did not put the vacuum line back onto the air intake hood on the engine!
A new Screw Clamp and re-connect the vacuum line fixed the problem for $0.67 !!
3. The gas filler pipe may have a rusty hole just before the rubber hose near the gas tank.
This is the only part that does not have the plastic shield over it.
Scrape rust and apply rustoleum if no hole or fix with GB Weld and metal patch if needed or replace filler neck.
 
Hello

Ok, so far so good! I have gone 80 miles and no CEL on. However I had the emissions test failed 2 times with "Not Ready"

Does anyone know what the 1999 Subaru Legacy Drive Cycle is?

Does anyone have this TSB - Technical Service Bulletin??
AUGUST 2004 Emissions - OBD Readiness Test Procedure
 
Hello

Well, Adding a clamp on the Vacuum Hose to the Air Intake that was disconnected fixed the problem!!


I finally got a nice Bulletin from Subaru for the Drive Cycle!

See >> https://www.hearth.com/econtent/index.php/forums/viewthread/74257/

My mechanic had a good drive cycle to drive 25 miles and half on the highway and half in the city.
That worked for my Toyota but not for my Subaru so I am adding what the Subaru Bulletin said to this cycle and since the Evap system monitor resets better when the gas tank is between 1/2 and 3/4 full I am adding this in also.

So I did the drive cycle as follows for the 1999 Subaru Legacy 4cyl and got the sticker this morning!!!

With the gas tank between 1/2 and 3/4 full.
Drive the car 25 miles half highway and half city (stop & go) and while on the highway include a minimum speed of 55 mph for a min of 3-5 mins and then coast 30 MPH for a min without breaking and then back up to 55 MPH for 3 - 5 mins.

With ODBII cars from 1996 - 2000 can have two monitors "Not Ready" and still pass. Unfortunately the printout says pass and does not tell you if any monitors are still not ready. The new cheap code scanners can now show all the monitors and if they are ready. See link above!


So that is the fix. CASE CLOSED !!!
 
Status
Not open for further replies.