Went to clean the stainless steel chimney and No Chimney Cleanout! What brush do I need?

  • Active since 1995, Hearth.com is THE place on the internet for free information and advice about wood stoves, pellet stoves and other energy saving equipment.

    We strive to provide opinions, articles, discussions and history related to Hearth Products and in a more general sense, energy issues.

    We promote the EFFICIENT, RESPONSIBLE, CLEAN and SAFE use of all fuels, whether renewable or fossil.
Status
Not open for further replies.

Don2222

Minister of Fire
Feb 1, 2010
9,117
Salem NH
Hello

Well it is that time of year to check the chimneys and make sure they are ready to go!

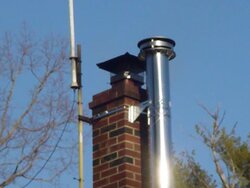
However after spending 6k for a boiler and 2.5k for the chimney, the 5" round metal chimney on my boiler had no cleanout!!

Sure just take out a few screws and wrestle and fuss and then clean the mess!!!!

Or pay big bugs for someone else to do it. If he spends alot of time taking things apart and then getting them back together, then that is way less time to a nice chimney cleaning.

So I am taking it apart once and putting in a T pipe with cleanout cap!!

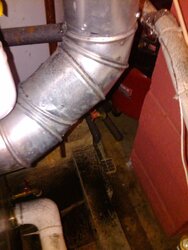
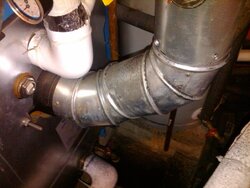
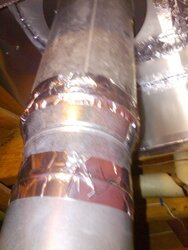
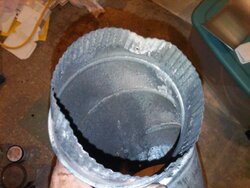
Naturally it does not go as planned and I cannot use the 2 45s in pic 1 & 2 below!
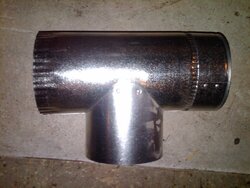
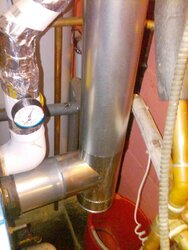
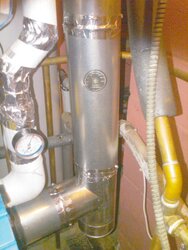
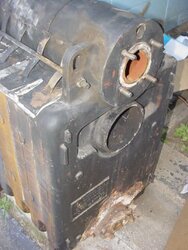
T is in pic 3 and the pipes are fitted in pic 4 just have to put in some screws!!

So for approx $23.00 for the 5" 26 guage T and $6.25 for a 2 feet section of 5" flue, it works!!

How much would a pro charge for this job?

Now if that goes into a 6" pipe should I get a 5" poly flue brush or will a 6" brush work for both 5 and 6 inch sections??

Click on pics to enlarge!
 

Attachments

  • TRHBuderusBoilerCleanoutsc (1).jpg
    TRHBuderusBoilerCleanoutsc (1).jpg
    88.8 KB · Views: 404
  • TRHBuderusBoilerCleanoutsc (2).jpg
    TRHBuderusBoilerCleanoutsc (2).jpg
    93.4 KB · Views: 433
  • TRHBuderusBoilerCleanoutsc (3).jpg
    TRHBuderusBoilerCleanoutsc (3).jpg
    92.4 KB · Views: 412
  • TRHBuderusBoilerCleanoutsc (4).jpg
    TRHBuderusBoilerCleanoutsc (4).jpg
    108.4 KB · Views: 406
I would stick to the proper sized brush, even if that means you get two brushes - a 5 inch brush on a 6 inch chimney will leave stuff behind, depending how dirty it was to start with - and especially if there is creosoting. You might be able to get away with just using a chimney brush on the chimney part, from the top, and some other kind of non-wire bristle brush with a longish handle on the furnace pipe part, from the bottom - I think the heavier stuff would end up higher in the chimney & there would just be light ash at the bottom. You might even end up not having to do any brushing on the bottom part.

Can't quite understand installs that leave no cleanout behind.
 
maple1 said:
I would stick to the proper sized brush, even if that means you get two brushes - a 5 inch brush on a 6 inch chimney will leave stuff behind, depending how dirty it was to start with - and especially if there is creosoting. You might be able to get away with just using a chimney brush on the chimney part, from the top, and some other kind of non-wire bristle brush with a longish handle on the furnace pipe part, from the bottom - I think the heavier stuff would end up higher in the chimney & there would just be light ash at the bottom. You might even end up not having to do any brushing on the bottom part.

Can't quite understand installs that leave no cleanout behind.

The chimney is all metal and it goes from 5" to 6" just before the 1st floor ceiling (see pic below), because the old boiler had to have a 6". So it may be best to do the 6" brushing from the Roof and then the 5" brushing from below using the new cleanout?

I just order a new 5" brush, they are hard to come buy.
http://www.northlineexpress.com/itemdesc.asp?ic=5SB-34805M&source=nextag&kw=5SB-34805M
 

Attachments

  • TRHBuderusChimneyReducerSC.jpg
    TRHBuderusChimneyReducerSC.jpg
    83.2 KB · Views: 322
Or do them both from the top, but the 6 brush only until it hits the 5, then change brushes to do the rest.

Looks from your info like it's a pellet burner though? If so, I still think the 5 might not even need brushed with a chimney brush - but inspect before deciding that. On my old tech wood burning creosote generating furnace, I only sweep the main chimney, and get the furnace pipe by knocking a bit first & scraping the ash out into a pan (have to disconnect pipe at furnace & twist around until I get my hand in there though). Never much creosote in first pipe, only ash - the chimney is what seems to collect the creosote, except for right before the pipe goes to chimney where I have a barometric damper. The cold air from that entering is a creosote sink also, but I can stick my hand in the damper and scrape the creosote towards the chimney until it falls into the bucket I have sitting under the T.

Disclaimer: I am not a chimney pro, just lots of years dealing with my own creosote.
 
maple1 said:
Or do them both from the top, but the 6 brush only until it hits the 5, then change brushes to do the rest.

Looks from your info like it's a pellet burner though? If so, I still think the 5 might not even need brushed with a chimney brush - but inspect before deciding that. On my old tech wood burning creosote generating furnace, I only sweep the main chimney, and get the furnace pipe by knocking a bit first & scraping the ash out into a pan (have to disconnect pipe at furnace & twist around until I get my hand in there though). Never much creosote in first pipe, only ash - the chimney is what seems to collect the creosote, except for right before the pipe goes to chimney where I have a barometric damper. The cold air from that entering is a creosote sink also, but I can stick my hand in the damper and scrape the creosote towards the chimney until it falls into the bucket I have sitting under the T.

Disclaimer: I am not a chimney pro, just lots of years dealing with my own creosote.

Hello maple1
Thanks for the info. It is an Oil Burner. I disconnected it from the original block chimney because that is what my pellet stove goes into! One flue per appliance so I do meet code!

The old boiler before it went clogged the chimney with soot so I do not like taking apart the pips near the boiler and putting them back again.

Pic 3 shows how it was.
Pic 1 shows a bent 45 when the 2 self tapping screws pushed in the wall before they grabbed!
This happened when the boiler man put them on new! I hate that so I drill small pilot holes from now on!
anyways, soot was getting all over the floor because of these openings between the inner male part and outer wall. So I removed them. The boiler man would not admit that it was a problem!! So he does not have to come fix it!
Pic 2 shows the new T with strait pipes and taped joints I did so no soot comes out!!

Click to Enlarge
 

Attachments

  • TRHBuderusBoilerCleanoutsc (2).jpg
    TRHBuderusBoilerCleanoutsc (2).jpg
    93.4 KB · Views: 306
  • TRHBuderusBent45FlueSC.jpg
    TRHBuderusBent45FlueSC.jpg
    91.1 KB · Views: 303
  • TRHBuderusCleanoutFinishedSC.jpg
    TRHBuderusCleanoutFinishedSC.jpg
    101.2 KB · Views: 306
I have done that myself to pipes when screwing them together - very frustrating when it's the last screw & that happens. Also not very nice for the guy to not fix it.

And it is an oil burner? If it is burning right it should never need swept.
 
maple1 said:
I have done that myself to pipes when screwing them together - very frustrating when it's the last screw & that happens. Also not very nice for the guy to not fix it.

And it is an oil burner? If it is burning right it should never need swept.

Yes, it is an oil burner and very efficient one. However the 22 year old valiant shot a big load of black soot into the chimney before it croaked last summer. So now I have a dirty chimney!

That is why I am getting black soot all over the place, but buy taping the joints the black soot should collect in the cleanout cap now until I can get up on the roof and clean the flue.

Just priced the brush and pole kit at Home Depot. They just got their stoves out for the winter.

The 6" round Poly Flue brush is $15.97


Rod kit $29.98
http://www.homedepot.com/h_d1/N-5yc...splay?langId=-1&storeId=10051&catalogId=10053

See pic of old boiler!!! What a mess!
 

Attachments

  • 060Valliant22yearsSC.jpg
    060Valliant22yearsSC.jpg
    32.9 KB · Views: 272
My father just had a new Buderus installed this summer - nice looking unit.

EDIT: I do the rod & brush thing too, takes me 6 rods to get all the way to the bottom, + 1 foot of my arm. Those rods flex a lot when there's 6 of them and you're trying to push past that last area of buildup.
 
maple1 said:
My father just had a new Buderus installed this summer - nice looking unit.

EDIT: I do the rod & brush thing too, takes me 6 rods to get all the way to the bottom, + 1 foot of my arm. Those rods flex a lot when there's 6 of them and you're trying to push past that last area of buildup.

Your father will like the Buderus, I use less than half the oil I used with the old valliant even though it was 85% efficient!!

I use the Tekmar 260 outdoor reset with it. Does he have the Buderus Digital Controler or another outdoor reset?

How tall is your chimney?

The HD has 6 3 foot rods and I think my chimney is approx 25 feet.

See pic of chimney top below:
 

Attachments

  • MetalChimney 036sc.jpg
    MetalChimney 036sc.jpg
    20.2 KB · Views: 335
Not to pick problems, but is your flue now in contact with that white PVC pipe mounted on the wall? Even though it is oil, the flue temp can get pretty hot....just be careful. Maybe I'm seeing it wrong.
 
bpirger said:
Not to pick problems, but is your flue now in contact with that white PVC pipe mounted on the wall? Even though it is oil, the flue temp can get pretty hot....just be careful. Maybe I'm seeing it wrong.

That is not PVC, that is the cast iron supply from the boiler covered with a high temp Zeston fitting and white 1" thick commercial R4 fiberglass pipe insulation to greatly increase efficiency!

http://www.specjm.com/products/pvcpipeaccessories/zeston2000.asp
 
Status
Not open for further replies.