What is this thing in my fireplace? (pictures)

  • Active since 1995, Hearth.com is THE place on the internet for free information and advice about wood stoves, pellet stoves and other energy saving equipment.

    We strive to provide opinions, articles, discussions and history related to Hearth Products and in a more general sense, energy issues.

    We promote the EFFICIENT, RESPONSIBLE, CLEAN and SAFE use of all fuels, whether renewable or fossil.
Status
Not open for further replies.

Tocramed

Member
Sep 30, 2015
79
WI
Hi, this is my first post here, first time owning an insert (or stove of any kind), just trying to figure things out and would appreciate any help.

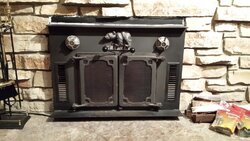
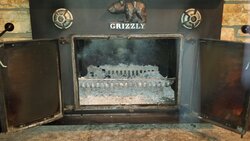
I have been searching the internet looking for the model and any instructions for my insert. We recently purchase a house with this installed and I am not 100% sure on how to use it. I would like to get to the point of burning 24/7 in it. Does anyone know what model Grizzly this is or anything about it? See pictures. I am guessing it is from the early 80s.

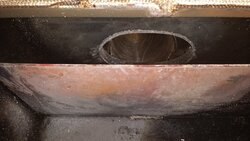
The previous owner has the chimney relined with the proper adapter for the stove. It should be insulated around the firebox and all the way up the flue.

We have had one fire in it so far and the stove was so hot I could barely touch the air control knobs on the front. It was not a roaring fire either. Is this normal?

I am also thinking that I should remove the fire grate if I want to use this as intended?
 

Attachments

  • 20151006_193157.jpg
    20151006_193157.jpg
    230.1 KB · Views: 428
  • 20151006_193316.jpg
    20151006_193316.jpg
    212.9 KB · Views: 439
  • 20151006_193331.jpg
    20151006_193331.jpg
    246.6 KB · Views: 408
I am also thinking that I should remove the fire grate if I want to use this as intended?
Yes it should not be there


We have had one fire in it so far and the stove was so hot I could barely touch the air control knobs on the front. It was not a roaring fire either. Is this normal?
Yeah they will get hot

Have you had the system inspected by a pro?
 
Have you had the system inspected by a pro?

Yes, we had an inspection done as part of the sale. The insert was venting into the expansion chamber with no connection to a liner or the flue. When they cleaned it, they pulled 5 - 5 gallon pails plus one shop vac full of creosote out... As part of the deal, they had a certified installer come out and redo everything. I talked to the installer and he said it good to go. Edit: this was April 2015.

In addition to the few questions I had above, I was concerned about the caulking around the top of the insert. You can see the white caulk in the pictures. When the installer did the work, he added black caulk which turned white during the summer (no fires). When we had our fire recently, the caulk started cracking and pieces broke away from the insert in a number of places. It was making me think we got the insert too hot.
 
Bob Fisher's father, Baxter invented the draft caps with fins. The original idea was to be able to turn them with your feet. They stay cooler on a stove with them mounted near the bottom and easier to reach with your foot. Fisher sold them to many stove makers at the time. keep the threads greased with high temp grease or silver anti-seize to prevent thread wear. They are still available, but not cheap.
 
Thanks billb3. I actually saw that thread a while ago. My Grizzly seems to be basic model compared to those with no cat or ash pan. It doesn't even have a damper.
 
Bob Fisher's father, Baxter invented the draft caps with fins. The original idea was to be able to turn them with your feet. They stay cooler on a stove with them mounted near the bottom and easier to reach with your foot. Fisher sold them to many stove makers at the time. keep the threads greased with high temp grease or silver anti-seize to prevent thread wear. They are still available, but not cheap.

Thanks for the tip coaly! I will do that. They do stick shut if you close them hard.
 
Yes, we had an inspection done as part of the sale. The insert was venting into the expansion chamber with no connection to a liner or the flue. When they cleaned it, they pulled 5 - 5 gallon pails plus one shop vac full of creosote out... As part of the deal, they had a certified installer come out and redo everything. I talked to the installer and he said it good to go. Edit: this was April 2015.

In addition to the few questions I had above, I was concerned about the caulking around the top of the insert. You can see the white caulk in the pictures. When the installer did the work, he added black caulk which turned white during the summer (no fires). When we had our fire recently, the caulk started cracking and pieces broke away from the insert in a number of places. It was making me think we got the insert too hot.
The original installation of these was installed into the hearth to vent up the existing chimney.
Any air leak around the Insert would allow indoor air to leak into the flue and mix with the rising hot gasses, cooling them and causing creosote, hence the new way of connecting liner to flue outlet eliminating the air leak into flue. The other reason for lining is fireplaces used much larger flues, and the Insert being more efficient than an open fire leaves less heat up, again causing creosote problems heating a larger flue area. So the liner should be the same size as Insert outlet all the way up. Caulk is no longer as important with yours sealed to the flue, only preventing indoor air leakage outside. It may be paintable caulk, I'd try it or caulk with the color of choice.
 
Tocramed, welcome to hearth, and hope you enjoy reading the topics. You have a insert stove, an older type at that - 1980's I would suspect looking at the flat baffle. A couple of things to take note right away.
1. Like another poster has mention, please call a certified sweep to inspect the unit and chimney, learn what your dealing with. Ask the sweep if you have a liner, or if its piped slammer style into the chimney. If you don't have a metal liner connecting from flue collar to chimney cap, order one up as the first thing. This is foremost for safety. The reasons - if you have a chimney fire it will be contained to the liner and less risk for cracking tiles and fire spreading into your home, secondly .. a liner will seal off the stove gases and only allow them out the chimney. This is important because a slammer style can allow a down draft to occur (end state of the burn) and co can seep into your home from the chimney. Also with the liner sweeping maintenance is 20 times easier and cleaner.
2. check your door gaskets, having a good door seal will help with controlling the stove during the burn just by using the draft caps and not having additional air enter the fire box by a leaky door.
3. After you start playing with the stove you will begin to realize that wood burning is fun and a great way to save $$ for heating, you will also realize that perhaps your stove is going through to much wood, when you hit that point start looking for newer more efficient stoves (they do make them a ton better today)
4. Secure a good wood supply, wood should be dry (seasoned is the layman's term) - Wood typically takes between 12 - 24 months depending on species to get below 20% moisture content (20% is the number or below you want to be at to burn effectively and efficiently)


Yes, we had an inspection done as part of the sale. The insert was venting into the expansion chamber with no connection to a liner or the flue. When they cleaned it, they pulled 5 - 5 gallon pails plus one shop vac full of creosote out... As part of the deal, they had a certified installer come out and redo everything. I talked to the installer and he said it good to go. Edit: this was April 2015.

In addition to the few questions I had above, I was concerned about the caulking around the top of the insert. You can see the white caulk in the pictures. When the installer did the work, he added black caulk which turned white during the summer (no fires). When we had our fire recently, the caulk started cracking and pieces broke away from the insert in a number of places. It was making me think we got the insert too hot.

Call a different sweep - this guy doesn't really seem to have a clue, read up on chimney liners, block off plates, hang out in the wood shed, and most importantly ask questions if your unsure, safety is paramount here.
 
Yes, we had an inspection done as part of the sale. The insert was venting into the expansion chamber with no connection to a liner or the flue. When they cleaned it, they pulled 5 - 5 gallon pails plus one shop vac full of creosote out... As part of the deal, they had a certified installer come out and redo everything. I talked to the installer and he said it good to go. Edit: this was April 2015

A certified installer to redo the whole thing, leaving out the fact that there was a huge creosote problem, not offering a liner, and reinstalling it as a slammer, to me that's bare minimum
 
1. Like another poster has mention, please call a certified sweep to inspect the unit and chimney, learn what your dealing with. Ask the sweep if you have a liner, or if its piped slammer style into the chimney. If you don't have a metal liner connecting from flue collar to chimney cap, order one up as the first thing. This is foremost for safety. The reasons - if you have a chimney fire it will be contained to the liner and less risk for cracking tiles and fire spreading into your home, secondly .. a liner will seal off the stove gases and only allow them out the chimney. This is important because a slammer style can allow a down draft to occur (end state of the burn) and co can seep into your home from the chimney. Also with the liner sweeping maintenance is 20 times easier and cleaner.
they already said they had a liner
 
A certified installer to redo the whole thing, leaving out the fact that there was a huge creosote problem, not offering a liner, and reinstalling it as a slammer, to me that's bare minimum
you misread that that sweep put in a liner as the op said
 
Yes, I should clarify. We had a sweep out for the cleaning and inspection. Then the previous owners hired a certified sweep/installer to redo the whole shebang properly. Currently we do have an appropriate liner fitted to the insert and insulated.
 
Lol, I sure did... Sorry for the confusion
 
  • Like
Reactions: bholler
Thanks for the help guys. The installer just stopped by to take a look at things and replaced the caulking with higher temp stuff. All seems well and we will keep working at it.
 
The Furnace cement turned white from Air drying, Then when heated dried even more and shrunk.... When I did my install several weeks back the Tube of Fireplace cement said To NOT Let it Air Dry for more than 30 days. Before your next fire I'd chip out what you can and start fresh. ( which is why I had a fire in august :) ) Mine turned white from the heat cure and didn't crack or fall out... I think yours just Air Dried too long....
 
The Furnace cement turned white from Air drying, Then when heated dried even more and shrunk.... When I did my install several weeks back the Tube of Fireplace cement said To NOT Let it Air Dry for more than 30 days. Before your next fire I'd chip out what you can and start fresh. ( which is why I had a fire in august :) ) Mine turned white from the heat cure and didn't crack or fall out... I think yours just Air Dried too long....

This could be it. He also said the stuff he used the first time (furnace cement) was only rated for 600^F. It has been replaced with stove caulk rated for 2000^F. There will be more fires sooner than later. ==c
 
After working on this insert a bit more this last week, a few other thoughts came to mind.

I presume it is not EPA certified and not very efficient, but does anyone know how well one of these should work? I know it is hard to give a detailed answer, but what about: "dump it for something better", "meh...you'll brake even", or "best you can get today"?

The sweep added a layer of fiberglass fire blanket on both of the sides and two layers right on top of the insert. The top and cast iron boot connected to the liner are completely surrounded. Maybe this helps a little?

It certainly feels like it is putting out some heat...keeping in mind it is 45^F outside.

For starters it is not an EPA unit. Still I would say burn what you have for now. Put a thermometer on it so you can monitor temps and see how she works. Build up a supply of wood and get it drying. That stove will be more forgiving of semi-seasoned wood than a new EPA certified unit would.

After you have some experience and some truly seasoned fire wood you can make a change, or maybe you decide to keep it. You can burn an older unit reasonably well with dry wood and good practices but the down side is you will use more wood than you would with a newer unit.
 
  • Like
Reactions: bholler
For starters it is not an EPA unit. Still I would say burn what you have for now. Put a thermometer on it so you can monitor temps and see how she works. Build up a supply of wood and get it drying. That stove will be more forgiving of semi-seasoned wood than a new EPA certified unit would.

After you have some experience and some truly seasoned fire wood you can make a change, or maybe you decide to keep it. You can burn an older unit reasonably well with dry wood and good practices but the down side is you will use more wood than you would with a newer unit.

Thanks. I have two cords of dry wood; no moisture meter, so I don't know how dry. I bought it from a reputable company, so I trust them when they say it is ready to burn. I am sure it won't last me through the winter, but it will get me started. I am cutting wood for next year now. I have some dead trees that need to come down that should give me at least several cords of wood.
 
Thanks. I have two cords of dry wood; no moisture meter, so I don't know how dry. I bought it from a reputable company, so I trust them when they say it is ready to burn. I am sure it won't last me through the winter, but it will get me started. I am cutting wood for next year now. I have some dead trees that need to come down that should give me at least several cords of wood.

It is most likely that the wood you purchased would not burn well in an EPA stove which require wood with <20% moisture. If you got the amount of wood you paid for and it was split and dried for a few months then that's all you can really expect from a dealer. In order to get that wood dry enough for a new stove it would take another year (at least) properly stacked in a good spot.

Wood and wood quality is a whole 'nother subject that I would at least become familiar with. Standing dead does not mean dry in most cases although some, especially lodge-pole pine seem to be usable right away.

Use what you got and give it a good amount of air. Monitor stove temps and keep an eye on the cap. If the cap starts looking gunked up it may be time for a mid-season sweep.

Enjoy the heater! Sounds like it's been set up correctly and will give some nice heat to the house.
 
For starters it is not an EPA unit. Still I would say burn what you have for now. Put a thermometer on it so you can monitor temps and see how she works. Build up a supply of wood and get it drying. That stove will be more forgiving of semi-seasoned wood than a new EPA certified unit would.

After you have some experience and some truly seasoned fire wood you can make a change, or maybe you decide to keep it. You can burn an older unit reasonably well with dry wood and good practices but the down side is you will use more wood than you would with a newer unit.

Thanks again everyone for your replies. I have been burning on and off and believe I am getting the hang of this stove, but I think I may be running it too cool. The wood I have is about 20%-25% and burns well, but I struggle to keep good flames without running the temps too high. 3-4 2" pieces is just about perfect, but I am constantly reloading.

Which brings me to my next question. Jatoxico, you mentioned adding a thermometer. I put a magnetic thermometer on the top plate of the insert right above the bear (right where the metal trim piece is caulked in. If I put more than 2-3 large (4" or so) pieces on a hot coal bed, they will easily run that thermometer up to 600^F. I have been trying to keep it just under that so the flue temps don't get too hot. Plus, the stove starts to give off a chemical smell at that, even after many fires.

Any thoughts on where and how I should be taking better temp reading?
 
Any thoughts on where and how I should be taking better temp reading?

If possible (if wood will allow) as you build a coal bed try using larger splits. 2" splits will burn hot and fast so try throwing 1 or two larger pcs in with a few smaller ones. 600 is not excessive but I'd like to see you push that thermo back away from the front but I see that may not be possible. Another option is to get a cheapo IR thermometer so you can shoot different parts of the stove.

Main thing is no glowing, turn off the lights if you have to. Loading a hot stove takes some learning. Loading on too hot a coal bed and you can get out of control. Mostly folks rake the coals forward to consolidate them then load. I would go with the larger splits on a reload and see if that helps give longer burns while keeping the temps within a safe range.
 
In my experience the older stoves need larger splits to operate properly. As has already been mentioned small splits burn too quickly in older stoves. I only use something as small as 2" on start up fires.
 
Status
Not open for further replies.