Woohoo! I reached an important part of the chimney!

  • Active since 1995, Hearth.com is THE place on the internet for free information and advice about wood stoves, pellet stoves and other energy saving equipment.

    We strive to provide opinions, articles, discussions and history related to Hearth Products and in a more general sense, energy issues.

    We promote the EFFICIENT, RESPONSIBLE, CLEAN and SAFE use of all fuels, whether renewable or fossil.
Status
Not open for further replies.

EatenByLimestone

Moderator
Staff member
I set the bottom cut out block for the thimble on top of the stack today! Pretty soon I will be cutting through the wall for the thimble and cutting up the roof overhang to let the chimney through.

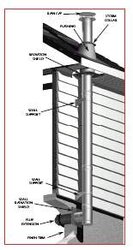
Does anybody know any links showing how somebody cut through the edge of the roof and flashed around it?

Matt
 
I applaud your effort and ambition. Me I just look at the chiment roof flange and cut it in from there I can tell you how to flash and roof it in. You do have a sawsall? Strip the shingles above and cut and flange placement. Its ok to cut out 1/2" larger that the pipe diameter
 
Here's a pic of what I am doing. It will probably help since I'm not the best with words.

http://www.woodworking-galleries.org/pp/data/500/medium/Chimney727.jpg

I see folks attach a small pic, but I'm not sure exactly how to attach it and standard stuff doesn't seem to be allowed

The blue painters tape line measures 2 feet down from the inside ceiling. My thimble is going to be below the line of tape.

I need to extend the chimney up through the roof overhang and the inspector wants the chimney top (at least) above the window of the 2nd story. I have a sawzall to cut out the roughly 8" of overhang. I'm not exactly sure what I will find or come across when I cut it open, but want to make sure that no water or critters can find their way inside. What would you use to cover up the opening in the overhang itself? Would a sheet of aluminum or steel satisfy code? I'll do regular flashing above the roof to the chimney. Also, when the chimney goes through the overhang, it will only be going through around 8" of it. Can I get by with only flashing or should I try my hand at saddle building?

In the upper right corner of the photo you can see some tree limbs hanging in from a neighbors tree. That tree will be cut back pretty far. Right now it's close enough for tree rats to easily make the leap.

Matt
 
is there a reason you did not use a PreFab pipe instead of a Masonary chemney?
 
Gideon said:
Hearthtools, good question. I'm curious too. Maybe it's a question of money - them prefabs are 1.5 grand+ for an outside one, aren't they?
depending on the size of pipe someting like that would be about $900 to $2,500 but it would be a lot less work and look nicer.

In California Due to Earthquake code most masons are now using RESIDENTAILINSULATED STACK(RIS) for Fireplaces.
they have sizes up to 24"

but if his install is just for a free standing wood stove he could use 6" Class A
 

Attachments

  • iccoutwall.jpg
    iccoutwall.jpg
    9.4 KB · Views: 411
The ladder isn't plumb. Sorry. I had to move it around when I went over the latest joints to smooth them out. The chimney is plumb. It is checked each and every block. The joints aren't the prettiest looking, this is my first masonry project, but they are strong and will hold. I figure I can cover the chimney with something later if the look bothers me.

There are two reasons I went masonry instead of pipe. First is cost. When I first started researching chimneys, I figured a steel pipe would be less expensive and quicker to install. I called a few places and was quoted over $100 a foot... Those were installed prices, but the cost for pipes alone looked to be a bit expensive on their own.

Then on an off chance I called the local block company. They quoted me around $300 for a 15 foot masonry chimney. They didn't include the foundation in the quote, but I could see it would be cheaper than going the metal chimney route. Around $300 will get me to the roof, not including the thimble. About 5 feet underground is a footing that is a foot thick, and extends 7 inches out from the chimney on each side. There are a few pieces of 1/2" rebar going up to a couple inches below the cutout. Between the cutout and footing is chimney block filled solid with concrete. My 8x8" clay flue extends all the way to the cutout. My inspector suggested this so I can clean the chimney out from the bottom.

The second is safety. I want to avoid a chimney fire, but have to consider that one may happen. I read somewhere that class A pipe is only rated for 5 minutes of a chimney fire. That's spookey. I'm hoping that a masonry chimney will last a bit longer. At least until the fire dept arrives if they are having a slow day.

If there is something I should know about, either safety wise or with my reasoning above, please let me know.

Matt
 
Well, I would rather him be honest. He has much more experience than I do in this matter. I certainly don't want any fire hazards. If there is a problem I find out about now, I can fix it before it gets expensive.

Matt
 
Re: the vinyl behind the chimney.

I specifically asked my inspector about this. I wasn't sure about it. I had seen some with wood siding behind them, but not a synthetic. He wasn't too worried about it. I asked him again when I was worried about the thimble going through the vynal and he suggested I look into products like the BDM insulflue. I was worried about the clay thimble that the block company sold me conducting heat around it. The insulflue has an insulator that allows a smaller hole.

Please let me know if my inspector should be trusted!

Matt

Edit: It's a bit odd, since he said he had been cutting and burning his own wood as the sole heat for his house for over a decade.
 
Most 2100 degree Flue pipe is rated at 30min chimney fire. And then you can replace the Sections that Collapse some times and no cost to you.
Clay flue tile WILL break and or crack in any flue fire and it is very hard to replace after they are damaged. (The TV show Dirty Jobs showed this example when he visited the Chimney sweep guild Training center) The started a flue fire in a chimney and in 3 minutes you could hear the flue tile(s) break)
This is why Chimney sweeps make fortune RELINEING Clay tile chimneys with SS insulated liners.

A 48” section of 6" ISS is around $145

I just did a rough est on my sales program at home. The prices are last years but for a 20 feet out the wall and up install with clean out T (like the photo I have in my other post.)
Would be around $1400 and would take a NOVIS about half a day to install.
Time is money and you must have about 40 hours in what you have now.
The cost above includes componets like the T, Wall thimbles, flashing, cap, Brackets Ect.

Also the flue pipe is warranted unlike clay flue tile.
<Snip from ICC warrantee>
Replacement of any components which fail as a result of normal use on a residential fireplace, wood burning stove, furnace or boiler and includes replacement of any components damaged as a result of a chimney fire.
Full replacement for 10 years 50% for life time after 10 years.
</end of snip>
 
I am trying to figure out what you are doing? are you building a manonry chimney up to class A top?

Where do you live is frost an issue? If so then what provisions have you done to support that weight and prevent frost heaves? What I do is, dig out the area past the frost, which is 4' in my area. Then I figure what size and thickness I need to pour a concerte footing. Code governs the size in relation to the chimney dementions. I them did down one foot more and fill it with 3/4" crush stone. The stone allows water to drain and flow independent of the footing. All this assumes your have soils able to support the weight. I then drill into the existing foundation and pin it with re rod pouring the concrete footing , where the rerods pins are embeded in the slab. Next I plumb lines each side of the chimney and cut out the siding and slide in J channel. As each course of chimney block is installed, I attach wall ties in the mortar joint attached to the sheathing or boarding. Better yet 8d nails into a stud and wall tie. I make sure I tar paper behind the chimney blocks and the boarding. That's where you should be now.

What puzzles me is what you intend to do next. Are you building an entire masonry chimney block chimney? I do not see any clay liners in the chimney or present on the site? If you are going to make a threw the wall cut, are you using class A from that point up? If so what purpose does the block chimney serve? What about an ash cleanout door? what about the connection thimble?

What about using double wall connector pipe only 6" clearances into a round clay thimble connected to the 8/8 clay liners? The rest of the way up. So how does that work? you cut out a box threw the wall and remove combustiables a little bigger than 24" pipe = 6" clearance 6" on all sides =24" into the round clay thinble cement it in and obtain your correct height. I supose you also could use an approved liner inside that chimney block instead of clay but you would have to support it and center it. It is a lot simpler than imagined. You could use wire wrap it around the liner and cement it in the mortar joints. I know its hard to place the blocks around and over the liner? Then why not use 1/2 chimney blocks? 2 halves = one whole. you have to explain what you are trying to do. Im guessing here . Did you know you could stucco that chimney to give it more of a finnished effect? You can even dye the stuccco mortar to say red? Remember My prior post I applauded your effort there are so many questions about frost levels footings I cannot advise what is best. Wall ties are a code issue and required. Chimney block is only 3.25" thick not 4" required and vinyl siding behind it? with only 3.25" insulated liner?
 
Thank you for answering so late. I'll try to answer as best I can. I'm pretty tired, so if it doesn't make sense I'll try to explain better tomorrow.

I agree with you that time is money. Sometimes this arguement makes sense, but when you have the free time... When I have little ones running around I'm sure that my free time will be better spent with them. Right now it's just me and the wife. The wife is usually about 30 feet away in the garden or just inside the windows studying. I usually look at it as the boss isn't paying me when I'm at home and I'm staying out of my wife's hair. (Probably priceless in her mind.) It saves a good deal in auto maintenance too. I also like her around when I'm setting a block while on a ladder.

I had no idea that metal chimneys were rated for such a long fire. If the masonry chimney was destroyed in a fire, I'd probably cut it down piece by piece and rebuild it.


I am trying to figure out what you are doing? are you building a manonry chimney up to class A top?


It will be a masonry chimney all the way to the top. I only mentioned the metal chimney and what I read regarding them to explain why I decided to build a masonry one.


Where do you live is frost an issue? if so then what provisions have you done to support that weight and prevent frost heaves? What I do is dig out the area past the frost which is 4’ in my area Then I fugure what size and thickness I need to pour a concerte footing code governs the size in relation to the chimney dementions I them did down one foot more and fill it with 3/4” crush stone The stone allows water to drain and flow independent of the footing All this assunmes your have soils able to support the weight. I then drill into the existing foundation and pin it with re rod pouring the concrete footing where the rerods pins are embeded in the slab. Next I plumb lines each side of the chimney and cut out the siding and slide in J channel as each course of chimney block is installed I attach wall ties in the mortar joint attached to the sheathing or boarding better yet 8d nails into a stud and wall tie I make sure I tar paper behind the chimney blocks and the boarding. That’s where you should be now.


Frost is an issue here. Schenectady is located just west of Albany... where the Mohawk and Hudson Rivers come together. My footing is 100% below the footing for the house, in undisturbed sand. It is a foot deep, and extends out 7 inches in each direction (except the side facing the house) from the 16x16 block. Code was 6", so I figured I was doing well to go the extra bit. I figured the weight wouldn't hurt. Just before pouring this, I got the funny idea that the actual chimney may come loose from the footing and fall over since they were going to be different pours. I threw (3) 1/2" bars of rebar into the footing to tie the chimney to the footing. I figured for the $6 it cost it was cheap insurance. The bars go from the soil below the footing up to just below the cutout door. Over this rebar, I placed chimney blocks and filled them with Quickcrete to make the whole piece solid. It's filled in slowly and with lots of water usage to keep any air pockets out. I backfilled around many fiberglass pools in the same way when digging was my job in H.S. (It's amazing what a guy will do in H.S. for $6.50 an hour... in South Florida... 10 yrs ago.) As I go up, there is a tie in every 3 blocks. The ties are little pieces of corregated metal. I hold them in with large wood screws that go much deeper than they probably need to. If that chimney wants to go, I don't think 10 screws going into OSB will hold it. If starts to lean they will probably give you enough warning to arrest the problem before it falls.


[/b]What puzzles me is what you intend to do next. Are you building an entire masonry chimney block chimney? I do not see any clay liners in the chimney or present on the site? If you are going to make a threw the wall cut are you using class A from that point up? if so what purpose does the block chimney serve? What about an ash cleanout door? what about the connection thimble? [/b]


It will be a 16x16 masonry chimney all the way to the top. It will be lined with 8x8 clay "tubes" from the cutout door all the way to the top. They are joined by refractory cement. The last flue tube I've put in is about 5" below the top that you see. I only picked up enough block and liner to go just above the roof. Then I'll have to go back to the block yard. Since I'm almost at the roof level, I only have 2 liners sitting back there. One has the thimble hole in it. I have not installed the cleanout door yet. It seemed like something that could be done at the end and I could have easy access to remove any mortar that fell down inside the chimney when troweling or setting the block up there.


Continued...
 
what about the connection thimble?

I didn't like the 6" clay cylinder that the block company sold me. I ended up with one of these.

http://www.dalsinmfg.com/links/insul_flue.html

What about using double wall connector pipe only 6” clearances into a round clay thimble connected to the 8/8 clay liners? The rest of the way up. So how does that work? you cut out a box threw the wall and remove combustiables a little bigger than 24” pipe = 6” clearance 6” on all sides =24” into the round clay thinble cement it in and obtain your correct height. I supose you also could use an approved liner inside that chimney block instead of clay but you would have to support it and center it. It is a lot simpler than imagined. You could use wire wrap it around the liner and cement it in the mortar joints. I know its hard to place the blocks around and over the liner? Then why not use 1/2 chimney blocks? 2 halves = one whole. you have to explain what you are trying to do. Im guessing here . Did you know you could stucco that chimney to give it more of a finnished effect? You can even dye the stuccco mortar to say red? Remember My prior post I applauded your effort there are so many questions about frost levels footings I cannot advise what is best. Wall ties are a code issue and required. Chimney block is only 3.25” thick not 4” required and vinyl siding behind it? with only 3.25” insulated liner?

The flue liner will go all the way from the top to the cutout door. The liner is fully supported. Those blocks are not much fun setting in place, especially from the ladder. It's slow, but with the ladder at a low enough angle it's do-able. I had no idea they made half blocks. It would certainly be nice juggling 30lb blocks instead of ~60 lb ones. Unfortunately, when I get above the roof I'll have a nice place to stand while setting them again. It should be easy except for the top few. I planned to coat the outside eventually. Not this year, but next year or so. There is a small air space between the siding and the chimney.

Once again, thank you for your help. I'll check back again before I have to leave for work tomorrow. Please let me know if anything I typed did not make sense.

Matt
 
Way to much work for a wood stove install
I was off on my est on pipe because looking at the photo you do not need 20 feet of pipe only about 8 feet of pipe if you are 10 feet from the 2nd story.
 
Status
Not open for further replies.