Zero Clearance Help - FP 30 install

  • Active since 1995, Hearth.com is THE place on the internet for free information and advice about wood stoves, pellet stoves and other energy saving equipment.

    We strive to provide opinions, articles, discussions and history related to Hearth Products and in a more general sense, energy issues.

    We promote the EFFICIENT, RESPONSIBLE, CLEAN and SAFE use of all fuels, whether renewable or fossil.
3. Where does everyone like having their blower switches? I'm guessing mine will end up on left or right side wall. Ironically I have a spare switch on the main bank of light switches in this room that controlled the wall lights on either side of the old wood stove. I wanted to splice onto these for simplicity, but my wife doesn't want the fan controls over with the light switches.
edit: 4. PE manual says remote duct can run a max of 20'. Do people follow this spec, or does upgrading to a higher CFM fan allow for longer runs?
3. Not sure if you have any home automation / smart home switches in your house but I will say it is nice being able to turn the fans on and off remotely with your phone or a smart speaker. You can setup automations to redirect airflow to the remote duct kits if the main room gets too warm or above a certain temperature. I use Caseta smart switches which are compatible with Apple HomeKit, Google and Alexa.

4. I don't have any experience with longer runs but if you insulate a longer run and have a more powerful fan, it should lengthen the distance you can pull heat through the ducts. The specs they list are for their duct kits and from what our installers told us, almost none of the manufacturers make great remote duct kits. For less money than the manufacturers duct kit, I designed my own and it performs much better and should last longer
 
Our switches are on the "side wall" and we don't mind them there at all. They are something you flick on and off often. Wherever they are easy to access would be my recommendation. IIRC romex is what our electrician used. We did have to adjust our main fan a few times to rid harmonic vibrations. Burning before you completey encase the unit allows this to be done easier.
 
  • Like
Reactions: begreen
Well I'm sold on a second remote duct run that will be 'custom' designed... I'm going to run the OEM kit to the close side of my basement, and go custom over towards the far side.

The OEM kit uses B-vent (temp rating 470F). Semi-rigid Aluminum duct is rated to 435F (for dryers and range hoods) and much cheaper/easier to work with. It seems like I could use this duct and then insulated after I get below the chase. Curious what others have used for custom ducts? The smart switches are very appealing, but I don't think I'm quite ready to dive into all that yet.

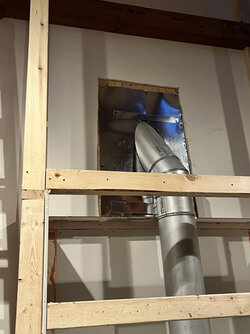
I got my flue ran and bricks installed on Thursday, and sealed up around the wall penetration on Friday with mineral wool and sheet metal (still need to caulk with HT Silicone). Last night with my infrared temp gun this was the warmest spot on my exterior wall.

I'm going to start breaking the stove in this week. Are the smells/fumes that the manual warns about really going to be that bad??? A friend just broke in a new Quadra Pioneer II and didn't mention having any with his wife/kids being around for the first couple burns.

IMG_5539.jpg
 
It's not just the temperature rating that's important. This is infrastructure, buried behind walls. The purpose of using B-vent is for its reduced clearances. B-vent is a double-wall pipe with an insulating air layer. Dryer vent is single-walled and is not approved. Note there must be a B-vent firestop between floors.
 
  • Like
Reactions: bcar
Well I'm sold on a second remote duct run that will be 'custom' designed... I'm going to run the OEM kit to the close side of my basement, and go custom over towards the far side.

The OEM kit uses B-vent (temp rating 470F). Semi-rigid Aluminum duct is rated to 435F (for dryers and range hoods) and much cheaper/easier to work with. It seems like I could use this duct and then insulated after I get below the chase. Curious what others have used for custom ducts? The smart switches are very appealing, but I don't think I'm quite ready to dive into all that yet.

I got my flue ran and bricks installed on Thursday, and sealed up around the wall penetration on Friday with mineral wool and sheet metal (still need to caulk with HT Silicone). Last night with my infrared temp gun this was the warmest spot on my exterior wall.

I'm going to start breaking the stove in this week. Are the smells/fumes that the manual warns about really going to be that bad??? A friend just broke in a new Quadra Pioneer II and didn't mention having any with his wife/kids being around for the first couple burns.

View attachment 319600
I have broken in two stoves (one being a PE Alderlea) and I don't remember the fumes being that bad, really. I know in the Zero Clearance Fireplace we just installed, during the break in process, we set our fire alarms off a few times.

Also good to remember, even after the break in process, any new high temp hit in your burning could cause you to smell fumes again. I know that we thought we were done breaking in our fireplace and during one of our "real" burns I started to smell fumes again (fire alarms might have went off, too) and that signaled a new high temp hit.

We have been good to go since, though.
 
  • Like
Reactions: bcar
I have broken in two stoves (one being a PE Alderlea) and I don't remember the fumes being that bad, really. I know in the Zero Clearance Fireplace we just installed, during the break in process, we set our fire alarms off a few times.

Also good to remember, even after the break in process, any new high temp hit in your burning could cause you to smell fumes again. I know that we thought we were done breaking in our fireplace and during one of our "real" burns I started to smell fumes again (fire alarms might have went off, too) and that signaled a new high temp hit.

We have been good to go since, though.
Exact sme experience with our fp30.....also be ready to hear new pings , pops and bangs as the stove comes up to temp amd or reaches a new high temperature. I will also mention that when your running the remote fans that they will signicantly reduce the heat output in the stove room. If the stove room temp is below your desired temp, I would either 1. turn the remote fan off and turn the unit fan on. Or 2. Keep the remote fan on and also turn the main unit fan on. (Both fans are on medium speed setting when I do this). Utilize your fans for the location(upstairs/downstairs) you are trying to "set" the room temperature for. Stuffing more wood in is a temptation , but usually not necessary.
 
I'm lighting my first fire tomorrow morning, so I'm getting pretty excited! I still have a lot of other work to get done, but slowly plugging away.

Having the option to redirect heat away from the stove room was a big one for me. I always hated opening the windows when the room got too hot with my old stove, seemed like a waste of resources.

On another note, I have 17' of flue from the top of the unit which gets me 3' above my roof to the bottom of the cap, and also have an OAK. I was planning on having 6.5" from chase cap to bottom of flue cap. A buddy said his recent installer told him to go 18" above the chase, and that I should add another stick to get mine higher. So, if I'm going to be changing anything around should I add another 12" or 18" stick of pipe, lower my chase walls, or just leave it alone?
 
Got a fire going this morning! My draft is pretty weak. OAK duct is still in the house, but with the windows open it should be drawing the same as 'outside' I would think. Will adding another 12 or 18" of pipe make any kind of noticeable difference in draft?
 
What is the outside temperature? It makes quite a difference at times....can you take a picture or short video and post it of the flame activity? Just checking that you do have the air intake/draft lever slid all the way to the left for full draft ?
 
What is the outside temperature? It makes quite a difference at times....can you take a picture or short video and post it of the flame activity? Just checking that you do have the air intake/draft lever slid all the way to the left for full draft ?
outside was probably 30-35 this morning. Yep draft lever was wide open. Getting started was pretty slow and I had to leave the door cracked for quite a while. Burning split Ash that's been drying since January probably. It was still pissing a little bit of moisture out the ends. Once I got everything going good and the stove heated up I would say I have too much draft now. With draft lever fully closed I'm still getting what I would consider to be a lot of flames, and I don't see being able to burn over night with that kind of draft. I know it'll take some getting used to also. Mostly I'm just glad to be sitting in front of a fire again!
 
  • Like
Reactions: mcdougy
Congratulations!! You should be able to get a firebox full of just secondary flames and not much flame coming off the logs themselves.
 
  • Like
Reactions: bcar
The way the stove is loaded and the timing of air regulation make a difference. Pack it tightly N/S and close down the air as quickly as possible without extinguishing the flames. Here's a primer on how to run the fireplace. It has essentially the same firebox as the T6.

 
The way the stove is loaded and the timing of air regulation make a difference. Pack it tightly N/S and close down the air as quickly as possible without extinguishing the flames. Here's a primer on how to run the fireplace. It has essentially the same firebox as the T6.

I had been referencing this thread previously also, but at this point I'm very hesitant to load my stove up like that. Maybe I'm still not turning air down soon enough, but the attached video (if it uploaded correctly) is with front air control fully closed, and my OAK duct mostly blocked off. This is a more extreme example of my fires thus far, but I just feel like I can't get it choked down and the first hour after a start/reload burns very strong.
 

Attachments

  • IMG_5594 (1).MOV
    1.7 MB
The digital flue thermometer has been the most helpful tool for knowing when to turn down the air and how quickly. It sooner and further than one might think going just by eye.
 
I suggest putting furthest from the stove as possible. I believe KC...... used the muffler and thought it worked well. Try it without and the muffler can always be put in later if desired. You will be much happier with this purchase vs the oem supplied fan. Ours exits down in the basement, I don't go down there much so I can really say whether it's too loud without the muffler or not. Sounds great from upstairs 😉
 
I suggest putting furthest from the stove as possible. I believe KC...... used the muffler and thought it worked well. Try it without and the muffler can always be put in later if desired. You will be much happier with this purchase vs the oem supplied fan. Ours exits down in the basement, I don't go down there much so I can really say whether it's too loud without the muffler or not. Sounds great from upstairs 😉
Mine will be going in unfinished basement that we don't use a whole lot as well, so I'm not too concerned about the noise either. This FP30 is a super heater though, so it will be nice to get some heat pulled away from our great room. I raised room temp by 10 degrees in two or three hours a few evenings ago w/outside temp being in the 30's, and the stove was far from full.
 
  • Like
Reactions: mcdougy
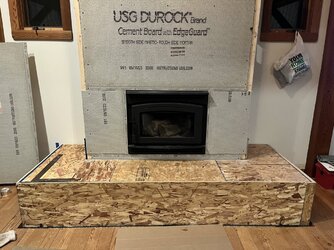
Hearth framing is coming along nicely... stone is delivering in just over 2 weeks!

edit: OSB will be replaced with Durock in the ember protection area of the hearth before stone is installed

IMG_5744.jpg
 
  • Like
Reactions: mcdougy
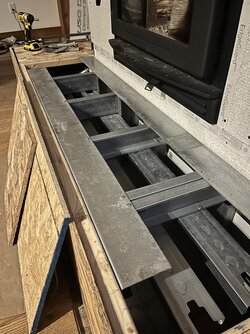
Cement board alone is not sufficient in strength to support a lot of weight, particularly not over a 16" span. If concerned, put down a sheet of metal over the OSB, then cement board and tile.
 
yeah the cement board is pretty flimsy. I have quite a bit of framing for the cement board, it's only spanning 8.5" between the two angles. I was going to insulate under the hearth stone for sound which is what the two flat 2x4's underneath were for. After thumping on some friend's hearth stones I'm not too concerned about sound so not planning to insulate now.

IMG-5767.jpg
 
  • Like
Reactions: mcdougy
yeah the cement board is pretty flimsy. I have quite a bit of framing for the cement board, it's only spanning 8.5" between the two angles. I was going to insulate under the hearth stone for sound which is what the two flat 2x4's underneath were for. After thumping on some friend's hearth stones I'm not too concerned about sound so not planning to insulate now.

View attachment 322035
Just asking....you are saying hearth stone....does that mean a full piece of stone a 1 1/4ish" thick ......or are you planning on something like a ceramic tile for the hearth? Ceramic will need to be well supported with no chance of flex, to eliminate cracked tile or popped grout. A solid slab of stone will work just fine on top of the cement board.
 
Just asking....you are saying hearth stone....does that mean a full piece of stone a 1 1/4ish" thick ......or are you planning on something like a ceramic tile for the hearth? Ceramic will need to be well supported with no chance of flex, to eliminate cracked tile or popped grout. A solid slab of stone will work just fine on top of the cement board.
we're doing a solid 2 1/4" thick slab of limestone.
 
  • Like
Reactions: mcdougy
we're doing a solid 2 1/4" thick slab of limestone.
OK, it was just a question of strength for me. If the thick limestone will bridge across the stud spans so that it's fully supported, then it should work out.
 
I got the AC Infinity hooked up in my basement yesterday. Super easy install... 110v plug, and doesn't even take batteries for the T-stat. It came w/ a temp probe also that I'm considering running back up into the chase to program the fan to kick on/off. I do get a pretty good air whooshing effect from my main upstairs room if I turn the fan up over 4 or 5 out of a max of 10. Stone should get here in about a week
 
  • Like
Reactions: mcdougy