
Inside the tank I installed two pieces of copper across the tank, they sit at about 32" off the floor. I have headroom issues above the tank since it is in the basement, so I will compress the coil, open it up once it is inside the tank, and use copper wire to suspend the coil off the two copper pipes. The support pipes will also serve as a base to support the upper exchanger...
Non Pressurized Storage...
- Thread starter GENECOP
- Start date
-
Active since 1995, Hearth.com is THE place on the internet for free information and advice about wood stoves, pellet stoves and other energy saving equipment.
We strive to provide opinions, articles, discussions and history related to Hearth Products and in a more general sense, energy issues.
We promote the EFFICIENT, RESPONSIBLE, CLEAN and SAFE use of all fuels, whether renewable or fossil.
You are using an out of date browser. It may not display this or other websites correctly.
You should upgrade or use an alternative browser.
You should upgrade or use an alternative browser.


I have a couple of concerns, the bulkheads are stamped Epdm...so the water temp should be OK, The thermo well is stainless, so I will be threading plastic to metal at the most vulnerable point...Teflon tape and crossed fingers, any suggestions? Also I purchased some high temp silicone, should I run a bead behind the rubber gasket or just trust the bulkhead gasket as it comes...


Was not comfortable threading stainless to plastic, so I found some transistion pieces at Grainger, ordered them today, will post photo when they come...I installed a bulkhead fitting today, used liquid Teflon on the thread, and backed up the rubber gasket with a small bead of high temp sealant...made a special tool to tighten the fitting...


Was going to use a steam boiler site glass to monitor the water level, It would have required two more holes through the tank. I decided to use a lid mounted level, float...not as nice, but fewer penetrations.
[URL=http://s260.photobucket.com/albums/ii25/genecop/?action=view¤t=4bc0e90dc8060ccba880bfce0440d01e.jpg] [/URL]
[URL=http://s260.photobucket.com/albums/ii25/genecop/?action=view¤t=4bc0e90dc8060ccba880bfce0440d01e.jpg]
[/URL]Attachments
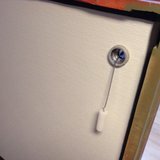

[URL=http://s260.photobucket.com/albums/ii25/genecop/?action=view¤t=f0546029779929b83170d34d85c2e362.jpg] [/URL]Not sure how much evaporation I will get, I am sure I will have to add water once in awhile..I can set up to easily do it manually, or I could use this float I picked up. I could wire to a valve the opens when the circuit closes...
[/URL]Not sure how much evaporation I will get, I am sure I will have to add water once in awhile..I can set up to easily do it manually, or I could use this float I picked up. I could wire to a valve the opens when the circuit closes...Attachments
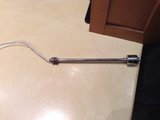
Lastly, for tonight, here are two feeds, two returns exiting the tank..
[URL=http://s260.photobucket.com/albums/ii25/genecop/?action=view¤t=dfe10f5bb087066870478a89a4ae1f05.jpg] [/URL]
[URL=http://s260.photobucket.com/albums/ii25/genecop/?action=view¤t=dfe10f5bb087066870478a89a4ae1f05.jpg]
[/URL]Attachments
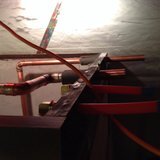
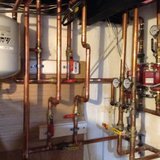
Added the top HX section that I originally built for the charge coil, now it fits on the top end of the tank and will hopefully pull heat off. A few more connection to make, then one of my Plumber buddies will come by next week to help me tie the whole thing into the heating system..
[URL=http://s260.photobucket.com/albums/ii25/genecop/?action=view¤t=53102985ad0a6712b2c31fecabed0652.jpg] [/URL]
[URL=http://s260.photobucket.com/albums/ii25/genecop/?action=view¤t=53102985ad0a6712b2c31fecabed0652.jpg]
[/URL]Attachments
Then disaster struck..LOL...my plumber buddy showed up yesterday about 9 AM, we started running copper and gazing at the situation not 100% certain of what had to be done. About noon we where all tied in, pressurized the system, no leaks...THOUGHT we where home free, while bleeding the system we used the water to begin filling the tank, inch by inch, the tank held tough. Half way up, it's about 5 o'clock by now, dinner time. We have a quick meal, go back downstairs, 3/4 full, looking good, almost at the top...Tank Leak...panick mode., 2 hours later tank drained down, about 15 gallons hit the floor, shop vac, nightmare...finished cleanup about 9, passed out about 9:15. Woke up regrouped, short version , the entire tank has a steel frame welded, except the Bottom. The bottom was built out of wood sandwiched 1-1/2" foam, solid but wood, I created a lip that the walls slid into, then screwed from the sides.. Then concrete floor, coating, etc...I think as the weight of 400 gallons started to bear down, very slight settling / compression, occurred in the base, this settling caused a very slight separation between the floor and walls..i have to remove the exchangers, get in, and take a close look, from the top everything looks perfect, but there has to be a crack, it was leaking out pretty good..What to do now, because I hated the look of just shoving in a EPDM liner, I opted for a cement based coating, the coating did not have enough elasticity...I have two options as I see it, but I am open to suggestions. There are a few liquid EPDM products out there, this would be the easiest..Coat and go, there are also a few companies that will weld up a custom EPDM liner to fit the tank...not sure which way to go yet, the custom liner sounds safer..I am tired but not beaten, Happy Holidays, it's going to be near 70, who needs storage anyway..LOL
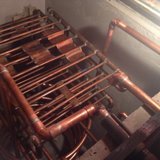
New work to the left in the photo...
[URL=http://s260.photobucket.com/albums/ii25/genecop/?action=view¤t=e61efbc1fffe3191ac99ac0e6fd8f879.jpg] [/URL]
[URL=http://s260.photobucket.com/albums/ii25/genecop/?action=view¤t=e61efbc1fffe3191ac99ac0e6fd8f879.jpg]
[/URL]Attachments
Getting ready for round two, drained the tank, got in, found several small hairline cracks in the bottom coating. Not 100% certain what caused the crack, 1000's of pounds of water bearing down on the bottom had something to do with it..LOL. One of my suspicions is when I meshed the corners, maybe I left air under the mesh, (Bridging) any hollow behind the mesh and coating would failed. Also , in the base I sandwiched 1-1/2" foam, maybe some compression, not sure. The tank is now dried out, everything looks perfect on the walls, so to treat the hairlines around the joint I am going to run a coating of Gluvit, not sure if anyone has used Gluvit it's a pretty amazing waterproof product. After that sets up Sherwin Williams has a line of commercial coatings, I will coat the entire tank again, Fingers crossed, this time I will fill and test the tank prior to installing HX again...
maple1
Minister of Fire
If this doesn't work out, Tom in Maine can hook you up with a liner.

Almost ready to go again, even though I will be confident in the tank I did want some insurance, 450 gallons in a finished space would not be good..I am hooking up an exterior pump 1500 gallons per hour. On the floor there will be two water sensors, if they get wet, the pump will go on and empty the tank...PVC / check valve/ it's a contraption, I will be testing it soon..
I haven't read this whole thread but if these waterproof coatings you're using are rigid rather than flexible you'll probably be going through this exercise again. Tough as they are, they don't like numerous temperature changes. I would use a sprayable silicone rubber coating.
I used to use various resilient industrial based tank liner coatings at work. Very few are rated for active movement that will hold up to the temps.
Lot to be said for Tom in Maine's PVC liners as long as you don't have any sidewall penetrations. Given your setup I don't know if he can help you but when it comes to heat storage tanks he has probably tried its all.
Lot to be said for Tom in Maine's PVC liners as long as you don't have any sidewall penetrations. Given your setup I don't know if he can help you but when it comes to heat storage tanks he has probably tried its all.
Similar threads
- Replies
- 10
- Views
- 2K
- Replies
- 4
- Views
- 2K
- Replies
- 13
- Views
- 5K
- Replies
- 20
- Views
- 1K