
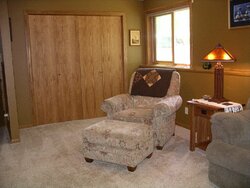
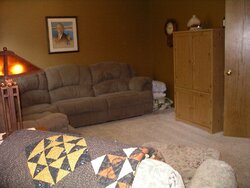
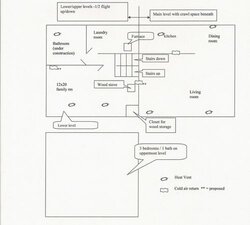
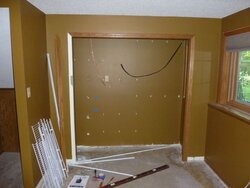
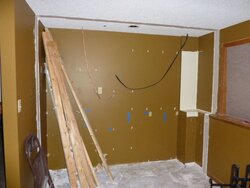
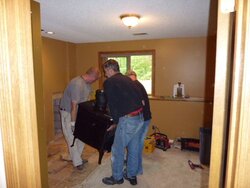
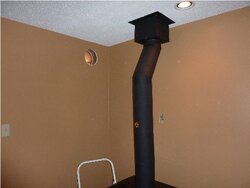
Here are the before pics, actually took them when I was looking to buy this house in summer 2008...no wood stove or fireplace was almost a deal breaker. The closet is where the T5 is going. I know, I know it's a tiny family room.
P.E. Alderlea T5 Installation (In Progress)
- Thread starter djlarson77
- Start date
-
Active since 1995, Hearth.com is THE place on the internet for free information and advice about wood stoves, pellet stoves and other energy saving equipment.
We strive to provide opinions, articles, discussions and history related to Hearth Products and in a more general sense, energy issues.
We promote the EFFICIENT, RESPONSIBLE, CLEAN and SAFE use of all fuels, whether renewable or fossil.
You are using an out of date browser. It may not display this or other websites correctly.
You should upgrade or use an alternative browser.
You should upgrade or use an alternative browser.
- Status
- Not open for further replies.

This is going to sound a bit radical, but would it be possible to install and support a header beam and then open up the wall between the closet area and the living room? Then the stove could face the living room, yet still heat the family room. It looks like that would help heat circulation a lot.
PS: I think you should start another thread for the installation of the T5. This looks like it will be very informative, but it's not about the Chimneysweep. If you start a new thread I think I can move the current posts about the install to it.
PS: I think you should start another thread for the installation of the T5. This looks like it will be very informative, but it's not about the Chimneysweep. If you start a new thread I think I can move the current posts about the install to it.
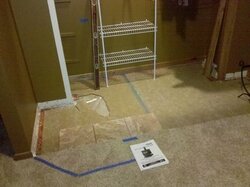
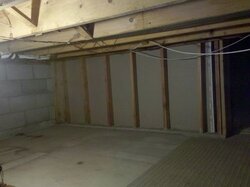
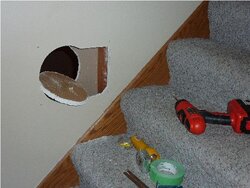
I'm not opposed to radical ideas....but the family room is 1/2-level down from the living room, so wouldn't work to have wood stove face living room. Could possibly pull out the 4-5' section between LR and FR, with header and railings to move air, hadn't really thought about that before. As far as air circulation goes, we're starting with what we have for this winter and modifying as needed. I don't need another project lined up behind the other 37 right now :ahhh: The attached pic is from the other side of the closet wall in the crawl space. The latest idea is to build a door to the right of the stove for access to wood storage in the crawl space.
I'll open another post.
I'll open another post.
Attachments
Ah, got it. I have my split level goggle on now. Sounds like a reasonable plan to try it out and see how it goes. If the upper part of the closet back wall is in common with the lower part of the living room wall, it wouldn't take much to cut a hole and install a register there later on.
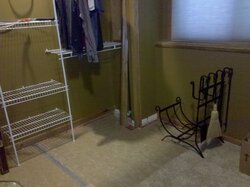
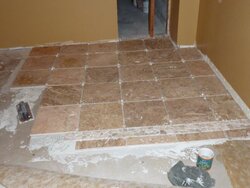
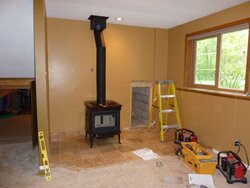
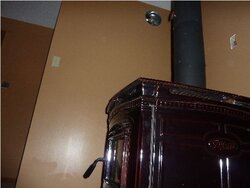
This is where I'm at now (2nd pic). Sheetrock patching on the walls and ceiling next, hopefully my roommate (painter) will take care of that for me. Then:
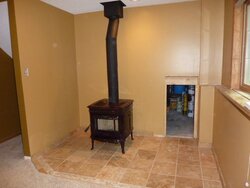
--Cut out/install access door for wood storage
--paint
--set tile and grout
--schedule stove installer
--Cut out/install access door for wood storage
--paint
--set tile and grout
--schedule stove installer
Attachments

Todd
Minister of Fire
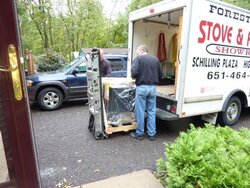
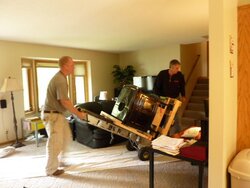
Looking good. That wood storage area looks like a great idea. I bet you wish you had it all done, today is a good day to fire up?
Hey Todd, it's actually installed and been fired up a few times - I'm playing catch up here. Just a few more tasks to be completed as you'll see in coming posts.
Attachments
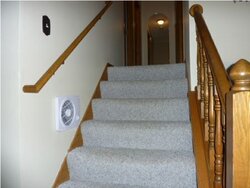
Through-wall fan is ready for the electrician. Had a fire last night (upper 30s) and the heat was passively coming out of the fan grate. A thermometer placed in the opening on the stove side read 100 degrees. Looking forward to what 200 cfm will do with that heat into our main and upper levels.
Attachments
madison
Minister of Fire
Thanks for the install pics, I always like looking at the progress and nice workmanship.
As has been recently discussed, a blower will really help with BTU output, i do not see the cord, but maybe it is hidden nicely behind the stove.
Also, besides the stack temp, hopefully it is a probe into double wall pipe and not a magnetic, most of the PE Alderlea threads comparing stove temps are monitored directly on the steel stove top, under the trivets.
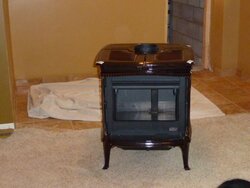
I am really digging the metallic brown.
Nice job all the way around.
As has been recently discussed, a blower will really help with BTU output, i do not see the cord, but maybe it is hidden nicely behind the stove.
Also, besides the stack temp, hopefully it is a probe into double wall pipe and not a magnetic, most of the PE Alderlea threads comparing stove temps are monitored directly on the steel stove top, under the trivets.
I am really digging the metallic brown.
Nice job all the way around.
Looking good MG. The enameled stove looks really sharp. Hope you will post some beauty shots of just the stove once it's burning. Keep us posted.
madison said:Thanks for the install pics, I always like looking at the progress and nice workmanship.
As has been recently discussed, a blower will really help with BTU output, i do not see the cord, but maybe it is hidden nicely behind the stove.
Also, besides the stack temp, hopefully it is a probe into double wall pipe and not a magnetic, most of the PE Alderlea threads comparing stove temps are monitored directly on the steel stove top, under the trivets.
I am really digging the metallic brown.
Nice job all the way around.
Thanks guys. No blower Madison, I'm going to try without and add if needed. It's a condar probe and I have a Rutland stovetop magnetic that I question how accurate it is. I'm getting stovetop readings of 600-700 while the flue thermo is 500-550. I read another post where BG indicated the higher stove temps are normal, so I'm pretty sure I'm ok, though I think I'm getting some gasket/door leakage which I put in another post.
Russ in Chicagoland
New Member
Looks great. I'm picturing a long "drawer" sliding into your storage area built out of a couple 2x4s and plywood on casters. Pull it out, load it up, slide it back in. Crawling in and out of that crawl space is going to get old quickly..
Russ in Chicagoland said:Looks great. I'm picturing a long "drawer" sliding into your storage area built out of a couple 2x4s and plywood on casters. Pull it out, load it up, slide it back in. Crawling in and out of that crawl space is going to get old quickly..
That's a great idea! We were thinking of stacking across the wall behind the stove and a friend of mine was saying something about an electric conveyor belt which sounded way too expensive. Hadn't thought of stacking the wood going straight back from the door. The well pressure tank is back there but probably about 10-12 feet back. It's also a slight drop from the tile to the concrete, maybe 5/16.
madison
Minister of Fire
MinnesotaGuy said:madison said:... though I think I'm getting some gasket/door leakage which I put in another post.
Search dollar bill test, for testing gasket leak.
and since I see the door was removed for moving the unit into your home, it is a bit of a pain, but you have to remove the side panel on the hinge side to access the three hinge bolts to square up the door. I posted some instructions/my experience a couple times, here is one link. https://www.hearth.com/econtent/index.php/forums/viewthread/34393/#365697
Once you get the hinge side adjusted, you can gently bend the latch catch on the opposite side to tighten/loosen the door latch.
MinnesotaGuy said:madison said:Thanks for the install pics, I always like looking at the progress and nice workmanship.
As has been recently discussed, a blower will really help with BTU output, i do not see the cord, but maybe it is hidden nicely behind the stove.
Also, besides the stack temp, hopefully it is a probe into double wall pipe and not a magnetic, most of the PE Alderlea threads comparing stove temps are monitored directly on the steel stove top, under the trivets.
I am really digging the metallic brown.
Nice job all the way around.
Thanks guys. No blower Madison, I'm going to try without and add if needed. It's a condar probe and I have a Rutland stovetop magnetic that I question how accurate it is. I'm getting stovetop readings of 600-700 while the flue thermo is 500-550. I read another post where BG indicated the higher stove temps are normal, so I'm pretty sure I'm ok, though I think I'm getting some gasket/door leakage which I put in another post.
About what position is the air control being set to when these temps are recorded? Can it burn ok with the air control all the way closed?
BeGreen said:About what position is the air control being set to when these temps are recorded? Can it burn ok with the air control all the way closed?
Closed all the way and that's with the primary taped off some. So yes it burns fine with air all the way shut off. Even though I'm new with this stove and this type of burning, it looks and seems like a fairly low/slow burning fire to me (have had decent burn times). However, it seems a little lopsided at times, with the back right of the stove burning slowest and front left burning fastest, which leads me to believe I may have an air leak. The baffle / secondary burn also seems to burn preferentially in diff areas. I confess to not completely understanding the secondary burn process yet but it seems like it's working properly at times and at times it's not.
The baffle design does make it burn hotter in the center than at the sides. The two place to check for leakage are all around the door gasket to be sure that the door is aligned correctly, parallel to the stove body, and the ash port. Front left burning faster may be related to the ash port not being closed all the way. Make sure that it is closed tight and that there are no ashes or charcoal fragments holding it slightly open.
- Status
- Not open for further replies.
Similar threads
- Replies
- 53
- Views
- 2K
- Replies
- 35
- Views
- 2K
- Replies
- 5
- Views
- 2K