Englander 50-SNC13I installation please help

  • Active since 1995, Hearth.com is THE place on the internet for free information and advice about wood stoves, pellet stoves and other energy saving equipment.

    We strive to provide opinions, articles, discussions and history related to Hearth Products and in a more general sense, energy issues.

    We promote the EFFICIENT, RESPONSIBLE, CLEAN and SAFE use of all fuels, whether renewable or fossil.
Status
Not open for further replies.

falkie

New Member
Feb 11, 2011
16
bremerton,WA
Hi,
I bought englander 50-SNC13I, but having problems with installing it. First of all I cannot find proper elbows and pipes. I read somewhere that I cannot use 45 or 90 degree elbows (against UL103). But, I cannot find double wall 30 degree elbows either. Can I use double wall stove pipes instead of stove pipes double walled? How do I connect then double walled pipes to the single wall pipe in the chimney?

Please help.
 
Welcome barnowl. Let's back up a bit and discuss the whole enchilada first. Describe the complete chimney installation so that we understand the problem you are trying to solve. How is the flue piping going to run, from stove to the flue cap?
 
And why you need 45 or 90 degree elbows or double wall anything to install a fireplace insert?
 
BeGreen said:
Welcome barnowl. Let's back up a bit and discuss the whole enchilada first. Describe the complete chimney installation so that we understand the problem you are trying to solve. How is the flue piping going to run, from stove to the flue cap?

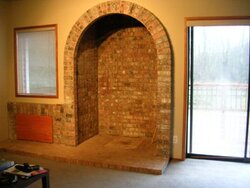
Well, I have got a masonry fireplace niche where freestanding stove was located (got rid of it). It is a brick structure that stands out to the exterior of the house. The height of the niche is about 100", 53" wide and about 45" deep. Dimensions of it more than enough for the insert (according to the insert manual). There is a single wall stainless steel liner runs through the chimney and about 6 inches of it sticks out of the concrete ceiling of the niche. The top of the stove is not aligned with that pipe that is in the chimney. I cannot push the insert deep into the niche also, since it will be sitting too deep. Now, to me it looks like I need to get adapter, connect 30 degree elbow to offset misalignment of the stove top and the liner , then 24" double wall stove pipe, another 30% elbow, 36 inches stove pipe, connector to connect liner to the stove pipe. Attaching pictures. Then, after all connected I am going to attach about 4 metal brackets to the walls on each side, screw a metal stripe to the brackets (some sort of wall studs), then screw to those metal stripes sheets of non-combustible cement board all the way to the ceiling to cover arch. Any suggestions how to accomplish my mission?
 

Attachments

  • DSCN2643.jpg
    DSCN2643.jpg
    20.6 KB · Views: 607
BrotherBart said:
And why you need 45 or 90 degree elbows or double wall anything to install a fireplace insert?
I need elbows for offset and double wall because I will be covering the front of the opening with cement board and double walls allow 6" clearance vs to 18" with single walls.
 
It should be against the law to cover up that beautiful alcove. Why do you not want a free standing stove in there?
 
BrotherBart said:
It should be against the law to cover up that beautiful alcove. Why do you not want a free standing stove in there?

+1000 I'd pee my pants if my house came with an alcove like that. Stunning.
 
Hate to say this, but you got an insert and this is not a fireplace. It is a stunningly beautiful alcove and should stay that way. With a good stove, it will heat and look much better. Also, that is not a true hearth if it is only a brick deep. That's why I asked. It is not designed for an insert, nor the freestanding 13NC stove.

Hang tight, we need to get you working well. What was the freestanding stove that was previously in place and why was it removed? Not enough heat?
 
Guys thank a lot for your replies!

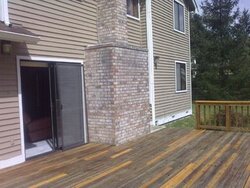
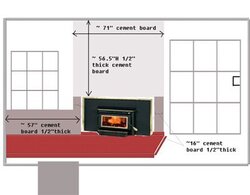
I understand that you like it, but why is that I cannot use the space for an insert? What makes it illegal to cover the front of it? BeGreen it is not one brick deep. There is a thick concrete layer underneath of the brick. I bought the foreclosure house and the previous owner sold the stove before I got in. But anyways, I would still get rid of it if it was there. Not really in my taste to have algoe fireplace. I already bought the insert and dont want really to return it. I am attaching two more pictures. One is the view from outside and another is my plan.

Please tell me how to connect all of this.
 

Attachments

  • 05162010044.jpg
    05162010044.jpg
    28.9 KB · Views: 510
  • fireplace -post-insert copy.jpg
    fireplace -post-insert copy.jpg
    14.7 KB · Views: 492
This is my idea: After connecting the insert, cover with non-combustible cement board all brick, cover the hearth both sides of the insert with black/white marble tiles (including the section under the window), and above the mantel, cover cement board with a venitian plaster all the way to the ceiling that will make that piece look like as it is made of whole marble piece.

Please tell me if it can be done.

Here are my questions:

1. what kind of double-wall stove pipes I should use? Can I use class "A" (not my choice, since they are extremely expensive, especially elbows). If I should use class A, how do I connect class "A" to the single wall chimney pipe that runs through the masonry chimney?
2. Looks like there was something screwed to the ceiling around the chimney pipe. Was it some sort of support box?
3. Can I use 45 degree double wall elbows to connect the stove pipes? I read somewhere that it is against UL103 code to utilize 45 degree, max allowed is 30 degrees, but I am able to find double wall 30 degree elbow stove pipe (black). The only elbows with 30 degrees available are the class "A" ones, but how do I put 3 screws in them (according to manual)
 
It'd be sacrilege to put anything but a lovely stove in there.


If you bought the insert from Englander, can you return it, and get a stove?


Welcome to the forums !
 
Doing The Dixie Eyed Hustle said:
It'd be sacrilege to put anything but a lovely stove in there.


If you bought the insert from Englander, can you return it, and get a stove?


Welcome to the forums !

Unfortunately I cannot return it and honestly freestanding stove is not in my taste I would rather cover the entire space without putting anything in there, than buying another stove and placing it there if get to keep the alcoe. Guys, please, tell me how to connect my insert, without talking me out of it. I am determined to get rid of the arch and brick by covering it.
 
Guys,

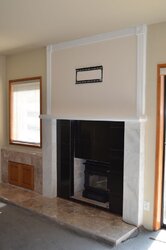
Regardless what you said, I did it. I even had the county inspector coming and approving the installation. Here is the picture of my project, compare it to the one shown previously.
 

Attachments

  • DSC_0011.jpg
    DSC_0011.jpg
    46.2 KB · Views: 398
That doesn't look bad. The alcove before looked Southwest to me. But this is more modern. You planning to heat on a regular basis with that small insert? Not to be critical, but it appears under-sized for the fireplace. Maybe it's just that it's recessed so far. I'm more used to seeing inserts protruding past the surround.
 
Well, you are right it is recessed a bit, but I did not want to use any elbows to compensate the stove's standing out to the room. I have not checked how much heats it outputs, but it has a blower, which might help a bit. The front black square panel in the middle i created a frame with angles , attached a cement material and granite on the top, then I hang that from the middle. It looks like solid, but removable. I did it removable in case i need to clean the flue from inside.
 
Well, I guess if your happy it's all good. I personally would have just refaced the brick with tile and put a freestanding stove in there but each to there own. Congrats on getting it done
 
Job well done. Big ole free standing stove would have given you a lot more heat though, "if" heat was your main mission. :)
 
Thanks a lot for liking it. I thought a lot about trapping heat in that niche and not being able to maximize heat radiation into the room. But my primary mission was aesthetics and some heat, in case if I lose power and my gas furnace blower stops. As long as this insert will not let my family freeze to death and help to lower a bit our gas bill then I am more than happy. Cant wait for winter to test it. Do you guys think I need RTV calking or sealing around flue joints? Can I use RTV sealant or it has to be special cement basis?
 
Looks like you did very nice work finishing the new space, but to be completely honest, I like the "before" much better than the "after"..... But the main thing is you love it!
 
No sealant should be used on the class A pipe joints. Keep us posted on how this works out in the winter. My concern is that with this setup you are going to be heating the outdoors a lot with the captive heat coming off the stove, especially without the blower running. If you have an IR thermometer, this should be evident on a 40 degree day with the stove going strong. I suspect you will even be able to feel the heat outdoors on the masonry with your bare hand. But if the stove is mostly for a nice fire view, maybe this is not a big deal.
 
BeGreen,

Thanks for your post. I have a black telescopic flue pipe rising up about 70" from the top of the stove that connected to the stainless steel (I think it is a class A) single wall flue pipe just about 5 inches below the ceiling level. The ceiling is cement and stainless steel flue pipe runs inside of the chimney lined up with chimney tiles all the way to the top. I wanted to apply the sealant around stove's top connector adapter, telescopic pipes joint and the place where black flue pipe joins the stainless steel. The granite plate that is below the mantel shelve is removable, so I kept the access to the flue in case I need it. I have heard that sealant is overkill and normally does nothing as long as the flue is working and air has a good pull.
 
Status
Not open for further replies.