
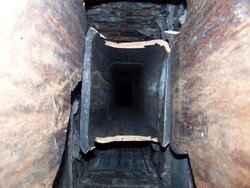
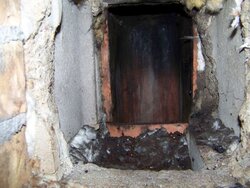
So I pulled my liner and took some pictures after I broke some tile to see what I got in there. Looks like they just stacked the tiles right on top of each other, I couldn't feel or see any mortar between the top few tiles. I've had one bid so far to rebuild the top, reline with Supaflue one of the two flues, replace the crown and seal the whole chimney for $4k. I suppose the other flue is similar but I just relined and insulated with perlite last summer so I don't really want to touch that side. I don't know, maybe I should just tear the whole thing down and get it done right? What would you do?
Starting My Chimney Rebuild (pics)
- Thread starter Todd
- Start date
-
Active since 1995, Hearth.com is THE place on the internet for free information and advice about wood stoves, pellet stoves and other energy saving equipment.
We strive to provide opinions, articles, discussions and history related to Hearth Products and in a more general sense, energy issues.
We promote the EFFICIENT, RESPONSIBLE, CLEAN and SAFE use of all fuels, whether renewable or fossil.
You are using an out of date browser. It may not display this or other websites correctly.
You should upgrade or use an alternative browser.
You should upgrade or use an alternative browser.
- Status
- Not open for further replies.
I'd keep exploring options. What happens if you do nothing other than a repoint and seal? If that will buy 15 years, that's the path I would take. Then replace the busted tiles, stainless liner and more perlite. Reassess in 15 years.
Yeah, I'm thinking of that option as well, but I have the money now and don't know if I really want to revisit this later on down the road. I also like the idea of the Supaflue system and how it helps reinforce and insulate the whole chimney. Lifetime warranty as well.
DanCorcoran
Minister of Fire
I know nothing about Supaflue, but when I hear "lifetime warranty" my first reaction is, "how long has and will the company providing the warranty be around?"
woodchip
Minister of Fire
DanCorcoran said:I know nothing about Supaflue, but when I hear "lifetime warranty" my first reaction is, "how long has and will the company providing the warranty be around?"
+1 .......
I have always been suspicious of lifetime warranties, never liked the idea of some company hoping they will outlive me ;-)
http://www.supaflu.com/index.htm
It's been around since 1979. The guy that gave me the bid has been doing it since 1984 and said he has never seen a problem or had a warranty. I wonder if an insulated stainless liner would have more R value than this Supaflue stuff? A wrapped s/s liner would be a few hundred less but I wouldn't get the added structure strength of the Supaflue.
It's been around since 1979. The guy that gave me the bid has been doing it since 1984 and said he has never seen a problem or had a warranty. I wonder if an insulated stainless liner would have more R value than this Supaflue stuff? A wrapped s/s liner would be a few hundred less but I wouldn't get the added structure strength of the Supaflue.
Backwoods Savage
Minister of Fire
Backwoods Savage said:Todd, isn't that the way those are built normally? Just stack the clay in there, that is.
I think it's up to code? The tiles on the bottom have mortar between but the top 2 must of disinigrated, there's a good 1/2" gap I can stick my finger inside between the tiles. I also have a lot of bad bricks and mortar, was told it would be best to just rebuild the top from the roof line up.
The house was built in 1975 and there was never any flue caps til I moved in back in 2003. I've been patching it ever since and I think it's time to get it done right. Once the top is off I will be able to see more. The other flue tiles are the older 13x13, I relined that one with a 6" s/s liner, filled the gap and old fireplace cavity with perlite so maybe they can pour that Supaflue around that tile without removing it. Work like this never goes as planned, prolly run into a few issues. Also looks like there is a wall between the two flues.
Backwoods Savage
Minister of Fire
Ya, do it right this time. I've seen lots of them that were put up in the 70's and 80's and they go bad rather quickly.
O
oldspark
Guest
I read an article about building chimneys back in the 70's and it said to stack the clay liners with out motor, so that is what I did with mine and the liner still looks good but the block is crumbly.
I would love to have poured in place liners in my flues. They are what the insurance companies usually have done.
Just can't go a year without changing something, can ya? :lol: You are as bad as I am.
Just can't go a year without changing something, can ya? :lol: You are as bad as I am.
Yeah BB I'm running out of things to change. I'm way beyond saving any money by burning wood. :lol: Oh well, that's how it goes, if I let it go it will just cost more down the road.
leeave96
Minister of Fire
The poured liner would be very nice, but as you note, expensive.
Are you going to do a 6 inch liner?
The flue tiles in my chimney were not cemented in either and my house is over 50 years old. Infact, the guys broke the tiles from top down. I ask why and they said that typically the clay liners were not cemented in place. Start to break the liner out from the bottom and the whole stack can slide down and break-up causing a nasty plugged chimney at the bottom - not good.
I have to say that I am very pleased with my rigid liner with 1/2 inch wrapped insulation. If you don't go poured, I think rigid is the way to go.
Good luck,
Bill
berlin
New Member
I would bust out the old, damaged tile and slide in new ones, butter the ends with a waterproof heatstop alumina mortar, pour vermiculite/pearlite and done.
berlin said:I would bust out the old, damaged tile and slide in new ones, butter the ends with a waterproof heatstop alumina mortar, pour vermiculite/pearlite and done.
After running a SS liner for the first time this winter there is no way I'd ever recommend using clay tiles again. The difference is huge in performance, cleanliness, and safety. I don't suggest setting new tiles down in that chimney. Especially when 20 feet of 6 in liner can be had for the 400 buck range. Add a bit more for insulation.
pen
cmonSTART
Minister of Fire
Wow. Ya, there's a lot of issues with that chimney. Some re-pointing and waterproofing would be helpful too if the budget allows. Supaflue and other poured liners are great products and will last a very very long time, but they are a bit pricey.
In most places, current code standards state that the flue tiles should have a non water soluable refactory cement joining them, not just loosed stacked. It is also against code in a lot of places now to replace clay tiles with more clay - they damage so easily they want them to be replaced with stainless or poured, or something else.
Removing those flue tile shouldn't be too difficult. That's a good thing. I would price out a poured insulation with the liner, also. I usually use blankets but in this case the poured insulation will add some structure to the chimney and really help it.
leeave96 said:The poured liner would be very nice, but as you note, expensive.
Are you going to do a 6 inch liner?
Bill
I want to go with 6" even though the Keystone can go either 6" or 7". I figure with my stove addiction I'm not quite done buying stoves yet and most vent 6".
daryl
Feeling the Heat
Hi Todd
How about stucco the chimney, SS liner with Ther-mix insulation. You mix up thermix with water and it sets up for some structal support. Then put a metal chase top on top of the chimney then you never have to worry about the crown cracking and repairing it down the road.
How about stucco the chimney, SS liner with Ther-mix insulation. You mix up thermix with water and it sets up for some structal support. Then put a metal chase top on top of the chimney then you never have to worry about the crown cracking and repairing it down the road.
Resiburner said:Hi Todd
How about stucco the chimney, SS liner with Ther-mix insulation. You mix up thermix with water and it sets up for some structal support. Then put a metal chase top on top of the chimney then you never have to worry about the crown cracking and repairing it down the road.
The wife wants to keep the brick. I have thought about thermix or even dry vermiculite or perlite. I think this supaflue stuff is a perlite masonry mix. Good idea with the metal top.
fbelec
Minister of Fire
todd you said that you pulled your liner. do you have a stainless liner now? is that what you pulled? i'm not sure about the cost of bricks, and that's if you can get replacements. i rebuilt the top of my chimney last year. two sections of clay liner and three cement blocks. no brick. my original chimney was built in 1978. it had mortar between the liner blocks. all total for the rebuild in supplies were 52 dollars. if you have a stainless liner and it's still good that might be the cheap way out and still getting it done safely. just might take some time with the bricks.
just a thought
frank
just a thought
frank
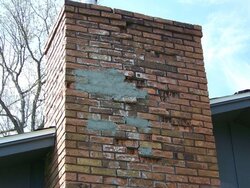
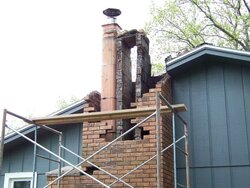
Is that side of the chimney the worst? The white is efflorescence, indicates water getting into the bricks from above or behind and leaching mineral salts through. And that water is causing the spalling you're getting where the face of the bricks bust off when the water freezes or by continual efflorescence. If the chimney is in fairly good structural shape and this is the worst of it you can remove the spalled bricks and replace them with new ones. a grinder with diamond blade does a nice job of grinding out the joints to help remove damaged bricks and to clean rotten mortar out in prep for repointing. Even if you can't find an exact match for the damaged bricks the replacements will look nicer than parging over the damaged areas (you mentioned your wife's desire to keep the bricks.) If you want to parge over the damaged areas you can use mortar dyes to get a close color match.
If the top section is worse than the picture shows (joints deteriorated more than halfway through) it might be worth taking it down to where it's sound, cleaning up the good bricks, replacing the bad ones and building back up.
Either way, it looks like the top couple tiles are the damaged ones and they're easily replaceable. And from the looks of the picture it doesn't seem like you have a cap on this chimney. That's your protection against further damage. Should have a 2"overhang and space (caulked) between it and the flue tile to allow the tile to expand.
If you want to diy and save some money there's plenty of literature out there to guide you along your way. I've been in this business for some time but I'll say that just like almost anything you can do it as well as any professional since you want to do it right and not for the paycheck.
The top looks worse than the pics, lots of loose and deteriorating mortar. There is a cap up top too but it's pretty shot and I've been brushing on some cap repair sealer stuff every other year. Two different chimney guys recommend rebuilding the top from about where the roof line is, replace some of the lower brick, and use a sealer on the whole chimney.
I removed my 5.5" s/s liner and busted the old upper clay tiles to get a better look at the inside. Those tiles are coming out no matter what so I can get a proper sized insulated liner in there.
I decided to go with the rebuild of the top and a new 6" Supaflue for at least the one flue pictured. Once the old cap is removed I will decide what needs to be done on the other 12x12 flue. I might be able to leave it since it has an insulated 6" liner inside and maybe just pump the Supaflue stuff around the old tiles to fill the cavity. We shall see. I have about 100 matching bricks from my two hearth projects and if I need more I can get them. They will probobly start next week and I'll have some updates with pictures.
daryl
Feeling the Heat
Todd said:The top looks worse than the pics, lots of loose and deteriorating mortar. There is a cap up top too but it's pretty shot and I've been brushing on some cap repair sealer stuff every other year. Two different chimney guys recommend rebuilding the top from about where the roof line is, replace some of the lower brick, and use a sealer on the whole chimney.
I removed my 5.5" s/s liner and busted the old upper clay tiles to get a better look at the inside. Those tiles are coming out no matter what so I can get a proper sized insulated liner in there.
I decided to go with the rebuild of the top and a new 6" Supaflue for at least the one flue pictured. Once the old cap is removed I will decide what needs to be done on the other 12x12 flue. I might be able to leave it since it has an insulated 6" liner inside and maybe just pump the Supaflue stuff around the old tiles to fill the cavity. We shall see. I have about 100 matching bricks from my two hearth projects and if I need more I can get them. They will probobly start next week and I'll have some updates with pictures.
Todd if you need some tile breaking rods let me know.
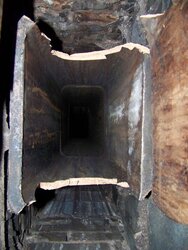
Chimney guy started yesterday, tore down the old damaged bricks and removed a few tiles. If the rain holds off I think he should get the rest of the tiles out and start rebuilding.
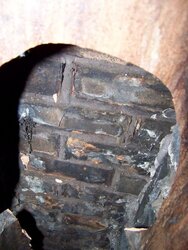
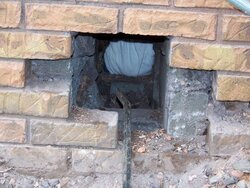
The flue left standing looks ok and there is mortar between them. I'm thinking about pouring that Supaflue stuff around it to fill in the gap and make it stronger.
The flue left standing looks ok and there is mortar between them. I'm thinking about pouring that Supaflue stuff around it to fill in the gap and make it stronger.
Attachments
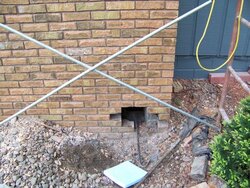
Punched a hole in the bottom of the chimney to help remove the tile, he said it is easier than using the small cleanout inside and making a mess in the house. I stuffed a white rag in the stove pipe hole.
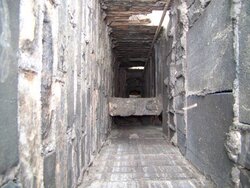
Tiles are removed, time to start the rebuild. You can see the rod and tile breaker in the upper right corner.
Tiles are removed, time to start the rebuild. You can see the rod and tile breaker in the upper right corner.
Attachments
- Status
- Not open for further replies.
Similar threads
- Replies
- 35
- Views
- 2K
- Replies
- 6
- Views
- 2K
- Replies
- 8
- Views
- 934
- Replies
- 3
- Views
- 890