Getting past that GW is like having the X wife living in my basement and with the cold weather closing in I decided to move working on it up on the priority list. I have been doing my best thinking over the summer on how to remedy all the problems I saw with this unit. I am going to take pictures of what I am doing and post them (if all this works) perhaps they will be of some help to others here. We’ll see!
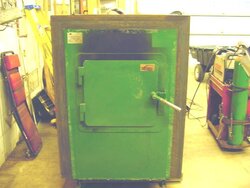
Problem # 1 was all the condensation forming on the steel skins. My thoughts, I added 4” of steel C channel all the way around the unit to increase the insulation around the fire box to around 6” instead of 2”. Also I’m looking at materials other than metal for the skin replacement, cement based board (3’X5’X1/2” Hardy Backer $12.00 a sheet at Home depot) is being considered though I would like to keep from having any seams or I’ll need to add some steel at the seams.
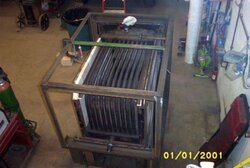
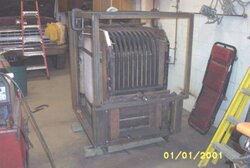
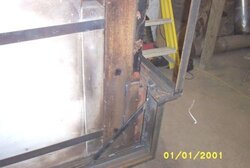
Problem # 2 cleaning the HX I chose to put the access panel in the back that gave me a full width reach to everything. This was incorporated in sealing off the top and sides of the fire chamber. I think the cooler incoming water temp and lower fire temperatures is in part the reason for all the build up around the HX in the rear.
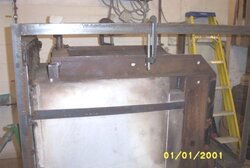
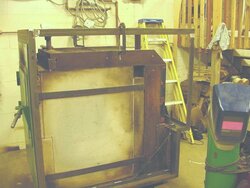
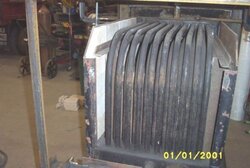
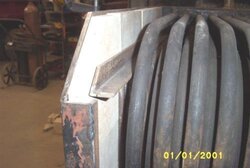
Problem # 3 I did not like the idea of the fire chamber open to the insulation above around and down the sides. I’m pretty sure letting the fire meander as long as possible to extract as much heat as possible was the concept but I don’t think it’s a good trade off with the other contributing problems that causes. The existing reverse concrete lip on the back wall should cause enough turbulence. I decided to line the fire chamber all the way around and down the sides to the bottom with heavy ½” angle iron and made a channel on the sides to slide in off the shelf fire brick from Tractor Supply. The top and rear over the fire box shroud is going to be made of stainless steel lined with rigitized Kaowool setting 1” away from the HX instead of right on top of it from sagging. I wanted to use refractory but the curing and firing process was more than I can accomplish here. My thinking on closing in the fire chamber, 1 this will keep the insulation away from the HX tubes and the heat and fire from lapping around everywhere it doesn’t belong. 2 the closer extra mass around the HX should aid in heat transfer. 3 the streamlining of the fire path should aid in putting more heat to the rear HX tubing and boost the draft from fewer restrictions. I also added a piece of steel plate at the bottom of the fire chamber that leans on the refractory towards the exhaust outlet to create a smoother flow there too.
Problem # 4 I also replaced the 2” draft tubes with Stainless steel while this thing was down. One of the originals fell off while dismantling?
Problem # 5 Insulation I found a product called Fiberfrax that will be the first layer on the put back it’s a ¼” thick and will flush out with the steel retaining bands and I’ll be working my way out with Kaowool and rockwool. Fiberfrax was also used for expansion and contraction control between the metal parts and the refractory.
We'll See! Wayne
Problem # 1 was all the condensation forming on the steel skins. My thoughts, I added 4” of steel C channel all the way around the unit to increase the insulation around the fire box to around 6” instead of 2”. Also I’m looking at materials other than metal for the skin replacement, cement based board (3’X5’X1/2” Hardy Backer $12.00 a sheet at Home depot) is being considered though I would like to keep from having any seams or I’ll need to add some steel at the seams.
Problem # 2 cleaning the HX I chose to put the access panel in the back that gave me a full width reach to everything. This was incorporated in sealing off the top and sides of the fire chamber. I think the cooler incoming water temp and lower fire temperatures is in part the reason for all the build up around the HX in the rear.
Problem # 3 I did not like the idea of the fire chamber open to the insulation above around and down the sides. I’m pretty sure letting the fire meander as long as possible to extract as much heat as possible was the concept but I don’t think it’s a good trade off with the other contributing problems that causes. The existing reverse concrete lip on the back wall should cause enough turbulence. I decided to line the fire chamber all the way around and down the sides to the bottom with heavy ½” angle iron and made a channel on the sides to slide in off the shelf fire brick from Tractor Supply. The top and rear over the fire box shroud is going to be made of stainless steel lined with rigitized Kaowool setting 1” away from the HX instead of right on top of it from sagging. I wanted to use refractory but the curing and firing process was more than I can accomplish here. My thinking on closing in the fire chamber, 1 this will keep the insulation away from the HX tubes and the heat and fire from lapping around everywhere it doesn’t belong. 2 the closer extra mass around the HX should aid in heat transfer. 3 the streamlining of the fire path should aid in putting more heat to the rear HX tubing and boost the draft from fewer restrictions. I also added a piece of steel plate at the bottom of the fire chamber that leans on the refractory towards the exhaust outlet to create a smoother flow there too.
Problem # 4 I also replaced the 2” draft tubes with Stainless steel while this thing was down. One of the originals fell off while dismantling?
Problem # 5 Insulation I found a product called Fiberfrax that will be the first layer on the put back it’s a ¼” thick and will flush out with the steel retaining bands and I’ll be working my way out with Kaowool and rockwool. Fiberfrax was also used for expansion and contraction control between the metal parts and the refractory.
We'll See! Wayne