Building of my hearth - from start to finish

  • Active since 1995, Hearth.com is THE place on the internet for free information and advice about wood stoves, pellet stoves and other energy saving equipment.

    We strive to provide opinions, articles, discussions and history related to Hearth Products and in a more general sense, energy issues.

    We promote the EFFICIENT, RESPONSIBLE, CLEAN and SAFE use of all fuels, whether renewable or fossil.
Status
Not open for further replies.

The Dude

Member
Jan 17, 2011
78
Central PA
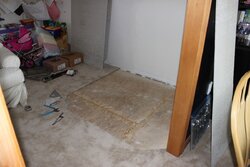
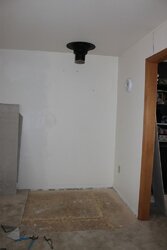
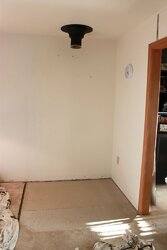
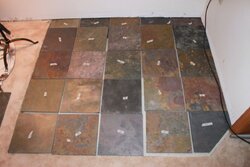
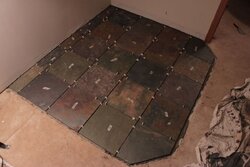
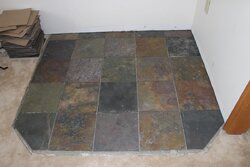
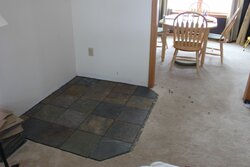
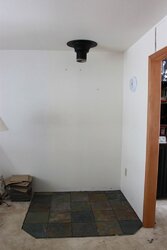
I thought I'd start a thread outlining the progress of the building of my hearth. I had asked a few questions in other threads, one about raised hearths and another about a natural stone heat shield. With that all taken into consideration, I have begun building. So far, the tile has been laid, with the help of my dad. I plan to post photo updates as it progresses. I welcome suggestions, especially if you see something I might be doing wrong. I imagine it can only turn out better with the input of others.

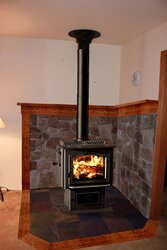
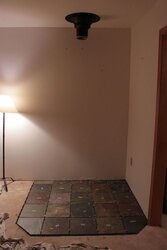
From the current tile stage, I created a rendition of the design I am looking for. This picture below is a photoshopped virtual hearth, nothing here is actually built yet except the slate tile floor. My stove is a harman TL-300. This is a stock photo, modified to look like my basic model. One last note about the rendition...I do plan to add more tile off to the side of the pad shown here for wood storage and other general needs that carpet shouldn't handle.

Design plan:
Natural Slate Tile - Bought at Lowes
Natural Creek Stone - Locally collected, mounted on cement board, vented 1" from combustibles (drywall) and 1" open on top and bottom
Quarter Sawn White Oak Moulding & Mantel, Craftsman Style
 

Attachments

  • Wood Stove Hearth Rendition 800x1200.jpg
    Wood Stove Hearth Rendition 800x1200.jpg
    75.5 KB · Views: 20,504
Step one: Cut out the carpet, lay the hardibacker cement board
 

Attachments

  • IMG_1310 800x1200p.jpg
    IMG_1310 800x1200p.jpg
    111.9 KB · Views: 1,907
  • IMG_1312 800x1200p.jpg
    IMG_1312 800x1200p.jpg
    42.8 KB · Views: 1,862
  • IMG_1315 800x1200p.jpg
    IMG_1315 800x1200p.jpg
    51 KB · Views: 1,820
Dude thats my floor !
well pretty close when i get it done........
it's all in except the wood border. Have a walnut tree that needs to be cut.
It's been begging to be cut into planks but other things have gotten in the way.
16 x 16 sq slate tile that is around 1/2 inch above the floor with the idea that the walnut
would taper back to the floor height. Was thinking about the stone walls behind it.
Sure looks good that way. Get busy
Enjoy the project with your dad
rn
 
Laying Tiles: Dry layout, then the permanent laying.

I should mention I had received so many warnings about cutting slate tile - how tricky it is and how you MUST use a good wet tile saw. A $12 7" diamond blade on my circular saw with freehand cuts worked just fine, with my dad holding the tile down while I cut. I had a wet tile saw reserved from the local rental place, until it dawned on me that we should at least try the diamond blade for my circular saw first. As soon as I mentioned it, my dad agreed as if he already thought the rental was probably overkill. I don't know what all the fuss is about.

To anyone cutting slate, I recommend trying this first if you don't have too much to cut. Free hand cuts were surprisingly straight and chip-free on most tiles. I you need a bunch of straight cuts that will show, this probably wouldn't work. My cuts in the rear row of tiles will be hidden under the wall. Only the two corner tiles will have the cuts show. They turned out well. I am very picky when it comes to little imperfections like that, and I was satisfied with the cuts.
 

Attachments

  • IMG_1317 800x1200p.jpg
    IMG_1317 800x1200p.jpg
    104.2 KB · Views: 1,923
  • IMG_1323 800x1200p.jpg
    IMG_1323 800x1200p.jpg
    47.4 KB · Views: 1,922
  • IMG_1326 800x1200p.jpg
    IMG_1326 800x1200p.jpg
    112.5 KB · Views: 1,958
  • IMG_1327 800x1200p.jpg
    IMG_1327 800x1200p.jpg
    115.9 KB · Views: 1,859
Nice Photoshop job! All you need is some virtual wood and you have virtual heat.

Would it be possible to have the stove face into the room (corner install) or is this orientation better for the fireview?
 
keep us posted...i'm still in the research/planning phase of building my hearth so i can't wait to continue following your progress and methods!

thanks!
Nate.
 
Mortar set & tiles cleaned, no grout yet. Ready for sealer before grout.

Any thoughts on how to keep that outlet on the wall? I love the idea of building it into a stone, but I don't know if there are such things as non-combustible outlets. I imagine they all have some plastic parts, and then on top of that you have the wires in the box right behind the stone surface. The stone on the side will be roughly 12" from the stove, with the clearances required being 17" for combustible, 6" for non combustible. One idea would be to somehow sealed off when the stove is in use, but still accessible in the off season...somehow.
 

Attachments

  • IMG_1340 800x1200p.jpg
    IMG_1340 800x1200p.jpg
    105 KB · Views: 1,983
  • IMG_1341 800x1200p.jpg
    IMG_1341 800x1200p.jpg
    84.3 KB · Views: 1,740
  • IMG_1337 800x1200p.jpg
    IMG_1337 800x1200p.jpg
    43.2 KB · Views: 1,740
The outlet is low enough so that it shouldn't be much of a problem. If you are concerned, lower if more.

The stone veneer on the side is not going to make a huge difference in combustible clearance. How are you achieving the reduction?
 
It will be non-combustible to code by means of cement board that is spaced 1" off of the drywall, vented 1" at bottom and top. That method reduces clearance by 66% according to the national code. The stone is not really for protection, as the cement board will already be doing the job.

For the outlet, I'm looking to find a way to have proper clearance and protection according to code rather than just safe from melting. I want this whole this to be spotless in case there is ever a claim with our homeowner's insurance. I forgot to mention that my plan is to just cover it over. It's just that would be so cool to have a stone outlet or maybe a removable stone to access it. I love custom details like that.
 
Sounds good. I really wouldn't obsess about the outlet. The firebox is elevated by the pedestal.
 
BeGreen said:
Nice Photoshop job! All you need is some virtual wood and you have virtual heat.

Would it be possible to have the stove face into the room (corner install) or is this orientation better for the fireview?

I chose against a corner installation for three reasons.
1. The stove would just about stick out into the entrance way of the room, really screwing up the flow of things.
2. The chimney wouldn't line up as well with the back of the closet above it, meaning I'd need an offset on the connector which I wanted to avoid
3. Having this parallel installation in that corner of the living room allows us to see the burn from the dining room and kitchen; a corner install would limit the view to going all the way into the living room, which we seldom have had reason to do up to now.

Choosing a location in a house broken up into a bunch of rooms is tougher than I thought it would be. I went back and forth many times between different locations and orientations in that room, and even different rooms in the beginning.
 
Dude,
You've been busy.......lookin good. Nice thing about the wet saw is you don't have all the dust........
You may have a big puddle though, so if you're comfortable then go as you have. I probably would have done
the same but had a friend that had a wet saw that i could use. Just so you know, that slate will darken and shine just a bit
when you seal it. Has kept mine clean though. Just needed a bit of a wet wipe a couple of times.
Don't forget to seal the grout as well. Did not think of being able to see the fire from different locations in the house when i
decided where it was going.....got lucky though as we can see it from a distance..........
I was also thinking of the corner install but if you like being able to see it from both rooms i can't argue that.
You have to be happy with it. If you keep going like that you might get a burn in this season.
lookin good
rn
 
You're doing a great job! I'm in the middle of installing my Kozy Heat fireplace and am actually having a good time with it. A friend of mine has been over parts of the last 3 days and we're doing well. I can't wait to be heating the house w/ a lot less oil.
 
The Dude said:
BeGreen said:
Nice Photoshop job! All you need is some virtual wood and you have virtual heat.

Would it be possible to have the stove face into the room (corner install) or is this orientation better for the fireview?

I chose against a corner installation for three reasons.
1. The stove would just about stick out into the entrance way of the room, really screwing up the flow of things.
2. The chimney wouldn't line up as well with the back of the closet above it, meaning I'd need an offset on the connector which I wanted to avoid
3. Having this parallel installation in that corner of the living room allows us to see the burn from the dining room and kitchen; a corner install would limit the view to going all the way into the living room, which we seldom have had reason to do up to now.

Choosing a location in a house broken up into a bunch of rooms is tougher than I thought it would be. I went back and forth many times between different locations and orientations in that room, and even different rooms in the beginning.

Sounds good. You have done a lot of planning and I'm sure it will pay off in a very satisfying experience.
 
Looking good Lebowski! Now you just need a rug to tie the room together. :lol: I have an insert with a strange placement of the oringal fp. Reminds me of how you chose against the 45 deg install. I like the photo shop. All of my planning and pics were on graph paper. Can't wait to see more.

Tony
 
I have a question about my hearth installation regarding heat transfer to the studs in the wall behind the heat shield. I doubled up 3†wide strips of 1/2" hardibacker to use for spacers between my painted drywall and the cement board shield, which will be made of hardibacker covered by thin stones. In order to support the weight of the cement board and stone, I figure my only option is to screw the board and spacers into the studs.

What I can’t figure out is if this will defeat the purpose of the vented spacing by transferring heat right through the heath shield, the spacers and into the studs. If I understand correctly, the studs are the most critical combustible material that I’m trying to protect in the first place, moreso than the painted drywall in front of them. This would not be the case with ceramic spacers, but I'd rather move on with my current plan if it's safe. Any advice? Thanks!
 
The doubled-up strips of cement board will have an insulation value of R=.52 in addition to the top layer of cement board's R=.26. You'll be fine to proceed as long as the wall shield is open at top and bottom to allow good air circulation behind it and is tall enough to meet the stove maker's recommendation.
 
UPDATE

I got a lot done in the progression of my hearth. Here are pictures of the different steps.


Marking the studs for heat shield spacers. With the stone that will be hanging from my wall, I want this board to be anchored right in the center of the studs.


Trying out cement board spacers. These were cut from 1/2" Hardibacker cement board with a circular saw. It's dusty like people say but if done outdoors and wearing protection, it's not a big deal. I ended up scrapping these spacers, wasting the material and time cutting them. I couldn't accept the idea of them completely blanketing the studs, allowing for direct contact from heat shield to spacers to stud. The purpose of the heat shield with air space is to reduce such direct contact against the underlying studs. I went with ceramic spacers around each screw instead because of the minimal surface contact.


Testing out grout colors on sample tiles


Detail of grout test. Dark brown grout to the right, charcoal to the left. I ended up going with the charcoal but lightening it a little to make a dark grey.


The grouting process. I have never grouted before and worried that it might scratch the natural slate like sandpaper. It did not at all. I kept hearing warnings to avoid making your grout too thin, so I ended up making it too thick at first and those areas came out rough. It was also probably more difficult than usual because the slate tiles are different thicknesses so most were higher or lower than the others next to them.
 
Finished grout...


Flashing Installed...


This flashing was not required, but I wanted to seal up the bottom of the wall where the moulding originally covered, not so much for heat purposes but in case of the slight possibility of a hot coal finding its way down in between the tile and the dry wall.


Sealing the seam of the flashing...


I used clear silicone caulk with grout powder sprinkled on it to match the grout and also masked to look more like the grout lines.


Putting up the heat shield...


Not finished, but ready for the stove!
 
Looks good so far . . . are you planning on putting anything up on the shield walls?
 
Luv the mock'up and hearth work thus far... Question: would it look better to turn the stove 45 degrees so it's not so square to the wall on the right? I can't see the rest of the room but it kinda looks unbalanced aesthetic's ?
 
FPX Dude said:
Luv the mock'up and hearth work thus far... Question: would it look better to turn the stove 45 degrees so it's not so square to the wall on the right? I can't see the rest of the room but it kinda looks unbalanced aesthetic's ?

Good question. I planned this out about exhaustively as anyone could, and there are several reasons why I chose a parallel installation over a corner one. One reason is that with a corner setup, we'd only be able to see the fire from our living room. Parallel, we can see it from the living room, dining room, and kitchen looking through the dining room. Another reason is that the positioning of the stove in the corner would bring it out a few inches into the entrance way between the living room and dining room, and the tile in front of it would stick out half way into the entrance way. The floor is only a visual impedance, but that would still bother me. Third, the chimney had to come down in a specific place from the rear of a closet upstairs, causing an offset in the connector pipe for a corner install. And fourth, the pad for the corner install would take up more of the room, which is actually used as the play room with all the toys and we need to keep as much space as we can.
 
firefighterjake said:
Looks good so far . . . are you planning on putting anything up on the shield walls?

Yep, creek stone. Check out the very first post for a computer generated mock-up. That picture has field stone though, mine should be a bit more round. I just wanted to get the stove in as soon as it was safe to so I can get some burns in before it warms up too much.
 
That is one nice job,wish I had the talent to do things like that. Will that tile maintain it's integrity for spilled hot embers? I'm going to do something similar in front of my hearth ,although with the new Blaze King ultra I shouldn't be getting many. Thanks
 
I imagine the tile it will hold up to heat, because from what I understand, slate forms from shale through heat and compression. Maybe someone else with slate tiles who's had them for a while. I don't plan on having any spilled hot embers, since I have carpet nearby and am shooting for the no-house-fire approach. Are the occasional embers on the ground a reality that is hard avoid, or is this something that should not be happening in the first place? I would imagine the latter, but the previous post has me concerned.
 
Status
Not open for further replies.