Class A chimney/black pipe/cleaning question

  • Active since 1995, Hearth.com is THE place on the internet for free information and advice about wood stoves, pellet stoves and other energy saving equipment.

    We strive to provide opinions, articles, discussions and history related to Hearth Products and in a more general sense, energy issues.

    We promote the EFFICIENT, RESPONSIBLE, CLEAN and SAFE use of all fuels, whether renewable or fossil.
Status
Not open for further replies.
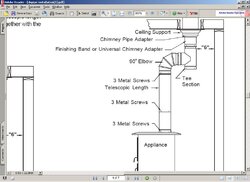
I'm doing an install in the new place I'm building, and am looking for any smart ideas I should incorporate in the design to make cleaning the stove pipe/chimney as painless as possible. The class A chimney is installed, I did it a couple years back when I was framing and roofing, it's a straight shot down to the stove, spent a fair amount of time with a plumb bob on the layout. Anyway the stove will be a Hearthstone Mansfield, approximately 14' vaulted ceiling, so about 11 ft of black pipe, then 8ft IIRC of Class A. Most people I know secure their black pipe to the ceiling support box and put the slip joint at the bottom, to clean they slip the joint apart, tape a plastic bag over it and then go up on the roof with the cleaning rods/brush. I'm planning this same approach. Are there any smart tricks I should do, say is there some sort of cleanout that go in the black pipe section that avoids dealing with the expansion joint? In short, for you guys in the know, how would you do such an install if it were in your place?

My old instal was a Quad 5100i insert, cleaning consisted of pulling the air tubes/upper brick and blanket and cleaning the mess into the stove. While not bad, I'd prefer to avoid crawling around quite this much in the firebox this time around.

Thanks.
Bri
 
This year I installed a “T” for easy cleaning and inspection. Last year the stove pipe just went straight up from my stove, and I had to disassemble the black stove pipe or go on the roof for inspection of the chimney, which in the winter with snow on the roof is no fun. Now with the “T” installed its just a matter of taking the end cap off the “T” for a quick view and/or cleaning of the chimney.
 
Greg123 said:
This year I installed a “T” for easy cleaning and inspection. Last year the stove pipe just went straight up from my stove, and I had to disassemble the black stove pipe or go on the roof for inspection of the chimney, which in the winter with snow on the roof is no fun. Now with the “T” installed its just a matter of taking the end cap off the “T” for a quick view and/or cleaning of the chimney.

That's the kind of thing I was thinking about. At least you could pull the cap, plug the pipe going into the stove with a rag, go up and brush the chimney and vac the mess out of the pipe. It seems a bit better than the trash bag approach. Have you found any way to clean without going onto the roof? I wasn't sure if the transition to the T, even though it's capped, would cause any degradation of the draft.
 
Here is a picture of what my setup looks like
 

Attachments

  • Tee.JPG
    Tee.JPG
    73 KB · Views: 419
Thats different than what I envisioned, I thought you put a tee in your straight pipe, with the center leg of the T coming out. Your setup is interesting, you really can clean the class A from the inside that way, and see right to the spark arrestor. My creosote buildup has always been in the last foot or so of pipe right by the arrseror, where things cool off.

Did you see any changes in your draft when you did this?

Bri
 
I test fired the stove a few days ago (it was 75 degrees out) and there was still excellent draft.
 
brian_in_idaho said:
you really can clean the class A from the inside that way, and see right to the spark arrestor.
Bri

That was my primary reason for installing it this way, so that I would not have to go on the roof in the middle of the winter, and cleaning the class A chimney would be easy and could be done frequently without much hassle, Everything is done from inside the house.
 
If you have room behind the stove and it is rear exiting that Tee would replace the need for a 90 elbow and also serve the same purpose for inspection and cleaning
 
Does anyone get any dripping from the tee on very rainy days? Seems like it would accumulate water in the right circumstances.
 
BeGreen said:
Does anyone get any dripping from the tee on very rainy days? Seems like it would accumulate water in the right circumstances.

I have only had mine installed for 2 weeks, we had a good rain storm a few nights ago, and I did not get any dripping from my Tee.
 
Greg123 said:
BeGreen said:
Does anyone get any dripping from the tee on very rainy days? Seems like it would accumulate water in the right circumstances.

I have only had mine installed for 2 weeks, we had a good rain storm a few nights ago, and I did not get any dripping from my Tee.

No problems in ours after a year. Not surprising because the design of the tee cap is such that you would have to have > 1/4" of water accumulate before it would overflow and drip out - there is a rim around the cap.

-Colin
 
Status
Not open for further replies.