Doing tile

  • Active since 1995, Hearth.com is THE place on the internet for free information and advice about wood stoves, pellet stoves and other energy saving equipment.

    We strive to provide opinions, articles, discussions and history related to Hearth Products and in a more general sense, energy issues.

    We promote the EFFICIENT, RESPONSIBLE, CLEAN and SAFE use of all fuels, whether renewable or fossil.
Status
Not open for further replies.

Snowy Rivers

Minister of Fire
Feb 7, 2010
1,810
NW Oregon
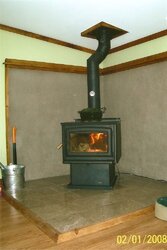
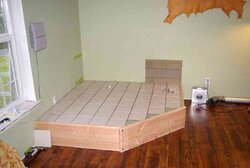
Got busy this afternoon and went after laying the tile on the new Hearth.

Got the cement out and the grooved trowel and went after the thing.

Took about 2 hours to get the tile all set and the tools cleaned and put up.

I have 3 pieces up front that must be cut but the weather was NASTY so I did not want to take the tile saw outside.

Will get those cut in the next day or so and then cement them in place.\

I took some pix and will post them when I get back home.

Having second thoughts about doing the rock wall look now. The stuff is going to cost over $600 and I really dont want to spend the $$$$$ now.

Thinking about doing a dark tan colored paint on that section of the wall and then rag rolling it with a lighter tan to give a nice look.

Jury us still out..

Looking forward to wrapping this up.

Later

Snowy
 
ret this: I apologize if the pic is not great, but its a hardibacker, w/ mesh screen srewed to it every few inches.. I then applied a layer of premix mortar (with a little uncut cement) over the whole thing.. I rippled the trowel around to smooth it, but leave some minute ridges (like a stucco, only finer)... after it dried, I painted it over w/ a rustoleum textured pottery paint (a mix of a few grayish/brownish colors) to give it a textured stone kinda look.. then trimmed out w/ wood.. looks nice against the marble hearth... spent more than I wanted on the marble tiles to do the hearth, but the walls only cost @ 75 bucks.
 

Attachments

  • stove[1].jpg
    stove[1].jpg
    143.6 KB · Views: 276
here is a better one
 

Attachments

  • scan0001.jpg
    scan0001.jpg
    92.3 KB · Views: 276
Looks great.

Loads of way cool ideas out there that really make things look cozy


Snowy
 
Here are two piccy's that I took this eavening of the project so far.

Three little triangle pieces of tile still need to go in and then grout the thing.


Snowy
 

Attachments

  • Tile1.jpg
    Tile1.jpg
    19.1 KB · Views: 241
  • Tile2.jpg
    Tile2.jpg
    18.1 KB · Views: 246
what do ya have for pipe there? simpson?
 
Yup

Brand spanky new Simpson Pellet vent pro.

Picked that up the other day.

Got all the goodies I need now to get the stove in and hooked up.

Just would like to have some weather that will allow me to paint the stove before hauling it into the house.

Stove is a 93 model and shows some scratches etc.

The new pellet pro is nice stuff. Ya dont have to smear the joints all down with silicone and you dont have to use screws on it either.

Internal high temp O rings seal the joints.

Snowy
 
Got home this afternoon and finished off the tile job.

Cut the 3 front triangle shaped pieces and got them cemented into place.

This weekend I will do the grout and then its off to the rodeo.

Snowy
 
Status
Not open for further replies.