(2) A Roof Support is also used in installations where there is a cathedral ceiling, and a
Square Ceiling Support is not desired. The Roof Support allows the DuraTech chimney
to come down into the room below the level of the ceiling. The Roof Support can
support a maximum of 45 feet of DuraTech Chimney total, and maximum of 20 feet below
the support. If a taller stack of DuraTech Chimney is required, you must use a Square
Ceiling Support Box instead.
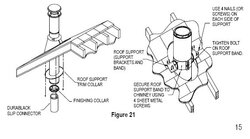
1. Cut and frame opening to provide a minimum 2” clearance on all sides of the
chimney pipe. Note: Opening in finished ceiling should be circular/oval in order for it to
be covered by Trim Collar.
2. Bolt on the Roof Support Brackets to the Roof Support Band using the supplied
hardware. Attach the Roof Support Brackets to roof using (4) 8 penny nails or (4) #8, 1-1/2” screws per side.

3. Determine how much DuraTech Chimney will be extending into the room (minimum of
3” below the ceiling). Be sure to maintain the proper clearance to combustibles (walls and
ceilings) for the connector pipe. Once you have identified the proper height for your installation, attach the of the Roof Support Band to the Chimney Section by tightening the Bolt, and secure it by using (4) supplied sheet metal screws.
4. Attach desired length of Chimney Sections above and below the roof level (max. of 45’
total, 20’ below the support). To transition to the Connector Pipe, attach the Finishing Collar by twist locking it to the bottom section of DuraTech Chimney.
5. Slide Trim Collar over the DuraTech Chimney and attach the Trim Collar to the ceiling using (4) 1-1/4” screws provided (Fig 21).
6. Refer to Steps 10 & 11 in the Ceiling Supported Installation section (page 9) to
complete the Roof Supported installation.
9. Attach Flashing: In new construction, assemble the Chimney Sections to a point
above the roof, then slip the Flashing over the chimney. On an existing roof, center
and install the Flashing before extending the chimney above the roof. Allow space to permit
sliding the next Chimney Section up through the Flashing. Always insure the chimney
remains vertical (use a level), and that at least a 2-inch clearance to combustible materials is maintained all around. Install the upper edge of the Flashing under the roofing. Nail to the
roof along the upper edge and down each side with 1-inch roofing nails. Do not nail the lower edge of the Flashing (Fig 12). Seal top and upper sides of flashing with roofing compound or sealant. Be sure to follow local building practices, as needed. Seal all nail heads with a non-hardening waterproof sealant. On flat or tarred and graveled roofs, nail and seal the Flat Roof Flashing to the roof on all sides with roofing compound. Do not put screws through the Flashing into the Chimney Pipe.
10. Finish Top: Apply a high-temperature (500ºF), non-hardening waterproof sealant
around the chimney at the point where the Storm Collar will meet the chimney just above
the Flashing. (Figures 12 and 13). Slide the Storm Collar down over the chimney to
the top of the Flashing. Tighten and seal the Storm Collar against the sealant. After
installing sufficient Chimney Sections to meet the height requirement (Fig 1), attach the
Chimney Cap onto the top of the chimney by holding the collar of the cap and twist locking
it clockwise onto the chimney. Do not hold upper portion of the cap and twist, as this may
damage the cap. The Chimney Cap can be removed for chimney cleaning as described
in the Chimney Maintenance section of the instructions. Use an Extended Roof Bracket if
the chimney extends more than 5 feet above the roof. (Figures 16 & 17 in the Extended
Roof Bracket section). If you are located in heavy snow country, it is recommended
that a “splitter” be installed, and should be fabricated from heavy gauge sheet metal (Fig
Figure 14). This will protect the chimney by routing the snow around it. This item is not furnished by Simpson Dura-Vent.
11. Enclosures: Enclose chimneys where they pass through occupied spaces, including
closets. Always maintain at least a 2 inch clearance between the chimney and any
combustible materials. Interior enclosures may be constructed with standard framing and
sheathed with sheetrock or plywood. Use Wall Straps as needed to maintain a minimum of 2
inches of air space between the chimney and combustible materials.
All i want is help understanding this so i can complete it safely, no question is a stupid question i was taught, please dont belittle me or go to personal attacks, all i am asking for is you professional help. Im a 38 year old man, i will admit i dont understand everything in life, and that is why i am here seeking your advice. all i ask for is help.
Thank You
Ray