Review of Dutchwest 300007DW. Corky here, we are well into the heating season now, here in northern New England. Our replacement stove is working well. To review, we had been using a "Freeflow" stove for about 30 years to heat our log cabin of about 1500 square feet. It has a cathedral ceiling in the main room, which promotes convection type heating. Originally, we had an Ashley stove located on the first floor. This meant that we had to bring wood in and store it near the stove, which was disruptive and dirty. When we changed over to the Freeflow, we moved it downstairs and enclosed it with a passive heat collector, from which the heat was distributed via trunklines to various corners of the house. This worked fine over the years, until the internal tubes of the stove cracked and leaked smoke into the house.
We did a lot of research to find a modern efficient stove, and ended up with the Dutchwest, sized to heat our modest home, and eschewed cast iron for plate steel to reduce cost.
While this was going on, I lined the old firebrick chimney with a 5 inch stainless steel liner, because the firebrick was coming apart at the top of the chimney. I would have gone with a 6 inch flue, but the chimney's construction did not allow that. Trust me, I tried. I ended up having to pull the 6 inch flue out in ribbons when it stuck 9/10'ths of the way down.
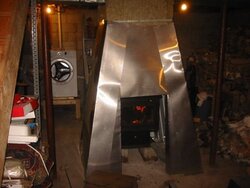
So the 5 inch liner was installed, the stove was installed, and I built up an insulated enclosure around the stove to collect the heat and distribute it to the various corners where we had heat grates. Again, let me stress that this is a PASSIVE heat collector, no fan is involved. The heat just rises from the stove, is channeled by the collector and is distributed to into the ductwork from which it exits, heating the house.
Now to the stove. I found out immediately that the stove requires a lot of air to get the materials burning. The trick, or at least what worked for us, was to leave the door slightly ajar while the tinder and kindling caught. I found that I had to let the wood really catch, before shutting and latching the door. Once I learned that trick, starting a fire was easy.
One of the tricks I found, was to use Birch Bark as tinder. It catches easily, and burns VERY hot, which gets the kindling going. So paper to start, birch on top, kindling, and then the wood.
So far, I've used only white pine as fuel. This is only because we had a few white pine blow downs over the last year and I'm not one to waste otherwise useless wood. True, it does not last as long as hardwood, but is does burn and produces heat so we'll use it until it's gone, then use the hardwood.
The stove works well. It gets hot enough to cook the wood, producing gasses, that the perforated pipes reignite. So if I turn it down low enough, you get this spooky look of gasses burning off the cooking wood. The gasses ignite right at the top of the stove, while the wood itself appears to be charcoling. While this it happening, the stove is producing some 500F of heat. So far, this has been enough to heat the house, letting the normal heating system rest.
Of course, it has not really gotten very cold yet, but on the other hand, I have not used any hardwood for fuel yet either.
So I'm happy. The stove is working well, the enclosure, insulated with mineral wool, is doing it's job, and we have plenty of wood left to burn.
Corky Scott
We did a lot of research to find a modern efficient stove, and ended up with the Dutchwest, sized to heat our modest home, and eschewed cast iron for plate steel to reduce cost.
While this was going on, I lined the old firebrick chimney with a 5 inch stainless steel liner, because the firebrick was coming apart at the top of the chimney. I would have gone with a 6 inch flue, but the chimney's construction did not allow that. Trust me, I tried. I ended up having to pull the 6 inch flue out in ribbons when it stuck 9/10'ths of the way down.
So the 5 inch liner was installed, the stove was installed, and I built up an insulated enclosure around the stove to collect the heat and distribute it to the various corners where we had heat grates. Again, let me stress that this is a PASSIVE heat collector, no fan is involved. The heat just rises from the stove, is channeled by the collector and is distributed to into the ductwork from which it exits, heating the house.
Now to the stove. I found out immediately that the stove requires a lot of air to get the materials burning. The trick, or at least what worked for us, was to leave the door slightly ajar while the tinder and kindling caught. I found that I had to let the wood really catch, before shutting and latching the door. Once I learned that trick, starting a fire was easy.
One of the tricks I found, was to use Birch Bark as tinder. It catches easily, and burns VERY hot, which gets the kindling going. So paper to start, birch on top, kindling, and then the wood.
So far, I've used only white pine as fuel. This is only because we had a few white pine blow downs over the last year and I'm not one to waste otherwise useless wood. True, it does not last as long as hardwood, but is does burn and produces heat so we'll use it until it's gone, then use the hardwood.
The stove works well. It gets hot enough to cook the wood, producing gasses, that the perforated pipes reignite. So if I turn it down low enough, you get this spooky look of gasses burning off the cooking wood. The gasses ignite right at the top of the stove, while the wood itself appears to be charcoling. While this it happening, the stove is producing some 500F of heat. So far, this has been enough to heat the house, letting the normal heating system rest.
Of course, it has not really gotten very cold yet, but on the other hand, I have not used any hardwood for fuel yet either.
So I'm happy. The stove is working well, the enclosure, insulated with mineral wool, is doing it's job, and we have plenty of wood left to burn.
Corky Scott