Extend exhaust flange from stove?

  • Active since 1995, Hearth.com is THE place on the internet for free information and advice about wood stoves, pellet stoves and other energy saving equipment.

    We strive to provide opinions, articles, discussions and history related to Hearth Products and in a more general sense, energy issues.

    We promote the EFFICIENT, RESPONSIBLE, CLEAN and SAFE use of all fuels, whether renewable or fossil.

crevasse

New Member
Dec 5, 2020
7
Breckenridge, CO
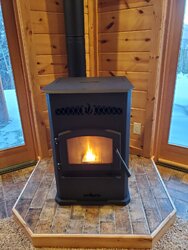
OK, bear with me! I installed my pellet stove a month ago and looked it it the other day and realized it is not remotely centered left to right on the raised hearth I built for it. I can't believe i missed that. I think I was so focused on the stove being "centered" on the brick tile I missed that I was one brick off. Epic fail. Talk about a blind spot, so obvious. Anyhow, I've thought of 3 mitigation options:

1. Install offset vent pipe elbows. Don't really want to do this due to esthetics and the fact the offset would be maybe 2".
2. Leave it as is and put some "decoration" on the right side to make it look intentional. I've seen pics on web where stove was not centered and it looks ok I guess.
3. Connect a 3" stainless car exhaust type elbow to stove's exhaust flange so that I can move stove to the right 2".

Leaning toward #3 as it seems like it would be best. Example of elbow is below. There are stainless butt connectors I could use, along with the sealant insure no leakage. Appreciate all input.

Pellet stove fail (2).jpg
stainless elbow.jpg
 
Leave it alone... My suggestion.
 
There really is nothing wrong with your idea,as long as you can still clean it from inside the stove,or from the clean out T. But,a few things.
I would use regular steel,no galvanized,as it off-gasses,
It should be "permanently" attached,to the flue pipe,or the stove outlet pipe.A few screws meet code.
There must be the fire proof structure underneath any non pellet pipe,to meet code(your stove hearth.
 
  • Like
Reactions: Washed-Up and Ssyko
#3 works, stainless steel will last well, SS butt connector will work but I like overlap so I would try to find a 2" SS angles slip on that is 3" ID on the end to the stove, 3" OD on the flue end. But then, a Butt connector does overlap the two pipes aButted inside.

Is the 45 and connection going to push your stove outward from the corner too far?

I understand moving it 2" right, adds 2" on the left at the same time, will look great.

Amazon product ASIN B076J92G47
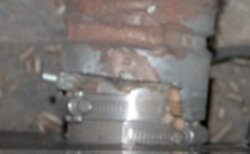
There also are 45 degree Dura Vent turns, the Dura Vent has ID of 3". The only difference in a Dura Vent adapter and a full Dura Vent pipe is the adapter has the interior SS pipe extend out over an inch from the outer "shielding". I know some will laugh it off, but I notched the outer in my install in '92 to allow me to use clamps (I used two worm drive clamps and a regular simpler clamp) ... notched it just for the screws to clear. It's never leaked.

But yeah, your #3 works. I was gonna comment on the offset stove, considered decorations, but now that you have noticed it and considered corrections, there's no turning back. Using that smooth 45 with no seams .... yeah, I like that idea. Besides, you'll always "see" it.

DSC_8390 clamp.jpg
 
Last edited:
#3 works, stainless steel will last well, SS butt connector will work but I like overlap so I would try to find a 2" SS angles slip on that is 3" ID on the end to the stove, 3" OD on the flue end. But then, a Butt connector does overlap the two pipes aButted inside.

Is the 45 and connection going to push your stove outward from the corner too far?

I understand moving it 2" right, adds 2" on the left at the same time, will look great.

Amazon product ASIN B076J92G47
There also are 45 degree Dura Vent turns, the Dura Vent has ID of 3". The only difference in a Dura Vent adapter and a full Dura Vent pipe is the adapter has the interior SS pipe extend out over an inch from the outer "shielding". I know some will laugh it off, but I notched the outer in my install in '92 to allow me to use clamps (I used two worm drive clamps and a regular simpler clamp) ... notched it just for the screws to clear. It's never leaked.

But yeah, your #3 works. I was gonna comment on the offset stove, considered decorations, but now that you have noticed it and considered corrections, there's no turning back. Using that smooth 45 with no seams .... yeah, I like that idea. Besides, you'll always "see" it.

View attachment 268631
Thanks for your posts. I was thinking it was going to be a 45 degree, but it looks more like a 22.5. As much as I'd like to use a slip on, the ones I've seen are too long, I.e. too far from the bend. As it is I will probably have to cut down whatever I buy so its only a few inches long basically the elbow and a bit of straight for the connection.
 
Hard to say from here, not knowing if the down pipe allows you to twist any, what size it is, connection details. I think I'm looking at 5 or 6 inch pipe in your picture, where does it step down, etc. All I can see is the stove turns 45 degrees from the wall the flue goes through. Picture of the rear details might help spark some suggestions
 
I think you are gonna need a short 45 degree elbow type adapter, something that turns 45 degrees asap as exit's the stove exhaust stub. Doing the butt connecter looks to me like is gonna put the stove way out into the room. If you could find a 45 elbow (3"OD) like you pictured initially but swelled on one end (3" ID) to slip up on the stove outlet, sealed to stove outlet stub, a good tight clamp, making a secure extension that waists no room with longish straights ... I think it would work. I can find them easily in mild steel, muffler man can make them while I wait even ... and that is what the stove stub is likely. You might find a muffler shop that can bend & swell it in a grade of stainless steel. I'm guessing by your picture that the flu can rotate?
 
Yes both the cold air intake and the exhaust ports swivel in any direction. Maybe I can remove the adapter and reducer (main stove exhaust pipe is 4") and replace it with a 1 piece 4" OD to 3" OD with my ~22.5 degree elbow. That would probably likely be about the same length, maybe even shorter when I angle it. If I understand what I could remove and replace with something that includes an albow:

whole kit, important/replaceable parts are:

adapter
reducer
 
So... to be clear ... your stove is 3" but you increased it with the adapter to use 4" flu pipe?
 
Looked at your pics.nice install.I see your point.i also know there is some flex in stove pipe,even with your high dollar stuff(great stuff,the best). But,you need to go 1.3/4 inches to the side,and a bit forward,for proper clearances.Doesn't the flue pipe move in and out,from the through the wall plates?There is enough give in the pipes,and you can change the distance of the pipe going through the pass through?But,maybe I am wrong,and the high dollar pipe setup does not just slide through the wall thimble?
 
  • Like
Reactions: tbear853 and Ssyko
I think Bob maybe "nailed it". If you can slide the pipe that goes through the wall passage into the room 1-3/4 or 2 inches, it would move your stove over though forward too some.
 
I think Bob maybe "nailed it". If you can slide the pipe that goes through the wall passage into the room 1-3/4 or 2 inches, it would move your stove over though forward too some.
I thought of this too and it would work as outside I have more than the required 12" away from the wall. But in order to get ~2" of movement left to right, I'd probably have to slide the stove pipe about 3" in as it is at an angle to the desired direction. In that case, I wouldn't have enough clearance (6") on the front of the stove, as it sits at 8" right now. Don't you agree?
 
I thought of this too and it would work as outside I have more than the required 12" away from the wall. But in order to get ~2" of movement left to right, I'd probably have to slide the stove pipe about 3" in as it is at an angle to the desired direction. In that case, I wouldn't have enough clearance (6") on the front of the stove, as it sits at 8" right now. Don't you agree?
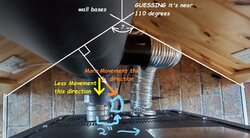
I was going to apply some trig and tell you exactly, but need more info. Might just be easier to measure & draw a scale drawing and measure directly. The walls appear to intersect at somewhat greater than 90 degrees, ie; " not square". You can readily see that moving the stove directly away from the wall thimble will move it forwards less that the movement sideways. In other words, moving it 2 " in the direction of your top most arrow will result in less than 2" movement towards the front of the hearth, likely nearer to 1-3/4".
 

Attachments

  • 20201207_083948_LI (2).jpg
    20201207_083948_LI (2).jpg
    135.9 KB · Views: 113
  • Like
Reactions: Mt Bob
Ok so I took a chance and after a crude measurement with a protractor, ordered a 22.5 degree bend 3" stainless car exhaust pipe and a heavy duty exhaust clamp, about $40 in total.

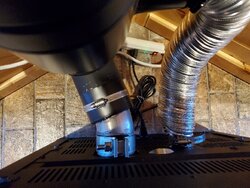
On the stove end, I cut off the long straight part of the exhaust pipe right after the bend so there was basically zero straight pipe. On the exhaust end, I left about 1.25" of straight which I fit into the 3->4" increaser and sealed it up with fireplace rope and sealant after a bit of McGyvering the increaser with my Dremel to accept the 3" OD exhaust tube.

The stove end is just butted to the stove flange instead of overlapped which would be preferable. So I cut a 1.5" strap from a piece of black stove pipe, added sealant, wrapped over the butt joint and used the exhaust clamp to keep it secure. I also added a piece of black strap and the standard hose clamp to the increaser to T junction as I could feel a bit of cold air coming in.

I let the sealant cure overnight and started it up this morning. All is well and even though I just eyeballed the plan before commencing the operation to move the stove to the right a few inches, it ended up being perfect. Thanks all for the responses.

20201224_080220.jpg 20201224_080248.jpg
 
Nice job!! Looks better now (my ocd is satisfied);)
 
  • Like
Reactions: SidecarFlip