Hello all,
After extensively reading the forums I was able to learn enough to take my $700+ electric bill down to $300 in the first month of stove usage, with more room to save. (1970's little house with poor insulation).
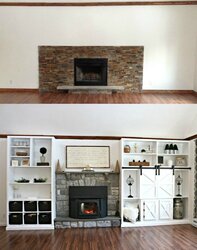
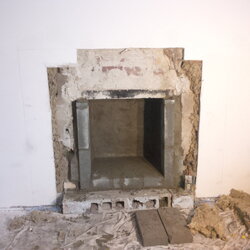
Anyway, on to the project. After purchasing the home I realized the "fireplace" installed was a zero clearance box that should have raised red flags because of the masonry chimney. After my electric bill began going through the roof to heat the place, I asked the original contractor who constructed the house, who happens to live down the road, what was originally there. He told me in the 1970's a heatform fireplace was installed...
An insert was the only solution because there was no room to be lost for a freestanding stove. The room is an open concept with vaulted ceiling and floor space is a premium. Plus, I have two little minions running around and the wife nixed any notion of a freestander.
Hmmm. Prior owner attempted his own root canal of the rusted out heatform firebox and realized it was no easy fix. He then installed the ZC slammer style in the open cavity and drywalled over where the original heatform facing stone was. Super ugly and super inefficient. On top of that the round slammer pipe in the rectangular flu was allowing cold air down into the heatform cavity which created cold drafts in the house because it was infiltrating the walls.
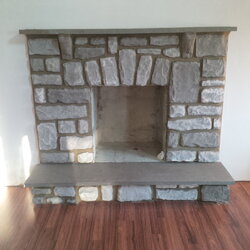
Stonecraft, a masonry/chimney company in the Poconos completed the overhaul. They ripped out the old ZC, refinished the damaged firebox, refaced the fireplace with manufactured stone, and slapped in a bluestone hearth and mantel. All in all they did a great job considering the mess I had on my hands. The guys were a pleasure to work with...
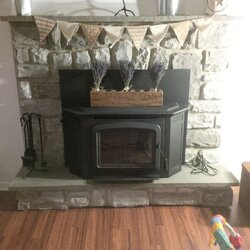
I opted for the Ironstrike Montlake 300 to fill the firebox. It is right around 3 cf and has a larger NS orientation. It also has dual blowers which attracted me because of the need to move heat to reduce the electric bill. I will still be experimenting next heating season, but got a good 2 months under my belt with the Montlake and was impressed.
My impressions of the Montlake:
-Loud blowers but VERY efficient at heating my house. Full blast on the blowers would require cracking windows. the low setting is still pretty loud since I'm not used to the white noise.
-Great airwash resulting in clean glass
-sweet secondary burns

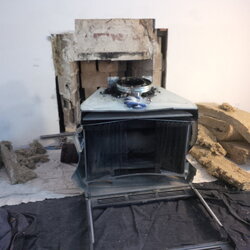
-the stove has a pretty cool heat exchanger design that really helps the blowers move HOT air. Above the baffle there are steel "stalactites" that heat up easily. However, the air comes out the front of the stove directly below the stove top. Without a stovetop thermometer, I overestimated the stove top temperature during burn in, and ended up scorching some of the paint on the stove top because it did not cure at the same rate as the rest of the stove. After learning about the stoves design, I should not have turned the blowers on until the stove was fully cured. (My bad but no big deal) The stove top appears to be the cooler part of the stove when the blowers are cranking??? Not expecting that.
-I have had good overnight burns without loading a completely full firebox. I am waiting until next winter until I am completely comfortable with the stove's manners and my wood supply. I also learned that I need bigger splits to stretch the overnight burns.
***Do not use any stove when your wife decorates it with flammables for the summer***
If anyone has questions about the more detailed steps of the root canal, feel free to ask. I didn't want to get into the nitty gritty but rather make sure something was out there as I did not find much online when I was trying to find out how to go about the repair. I'm not a mason, just a guy who forked out the dough to someone who knows what they're doing!
After extensively reading the forums I was able to learn enough to take my $700+ electric bill down to $300 in the first month of stove usage, with more room to save. (1970's little house with poor insulation).
Anyway, on to the project. After purchasing the home I realized the "fireplace" installed was a zero clearance box that should have raised red flags because of the masonry chimney. After my electric bill began going through the roof to heat the place, I asked the original contractor who constructed the house, who happens to live down the road, what was originally there. He told me in the 1970's a heatform fireplace was installed...
An insert was the only solution because there was no room to be lost for a freestanding stove. The room is an open concept with vaulted ceiling and floor space is a premium. Plus, I have two little minions running around and the wife nixed any notion of a freestander.
Hmmm. Prior owner attempted his own root canal of the rusted out heatform firebox and realized it was no easy fix. He then installed the ZC slammer style in the open cavity and drywalled over where the original heatform facing stone was. Super ugly and super inefficient. On top of that the round slammer pipe in the rectangular flu was allowing cold air down into the heatform cavity which created cold drafts in the house because it was infiltrating the walls.
Stonecraft, a masonry/chimney company in the Poconos completed the overhaul. They ripped out the old ZC, refinished the damaged firebox, refaced the fireplace with manufactured stone, and slapped in a bluestone hearth and mantel. All in all they did a great job considering the mess I had on my hands. The guys were a pleasure to work with...

I opted for the Ironstrike Montlake 300 to fill the firebox. It is right around 3 cf and has a larger NS orientation. It also has dual blowers which attracted me because of the need to move heat to reduce the electric bill. I will still be experimenting next heating season, but got a good 2 months under my belt with the Montlake and was impressed.
My impressions of the Montlake:
-Loud blowers but VERY efficient at heating my house. Full blast on the blowers would require cracking windows. the low setting is still pretty loud since I'm not used to the white noise.
-Great airwash resulting in clean glass
-sweet secondary burns


-the stove has a pretty cool heat exchanger design that really helps the blowers move HOT air. Above the baffle there are steel "stalactites" that heat up easily. However, the air comes out the front of the stove directly below the stove top. Without a stovetop thermometer, I overestimated the stove top temperature during burn in, and ended up scorching some of the paint on the stove top because it did not cure at the same rate as the rest of the stove. After learning about the stoves design, I should not have turned the blowers on until the stove was fully cured. (My bad but no big deal) The stove top appears to be the cooler part of the stove when the blowers are cranking???
 Not expecting that.
-I have had good overnight burns without loading a completely full firebox. I am waiting until next winter until I am completely comfortable with the stove's manners and my wood supply. I also learned that I need bigger splits to stretch the overnight burns.
***Do not use any stove when your wife decorates it with flammables for the summer***
If anyone has questions about the more detailed steps of the root canal, feel free to ask. I didn't want to get into the nitty gritty but rather make sure something was out there as I did not find much online when I was trying to find out how to go about the repair. I'm not a mason, just a guy who forked out the dough to someone who knows what they're doing!
Last edited by a moderator:


