I recently completed my first wood stove installation. I was having trouble finding examples of floor protection for an unlisted stove following the protocols described in the NFPA-211, so I figured I would share what I ended up building.
First, here are the NFPA-211 specifications for an unlisted stove with a minimum of 6" ventilated open space beneath the fire chamber:
The body of the stove I installed is approx. 24"x24", so I needed to construct a platform of dimensions 60"x60" (5'x5') to meet the requirement of 18" clearance on all sides. The way I interpret the NFPA-211, it would be acceptable to lay masonry directly on the floor. However, my barn floor has a slight lean to it, so I decided to construct the platform on a piece of plywood which would allow me to shim it level.
Materials used:
Process:
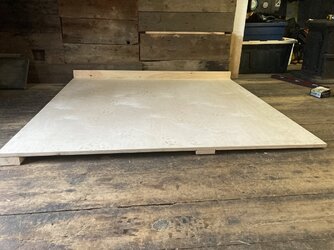
First, I positioned the plywood board to allow the appropriate clearance away from combustible wall materials. Following NFPA-211, this is 36" unless you use a non-combustible material supported with 1” spacers, in which case you can reduce the distance to 18". For my build, I am working in a corner and will use sheet metal against one of the walls. Once the board was placed, I affixed the shims to make it level, then attached one of the white pine boards to the side facing the wall (since it would be difficult to access this edge once masonry starts getting added). I attached the pine board with 1.5" deck screws using pre-drilled holes.
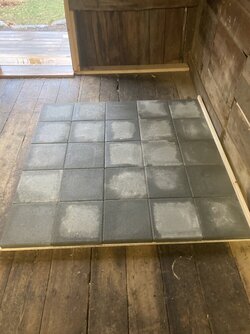
Next, I laid out the pavers. Bricks would have been a slightly cheaper option, but since my platform is exactly 5’x5’ it was much simpler to use 12”x12” pavers rather than cutting bricks to size. One of the instances where I chose convivence over cost. The pavers in my photo look discolored because I just unloaded them in the rain.
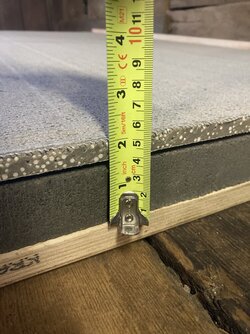
Now I lay out the cement board. Conveniently, cement board is sold in a 3’x5’ length, so I only had to trim 1’ off one of the boards to get a perfect fit to completely cover the platform. Regardless of platform size, cement board is fairly cheap and easy to cut. The layer of cement board on top of the pavers gives me exactly 2” of depth, good enough for the NFPA-211 specification.
Next, I attached the rest of the pine board to finish the trim. You could get fancy here and do a 45-degree miter cut on the corners, but this platform isn’t trying to impress anyone. I attached using 1.5” deck screws using pre-drilled holes again.
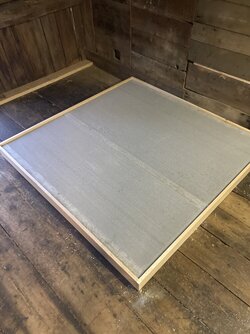
Finally, I lay in my piece of sheet metal. I was considering affixing the sheet metal to the cement board using masonry screws, but it seats perfectly flat on its own and I decided it wasn’t necessary.
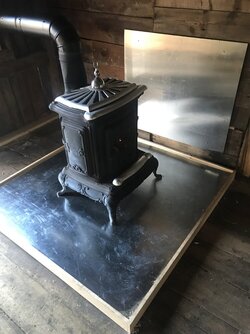
So, there you have it. Hopefully someone out there will find this helpful. Cheers.
First, here are the NFPA-211 specifications for an unlisted stove with a minimum of 6" ventilated open space beneath the fire chamber:
- The floor under the appliance is protected with closely spaced solid masonry units not less than 2" (51 mm) in thickness
- The top surface of the masonry is covered with sheet metal not less than 24 gauge [0.024" (0.61 mm)].
- The floor protection extends not less than 18" (457 mm) beyond the appliance on all sides.
The body of the stove I installed is approx. 24"x24", so I needed to construct a platform of dimensions 60"x60" (5'x5') to meet the requirement of 18" clearance on all sides. The way I interpret the NFPA-211, it would be acceptable to lay masonry directly on the floor. However, my barn floor has a slight lean to it, so I decided to construct the platform on a piece of plywood which would allow me to shim it level.
Materials used:
- 1 sheet of 3/4" thick Baltic birch plywood (sold in 5'x5' dimension!)
- 25 cement pavers (12"x12" and 1.5” thick)
- 2 sheets of cement board (3'x5' and 0.5" thick)
- 1 sheet of 24 ga sheet metal (5'x5'; cut to length from a 5'x10' sheet)
- 4 pieces of 8' 1"x4" white pine
Process:
First, I positioned the plywood board to allow the appropriate clearance away from combustible wall materials. Following NFPA-211, this is 36" unless you use a non-combustible material supported with 1” spacers, in which case you can reduce the distance to 18". For my build, I am working in a corner and will use sheet metal against one of the walls. Once the board was placed, I affixed the shims to make it level, then attached one of the white pine boards to the side facing the wall (since it would be difficult to access this edge once masonry starts getting added). I attached the pine board with 1.5" deck screws using pre-drilled holes.

Next, I laid out the pavers. Bricks would have been a slightly cheaper option, but since my platform is exactly 5’x5’ it was much simpler to use 12”x12” pavers rather than cutting bricks to size. One of the instances where I chose convivence over cost. The pavers in my photo look discolored because I just unloaded them in the rain.

Now I lay out the cement board. Conveniently, cement board is sold in a 3’x5’ length, so I only had to trim 1’ off one of the boards to get a perfect fit to completely cover the platform. Regardless of platform size, cement board is fairly cheap and easy to cut. The layer of cement board on top of the pavers gives me exactly 2” of depth, good enough for the NFPA-211 specification.

Next, I attached the rest of the pine board to finish the trim. You could get fancy here and do a 45-degree miter cut on the corners, but this platform isn’t trying to impress anyone. I attached using 1.5” deck screws using pre-drilled holes again.

Finally, I lay in my piece of sheet metal. I was considering affixing the sheet metal to the cement board using masonry screws, but it seats perfectly flat on its own and I decided it wasn’t necessary.

So, there you have it. Hopefully someone out there will find this helpful. Cheers.
Last edited:

