Gassification Tuning

  • Active since 1995, Hearth.com is THE place on the internet for free information and advice about wood stoves, pellet stoves and other energy saving equipment.

    We strive to provide opinions, articles, discussions and history related to Hearth Products and in a more general sense, energy issues.

    We promote the EFFICIENT, RESPONSIBLE, CLEAN and SAFE use of all fuels, whether renewable or fossil.
Status
Not open for further replies.
Nov 3, 2012
66
I have an Attack DP35 on which I'm trying to better tuner the quality of the fire, but have no idea how much to adjust the primary and secondary air, or how to tell if I'm doing the right thing. ANy guidance here would be helpful. It doesn't seem there is much difference in the secondary setting with it fully closed or fully open, so if anyone else has an Attack boiler, maybe you can tell me if mine seems right. The total range from fully closed to fully open is only about 5mm.
 
  • Like
Reactions: kjahnz
Looks like first step would be to get a sticky started, "Fine Tuning Attack DP". Or at least read the EKO sticky to get an understanding of the principles involved.

Next I suggest getting an inexpensive dial or vernier caliper so you can measure and reproduce settings accurately.

Then it would be best to have a friend with a combustion gas analyzer and let him take if from there.

Failing that, you need to be able to see the flame. On my DP 45 I made a panel in place of the lower door with foil faced mineral wool with a small window of regular pane glass foil-taped over a hole. Any thing fire-proof and air-tight with a window in it should work fine for as long as your tuning session will last.

Then set the primary and secondary exactly as specified on the sheet. Get a normal fire going with dry wood, a bed of coals, and good gasification; the whole bit. You should have a nice blue flame at this point and now you can mess with it knowing where to go back to if you get everything out of whack.

Adjust how much flame you want with the primary while simultaneously adjusting the color of the flame with the secondary. Wait at least a few minutes between adjustments before drawing any conclusions about the effect of the change. Write down your settings along with any observations.

I choose to minimize primary as much as I can and still have a healthy turbulent flame so as to minimize flue temperature. I think the DP 45 is lacking in heat exchange surface area and reducing the burn rate can therefore help efficiency.

Increasing secondary air from too little to too much will transition from yellow-orange, to iridescent blue, to obviously lean. I choose to go ever so slightly lean because it seems reasonable to me to perhaps sacrifice some efficiency through excess oxygen rather than risk having smoke fouling the heat exchangers and flue. You want a hot dry flame just like a cutting torch, maybe a little leaner.
 
Last edited:
Looks like first step would be to get a sticky started, "Fine Tuning Attack DP". Or at least read the EKO sticky to get an understanding of the principles involved.

Next I suggest getting an inexpensive dial or vernier caliper so you can measure and reproduce settings accurately.

Then it would be best to have a friend with a combustion gas analyzer and let him take if from there.

Failing that, you need to be able to see the flame. On my DP 45 I made a panel in place of the lower door with foil faced mineral wool with a small window of regular pane glass foil-taped over a hole. Any thing fire-proof and air-tight with a window in it should work fine for as long as your tuning session will last.

Then set the primary and secondary exactly as specified on the sheet. Get a normal fire going with dry wood, a bed of coals, and good gasification; the whole bit. You should have a nice blue flame at this point and now you can mess with it knowing where to go back to if you get everything out of whack.

Adjust how much flame you want with the primary while simultaneously adjusting the color of the flame with the secondary. Wait at least a few minutes between adjustments before drawing any conclusions about the effect of the change. Write down your settings along with any observations.

I choose to minimize primary as much as I can and still have a healthy turbulent flame so as to minimize flue temperature. I think the DP 45 is lacking in heat exchange surface area and reducing the burn rate can therefore help efficiency.

Increasing secondary air from too little to too much will transition from yellow-orange, to iridescent blue, to obviously lean. I choose to go ever so slightly lean because it seems reasonable to me to perhaps sacrifice some efficiency through excess oxygen rather than risk having smoke fouling the heat exchangers and flue. You want a hot dry flame just like a cutting torch, maybe a little leaner.
 
My DP35 seems to behave the same as you characterize the DP45. Flue temp seems fairly high and that speaks to insufficient exchange with the exhaust gasses. Overall, I'm pretty happy with the boiler, since it gives me high BTU output for a lot less than an EKO or Econoburn. With storage, burning a decently hot fire, I have had very good performance. Thanks for the tuning tips, I'm going to try a couple of things in the coming week. We have subzero temps forecast for mid next week........
 
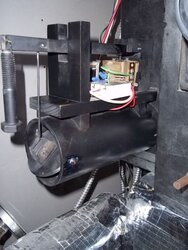
I added an inlet draft damper that maintains constant flue temperature by adjusting air inlet.

000_0035.002.jpg

But whether automated or not I think re-designing the inlet damper to be adjustable all the way down to completely shut off would be a good modification. With storage it makes no sense to me to have draft controlled by supply temperature, I think it makes more sense to be able to set the draft at a fixed opening once the unit is running steady.

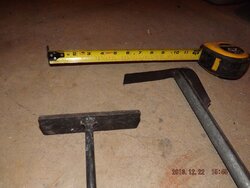
I'm using a PID controller to control injection of system return into a boiler recirculation loop while maintaining constant return temperature. By timing the duty cycle and multiplying by boiler supply temperature minus system return temperature I have a precise measure of heat output from one day to the next, and what I have found is that with flue temperature held constant, boiler output falls off after just a couple days of fly ash accumulation in the lower chamber. I made a hoe and a sidewall scraper that make it easy to clean the lower chamber without removing the refractories:

DSCF7127.JPG
 
Last edited:
  • Like
Reactions: mr.fixit
I added an inlet draft damper that maintains constant flue temperature by adjusting air inlet.

View attachment 121392

But whether automated or not I think re-designing the inlet damper to be adjustable all the way down to completely shut off would be a good modification. With storage it makes no sense to me to have draft controlled by supply temperature, I think it makes more sense to be able to set the draft at a fixed opening once the unit is running steady.

I'm using a PID controller to control injection of system return into a boiler recirculation loop while maintaining constant return temperature. By timing the duty cycle and multiplying by boiler supply temperature minus system return temperature I have a precise measure of heat output from one day to the next, and what I have found is that with flue temperature held constant, boiler output falls off after just a couple days of fly ash accumulation in the lower chamber. I made a hoe and a sidewall scraper that make it easy to clean the lower chamber without removing the refractories:

View attachment 121397
Not sure I fully understand what you're saying, but with a forced fan draft already, I'm not sure how much difference this makes. I am very new to this - only my second year with the boiler and my third week with storage. I'm looking for more basic guidance at this point, regarding the controls that are already included - the two rods which adjust the primary and secondary injection ports. So far I have already planned a number of additions. I'm really not happy with the RK2001UA controller that comes with the system. Some of the functions make absolutely no sense. My plans include a variable speed controller for both the circulator and combustion fan, flue thermocouple and combustion chamber thermocouple. I'm using a Vesta system controller which has the ability to add these devices quite simply and the PID control is built into the software. That will free me of the 2001 and give me full control over the process. As far as recirculation, I am using a Danfoss valve but not happy with the performance. Too much variation with load, but from what others have posted, it may simply be a bad thermostatic element. At this point I am not convinced I won't still want better control over this part of the process than a simple thermostatic valve. Still lots of work to do, but the addition of storage makes this a totally different system.

I like your tools. That is one annoyance of mine, that the ash that collects alongside the refractory is difficult at best to clean out without removal. I wonder why they don't provide such a tool with the boiler to begin with. I've thought of making something like that, just wasn't sure how much it affected the performance, but based on your work it appears to be significant. I have begun to clean more often, but you make a good case for a quick scrape before each burn.
 
But whether automated or not I think re-designing the inlet damper to be adjustable all the way down to completely shut off would be a good modification

Not sure I fully understand what you're saying, but with a forced fan draft already, I'm not sure how much difference this makes.

I couldn't seem to control draft very well with the factory damper flapper door. Even with the chain loose it let in more air than I wanted most of the time, and opening the flap even slightly made a huge change in air flow. So built the throttle butterfly type damper so I could adjust the air just so with repeatable measurable settings. (Then added the heat motor lever arrangement to automate draft control according to flue temperature.)

The reason I wanted to be able to shut draft off completely is to make it possible to kill the draft fan and close the inlet to stop the burn while there's plenty of charcoal left for starting the next fire. With a half a peck of charcoal all it takes to relight is to turn on the fan, rake the charcoal over the nozzle, hit the charcoal for a few seconds with a torch, pile on full size dry splits, and leave it alone.

How much do you adjust aty a time? The DP35 controls don't afford a wide range.
I just started with factory settings and then opened primary to twice factory and played with secondary to see how well I could tune it, then moved primary to half of factory and monkeyed some more with secondary. With no flue gas analyzer it's all guesswork so the only goal is to see if you can control the flame and then convince yourself you know what you want it to look like relative to factory settings.
 
Status
Not open for further replies.