have you ever seen a $20,000 wood shed?

  • Active since 1995, Hearth.com is THE place on the internet for free information and advice about wood stoves, pellet stoves and other energy saving equipment.

    We strive to provide opinions, articles, discussions and history related to Hearth Products and in a more general sense, energy issues.

    We promote the EFFICIENT, RESPONSIBLE, CLEAN and SAFE use of all fuels, whether renewable or fossil.

twd000

Feeling the Heat
Aug 28, 2015
448
Southern New Hampshire
I just might build one. Looking for feedback on my plans, which are preliminary at this point.

Would like to take advantage of the federal 30% tax credit. Current household usage is ~10,000 kWh/year. PVWatts tells me a nominal 8 kW system pointed due south can generate 10,750 kWh in an average year.

8 kW of 335-W panels is 24 panels. A 6x4 grid would cover 32' by 13'.

After the Great Northeast Deluge of 2018, I realized that I need a wood shed to reliably season firewood in my climate. So I'm thinking of trying for a 2-for-1 deal. Basically an open-wall woodshed that happens to have 24 solar panels on the roof. Has anyone else tackled a similar project? Is there a way to mount the panels tight enough that they are waterproof seams, to skip the cost of a roof that will be completely covered? Or do I need to attach a simple metal roof to purlins and then mount the racks?

A 13' roof at 40-degree elevation tilt would be 10' high at the peak. Here is a roughly to-scale drawing showing the site. Zoning setbacks are 50' on the front edge, and 30' on the sides and rear edges. This is going to require a lot of tree clearing, which is something we wanted to do anyways for landscaping and aesthetic reasons. Would like to put in some dwarf fruit trees and berry bushes in the newly cleared area. I understand the most critical solar production time is from 10 AM to 2 PM so I will prioritize trees that shade the panels during that time.

It's also going to require some significant site work and trenching. This area is already dedicated to wood processing and storage, so I will have some cleanup and re-arranging to do.
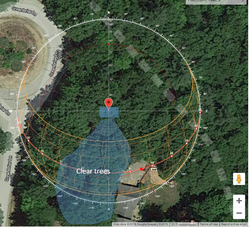
uaCGpHVKlXsGQN3BmY5syxMjyFGDs5ftZKI5qXDcMCTVugO1nJs2omsUVo0YRDAPzZ9RJmPOHpQ0BOEFJjE=w803-h727-no.png
 
Last edited by a moderator:
Talk to you tax accountant first on the extents the solar credit will cover. IMHO (not a tax adviser), you could probably build a code complaint ground mount structure that might have other ancillary uses like a wood shed. This would consist of corner posts tied to a permanent foundation with roof beams and cross bracing to accept the racking. A PE would need to sign off on the structure unless the AHJ waives it, I doubt that you could claim roof sheathing and the shingles (or equivalent roofing) in the rebate application as that is not required for PV system. I have heard that you can include the cost of trenching and conduit from the panel to the array in the credit and therefore you possibly could have the contractor apportion the work between solar an non solar. I would be hard pressed to claim having to level the lot or site work beyond pouring permanent footings but expect that while excavating the footings the backhoe would have to dig out soil and distribute it elsewhere. Ideally you would build the structure, take some photos of the array and then add the walls and floors afterwards. Cutting trees for shading purposes is reportedly is acceptable for the credit.

Note many folks have the dream of using PV panels in place of roofing. It has been done on high end architectural designs some of them successfully some not so successfully but I am not aware of any out of the box solutions for weather tight sealing the seams between the panels. I would envision a rubber trim piece with flanges on top but expect that its real tough environment. I and others have been tempted to do this. Alternatively is just sloped install gutters under the seams to drain the water away (tough in winter)

Note that you would need to read up on the Rapid Disconnect Requirements and see if they apply to a woodshed versus an external racking system. If you are using microinverters or optimizers its not an issue although you are paying a premium over string inverters. It would be stickier with a string inverter as you would not need RSS for the rack but would if it was a structure.

The trick with any tax credit or any deduction to the IRS is how well you have documented your case and how willing to sit across the table from an IRS auditor explaining line by line exactly why you deserve a credit for that line. Best case is they disallow a portion of the deduction and charge you interest on taxes owed, worse case is they call it fraud and fine you in addition to the taxes and penalties. Some folks just assume that they wont get audited and wait the three years (or 7 if its fraud). Also remember you cant deduct your manpower so you are paying others to do what you would probably normally do yourself, that means more out of pocket event though the fed is subsidizing it.

appreciate the input. I'm envisioning less of a traditional firewood shed, more of wooden ground-mount solar array that could be used to store firewood. Ancillary use, as you said.

I wasn't planning on putting up any walls, just leaving it open for the breeze to blow through. No floor either - probably sonotube footings for the posts. 6x6's with cross-bracing

Planning on going with microinverters because I understand they are better at balancing the output under intermittent shady conditions. Also easier to expand in the future when I get an EV (6-8 years out). I'll make sure to check out the rapid disconnect requirements before I apply for the permit

Planning on doing most of the work myself - hiring out the site prep work and tree-dropping work.

There is a local non-profit who helps people design and build their own DIY solar systems - I've been to a couple meetings and they know their stuff
25 completed projects to their name since 2010
https://sites.google.com/site/hareipv/home?authuser=0
 
Okay so a pergola with solar panels ;) far easier to sell than an entire building. I would be tempted to install gutters under the seams and use the panels for the roof. Harei is off shoot of the original Parei in Plymouth. Parei seems to have gotten quiet of late, they used to do a lot of solar hot water "barn raisings". I think they got burned somewhat as they were big on evacuated tube solar hot water and I think they like a lot of folks had a lot of defective tubes. One of the founders was a fairly clueless "peak oiler" on the edge of the End Of The World As We Know It crowd, good with PR but not so good with reality.
ALTE store will design a system for you, they are based out of Mass and their pricing is usually competitive and nearby. Microinverters based systems are pretty well plug and play but they get you on all the special wiring bits and pieces. The only big challenge left with microinverter design is making sure you have enough capacity in your main panel so you don't exceed the bus rating and making sure the home run wiring is big enough so there isn't a big loss from the array to the house. By the way, you may want to look at optimizers and a string inverter as you can run higher voltage in the home run which means smaller wire size, the string inverter can go in far nicer climate inside the house next to the main panel instead of hanging off the PV panels. The optimizers seem to have slightly improved reliability but function the same to deal with shading.

the HAREI crowd is still pretty active and have their heads on straight. Seems like an equal mix of accountants who like to calculate IRR to the 4th decimal place, and engineers/tech types who see the obvious payback at work with these systems. Haven't heard a word about solar hot water; it seems to have fallen out of favor. Yes they do the "barn raisers" with PV panels

I need to study up on my inverters to understand the tradeoffs. I will have a long trenched run to the main panel on the SW side of the house
 
any concerns with the wood drying in a reasonable timeframe with this system? The tall opening will be on the north side of the array, so the splits will be in shade 100% of the time, no direct sun. I wonder if it is an invitation for mold in a humid summer like we've had. The picnic table on my shaded screened porch was covered in mold by the end of August.
 
My guess is it depends on your layout and more importantly you are stepping into the debate of top covering stacks versus not covering. There are a couple factors and trade offs. For now lets make it simple and assume the panels are flat on the roof of the shed. So its four posts some cross beams and a flat roof that happens to have solar panels on it. In this case the front row of the stack gets direct sun while the rows behind the front row do not get direct sun. Wood mostly dries mostly due to air flow and the difference in the relative humidity in the surrounding air so the rest of the wood in the stack will also dry roughly the same as the front row Note that I expect the area of the wood exposed to direct sunlight is going to dry somewhat quicker as the radiantly heated wood is at higher temperature than the shaded wood so the local boundary layer of air adjacent the wood is warmer so the relatively humidity is lower in this layer. The big advantage to covering the stacks is any rain or snow does not get into the stacks as the roof keeps it off. IDamp stacks take a lot longer to dry so the trade off between the stacks in full sun versus covered tends to won in the direction of top covering. The key is that the roof needs to be separated from the top of the wood by an air gap as if there isnt one, convective air flow is reduced. The key with stacking multiple rows deep is to keep a gap between the rows and I expect most folks including myself rarely do leave air gaps between the rows as they want to optimize the amount of wood under cover and gaps can mean the stacks are less stable and more prone to falling over. Note the gaps can be maintained by setting aside some poles the length of the combined stack and laying laying them in between the rows but its a bit of PITA as all the rows have to be stacked at the same time.

Now lets take that flat roof and rotate it up to your ideal solar angle which is generally your latitude. There are couple of competing issues to consider, when you rotate the roof up to the ideal angle you have more surface area of roof than flat roof. This surface area is roughly perpendicular to the sun so it absorbs more heat. Heated air will rise along the back side of the panel and I expect that will increase air flow in the stacks although I am not sure by how much. The bigger trade off is snow. In NH the optimum solar angle is pretty shallow so snow tends to sit on the panels unless removed manually. On occasion it may slide off if the conditions are right, but normally it needs to be raked off. No matter what that means a big lump of snow builds up on the ground at the lower edge of the panel and that means the front of the stacks get shaded by the snow. It happens to me on my pole mount array so my solution is rake the snow off the panels and then run my snow blower in front of the base of the panels when id do the driveway. I have considered stacking wood under my pole mount array but the front edge is only 3 feet off the ground and I need access to the back of the array when I adjust the panel angle which is something you dont need to worry about.I rotate my panels to 60 degrees off of vertical in the winter so the actual covered area is lot less then in the summer.

A more interesting concept would be to run the panels right down to the ground, enclose the sides and rear and build a solar kiln. You may be familiar with vertical solar hot air collectors that consist of clear glass surface separated by a gap and then black absorber plate. The top and bottom of the collector is connected to the building behind it. In this case the black surface would be a solar panel. By putting a vent at the top of the panels and down low at the back of the stacks I expect there would be lot of airflow created.

Might be worth getting some big cardboard boxes from an appliance store and a thermometer and mocking up some layouts on sunny day and see how the air flow moves. Just paint the cardboard black in place of solar panel.
 
I'm told the optimal year-round tilt angle is 39 degrees at my location. Most panels I have seen around here shed the snow within a day or two after the storm. If I do a fixed ground array, I would set the lower edge 3 feet off the ground so that sliding snow would not obstruct the panels, and I wouldn't have to clear it with the snowblower.

Your mention of adjustable tilt angle reminded me of another array I just looked at this weekend. The gentelman had built a 4-car carport with 33 panels on top. He had designed it with a pivoting front edge and a chain hoist to raise and lower the rear edge seasonally. So I did some research about commercially-made single-axis and dual-axis trackers. The dual axis trackers (daily and seasonal adjustment) claim ~30% efficiency increase, while the single-axis (seasonal elevation tilt only) only improve output by ~10%. So I'm surprised to see the expense and complexity of adding single-axis tracking rather than going with a fixed array compromise, or shelling out for the full dual-axis tracker ($8-10k). What brand of pole-mount did you get, and are you happy with it? I see AllEarth solar selling a dual-axis tracker that can steer 24 panels. The simplicity of a single-pole foundation may make it worth the extra cost.
 
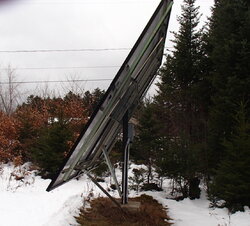
Mine is a made from scratch pole mount. Its 2 KW array that I installed by myself from scratch(included mixing and pouring 50 bags of Sakrete). As you can see by the image its basically two rectangular tubes poured in a concrete block. The two tubes are spaced apart the width of a Unistrut. There are three vertical unistruts that are what the rest of the framing is attached to. This pole mount was built for smaller array but I got a deal on my current Evergreen panels and had to stiffen it up to deal with increased surface area. The top of the two structural tubes have a 3/4" stainless steel pivot shaft that picks up the Unistrut in between the tubes and the two additional unistruts on either side of the tubes. I think the struts also have reinforcement plates inside them to beef up the bearing area. The entire array pivots off the one 3/4" shaft and the tubing arrangement takes care of the array trying to rotate vertically. Without the wiring I can flip the frame 180 degrees so its facing nearly vertical north or south. When I attached the panels I would attach 2 on one side, then flip the array facing the other direction and put on two more so I was always working from the bottom. This kept the array somewhat balanced and meant no scaffolding as I did everything off a step ladder. What sets the angle are the struts that run out from about half way up the lower panel to the post. Its in the winter angle (30 degrees) , if you look carefully there is a shiny SS bolt head that is the summer angle (60 degree) with a another set in between that corresponds to 45 degrees. To keep it from twisting in high winds I have extra struts running from the side of the foundation block to lower corner of the frame on either side (the perspective make it hard to see). I only use one in the summer but in the winter I use two (the one in the back is blocked but you can see the bracket.

The neat part is that since the array is balanced on the pivot I can adjust the angle by hand in about 10 minutes. First thing I do is remove the wind struts and then I remove one of the braces on either side of the pole. From there its pretty easy to hold the array at whatever angle I need with one hand and remove the bolt and then move the array to the higher angle with my one hand and then move the remaining brace to the next hole with my other and get the bolt started. I used to have some temporary braces to hold things in place but found that its lot quicker to use my current method. I could add horizontal tracking pretty easy but didn't want to complicate it for little gain. Note even at 30 degrees snow will build up on the array on occasion and stay on it for few days.

I did it out of single Unistrut as that was what was in stock at Home Depot. The local electrical supply place would not give me a discount so I used Home Depot as the strut was about half the price of the local supply place. If I had access to the full Unistrut catalog I would have gone with double or triple height strut which is lot stiffer than stacked single strut. Note some AHJs require a fence around the array, min didn't. It meet the code that the wiring is inaccessible but just barely. If you look carefully you can see the junction boxes on the panels and they are more about 7 feet from the ground. I also added galvanized hardware cloth over the area where the cables are run although its hard to see. Note some AHJs don't allow home built array racking unless its stamped by a PE. I do have a stamp if I needed one but in my town they didn't even inspect for several years.

I have DC rated throw switch on the pole and a Midnight Solar surge suppression device on the box. The pole has a ground rod and that is tied into the primary household grounding system via a #4 bare copper wire in the conduit trench. The DC power runs in a conduit to my basement to a 2 KW string inverter. I also have another 2 KW roof mount using commercial racking and my original 660 watt watts array that hang off the side of my house. It too has an adjustable angle but that one requires a 2by 6 and hydraulic floor jack to adjust.

The usual recommendation is latitude for best overall but if adjustable have the winter angle at plus 15 (total 60 degrees) and winter -15 for a total of 30 degrees. You are farther south so your latitude is less. I even though I should be considering moving the array up to spring mode soon I usually leave it at winter angle until March 1st to cut down on snow buildup. The lower angle is partially offset by reflectance off the snow on the ground. On a cold sunny day with snow on the ground I can put out more than rated power. Unfortunately my string inverter clips at 2005 watts so I loose out on a bit of power on very rare occasions.
 

Attachments

  • sway brace 12_05_14.JPG
    sway brace 12_05_14.JPG
    222.1 KB · Views: 161
  • Like
Reactions: twd000