1. Welcome Hearth.com Guests and Visitors - Please enjoy our forums!
    Hearth.com GOLD Sponsors who help bring the site content to you:
    Jotul Cast Iron Stoves
    Woodstock Soapstone Stoves
    Hearth and Home (QuadraFire and Harman Stoves)
Thread Status:
Not open for further replies.
  1. brian_in_idaho New Member

    joined: Aug 23, 2006
    157 posts
    Jewel Lake (Sagle), Idaho
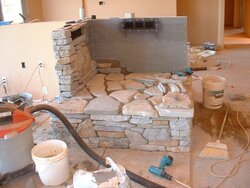
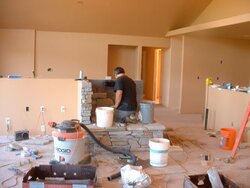
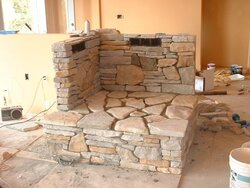
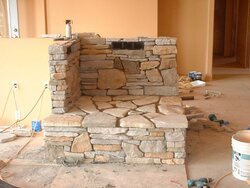
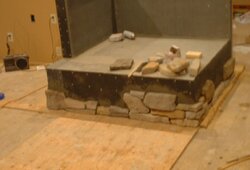
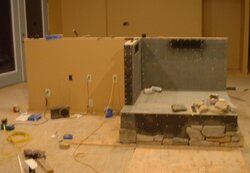
    I must be a bit deranged, I have been building my own house in my spare time...for the last 3 years now. Anyway, I recently started working on my hearth. Sheetrock is in and painted, I am getting the hearth ready for cultured stone. I figured I'd put in some pics if anyone was interested.

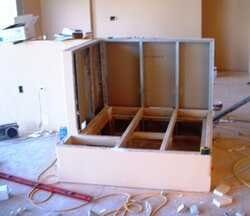
    First pic is the area where the stove will go, showing the framing. I didn't realize the pics aren't at a good angle, the stove will be against a 1/2 wall seperating the living room and dining area. The stove will be on the ledge on the right, the TV/entertainment center to the left of the perpendicular wall.

    OK, can't get the pic to post!
    #1

    Helpful Sponsor Ads!


  2. DonCT New Member

    joined: Dec 9, 2005
    609 posts
    Bristol, Connecticut
    To post pics, just click on the browse button then find the picture. You are limited on size, so you may have to make a couple posts depending on your file sizes. There's more info in the Picture Gallery forum on posting pics.
  3. brian_in_idaho New Member

    joined: Aug 23, 2006
    157 posts
    Jewel Lake (Sagle), Idaho
    Once more

    Attached Files:

  4. brian_in_idaho New Member

    joined: Aug 23, 2006
    157 posts
    Jewel Lake (Sagle), Idaho
    OK, I had to play with the pixel count and save to a smaller size, picture quality is bad. And I have dialup... I'll burn these to a USB fob and play with them some more at work. Heres one more try. This is as far as I got tonight, ran out of ledgerstone rock, the rest should be here Thursday.

    A quick summary, I built the walls with steel studs, the deck is plywood, wonderboard over the deck and on the walls. Metal lath is added to mount the stone. I cut vents into the left side and back wall (register cover on the "cold" side and a metal soffit vent on the sides towards the stove). I hope to get some better pics up to show the progression, sorry about the lack of quality. Keep in mind, I'm not saying this is the right way to do things, I'm just showing what I did. A stone mason would tell you all I'm doing wrong.


    Bri

    Attached Files:

  5. DonCT New Member

    joined: Dec 9, 2005
    609 posts
    Bristol, Connecticut
    Nice! It's like a grown-ups LEGO set :)
  6. brian_in_idaho New Member

    joined: Aug 23, 2006
    157 posts
    Jewel Lake (Sagle), Idaho
    OK, I should mention that I could never decide if I preferred to watch a good movie, or the fire. At my last place the layout had the stove and TV on opposite sides of the room. FIgured I'd put them both together this time...if the wife has a chick flick on, I can just watch the flames!

    Also, the waterproofing (roofing felt) is only applied to the low area, below the hearth on the vertical surfaces, which was drywalled; it is not on the CBB on the sides/walls. I don't see why the morter wouldn't bond just fine to the CBB (probably better). The Cultured Stone directions say put down the moisture barrier, seems like a really bad idea here, due to the heat involved.

    Bri
  7. Corie New Member

    joined: Nov 18, 2005
    2,428 posts
    Halifax, VA
    i think that is gonna look so sharp once the stove is installed. Thumbs up from me!
  8. ourhouse Minister of Fire

    joined: Feb 16, 2006
    720 posts
    Franklin Ma
    Looks great keep up with the pics.
  9. brian_in_idaho New Member

    joined: Aug 23, 2006
    157 posts
    Jewel Lake (Sagle), Idaho
    OK, lets try this some more. This is a pic of the framing, showing the steel studs and support for the hearth.

    Attached Files:

  10. brian_in_idaho New Member

    joined: Aug 23, 2006
    157 posts
    Jewel Lake (Sagle), Idaho
    Back side view, showing the vent (register cover). Messy work area, I try not to let things get this bad.

    Attached Files:

  11. brian_in_idaho New Member

    joined: Aug 23, 2006
    157 posts
    Jewel Lake (Sagle), Idaho
    Deck (plywood) is on. I cut a steel stud to give me an angle bracket to attach the bottom of the Wonderboard to.

    Attached Files:

  12. brian_in_idaho New Member

    joined: Aug 23, 2006
    157 posts
    Jewel Lake (Sagle), Idaho
    What happens when you get carried away using a tile scoring tool to score wonderboard (top). The scoring tool is a little carbide "wedge". Lower pic is redneck engineering approach to keep the job moving....

    Attached Files:

  13. brian_in_idaho New Member

    joined: Aug 23, 2006
    157 posts
    Jewel Lake (Sagle), Idaho
    Wonderboard is up and lath is on. Vent is installed on the back wall.

    Attached Files:

  14. brian_in_idaho New Member

    joined: Aug 23, 2006
    157 posts
    Jewel Lake (Sagle), Idaho
    Got-r-pretty-well-done totay, here are some pics, pad on.

    Attached Files:

  15. brian_in_idaho New Member

    joined: Aug 23, 2006
    157 posts
    Jewel Lake (Sagle), Idaho
    My aching back....

    Attached Files:

  16. brian_in_idaho New Member

    joined: Aug 23, 2006
    157 posts
    Jewel Lake (Sagle), Idaho
    Final product...sort of. I need to "cap" the wall, but haven't decided what I want to do. I'll get the stove in and finalize this. I'd like to do a split log top, but I think my clearance will be tight for that.

    Attached Files:

  17. brian_in_idaho New Member

    joined: Aug 23, 2006
    157 posts
    Jewel Lake (Sagle), Idaho
    Taking a break and having a beer while I post pics, I need to go clean up the mess. All-in-all, not a hard job. Stone cost was right around $500, with a bit left over. About another $100 or so in CBB, lath, morter, screws, etc. Time to complete, maybe 20 hours, not counting the drywall.

    Attached Files:

  18. Todd Minister of Fire

    joined: Nov 19, 2005
    8,795 posts
    Lake Wissota
    Nice job, What kind of stove did you go with. You have a good central location, the stove should heat the whole area well.
  19. ourhouse Minister of Fire

    joined: Feb 16, 2006
    720 posts
    Franklin Ma
    Looks GREAT. Coming along nicely.
  20. elkimmeg Banned

    The workmanship looks great. I like how you took the time to come up with the placement arrangements.
  21. MountainStoveGuy New Member

    Wow, that looks like alot of work. Good job! you should be well into a 6 pack by now...
  22. brian_in_idaho New Member

    joined: Aug 23, 2006
    157 posts
    Jewel Lake (Sagle), Idaho
    Thanks for the kind words guys, coming from you guys that do this stuff for a living and have your own setups it means alot.

    The stove will be a Hearthstone Mansfield, I'll have it delivered next week. I have to check on what my dealer gets for delivery and install. I could probably do it myself, I think the tractor and pallet forks will get it up on the deck fine, then roll it on abs pipe to the hearth and walk it up planks. I can get my buddy to help, but the beer may cost more than professional installation. Besides...this old back is complaining already. And if the pro's break something, it ain't my problem.

    MSG, you are right about the beers, took a couple to the hot tub when I got done.

    Bri
  23. MountainStoveGuy New Member

    make shure you dont put any pressure on the ash pan, it could crack the ash pan door frame. Its fragile. And as far as beer goes, i have had my fair share tonite. A local brewery makes a brew called "hazed and infused" it seemed approiate with the week that i had.
  24. begreen Super Moderator

    joined: Nov 18, 2005
    36,118 posts
    South Puget Sound, WA
    Beautiful work. It's a great feeling to see this coming together after all the work you've put in to get it ready. Hope you cleaned up before the beers (just kidding).
  25. suematteva New Member

    Brian,

    Your hearth setup looks great. good planning.

    Moving that mansfield is a bear, even in an area with good access...We had a john deere loader to grab it out of the pickup setting in garage, placed it on a wheel dolly in the garage by hand and had to then get down two steps (built little ramp) and then into the room where she works..We were fortunate it went well, but that is heavy ?%#$* 590 lbs.. We love every ounce!


    GOOD Luck
Thread Status:
Not open for further replies.

Share This Page