hearth extension suggestions: quick update

  • Active since 1995, Hearth.com is THE place on the internet for free information and advice about wood stoves, pellet stoves and other energy saving equipment.

    We strive to provide opinions, articles, discussions and history related to Hearth Products and in a more general sense, energy issues.

    We promote the EFFICIENT, RESPONSIBLE, CLEAN and SAFE use of all fuels, whether renewable or fossil.
Status
Not open for further replies.

NSDave

Member
Dec 29, 2011
114
Halifax NS Canada
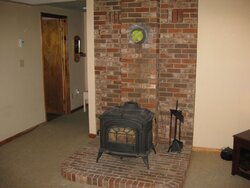
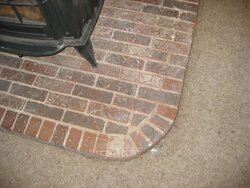
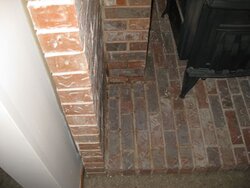
In anticipation of the new stove ( Enviro Kodiak 1200 ) here are some pics of my hearth. It measures 58" wide 49" deep at its deepest and 40.5" deep where the chimney juts out. I'm pretty sure I'm good Width wise, but to get the 18" from the loading door ( canada) I may have to add on. It is in a basement and the carpet is laid right on the concrete floor, we are planning a reno so I'm thinking for the time being I'll cut out some carpet and lay down some ceramic tiles just to meet code. That should do ; am I right? Pre inspection is Tuesday so I'm sure they will tell me what works and won't. The hearth size is within spec according to the manual but not with the chimney sticking out there; maybe.

I plan to put in a dri-core ( home depot 2x2 sq ) subfloor which is about 2" high; and remove the carpet; maybe tile ;maybe laminate will go back. or some combination

So would you:
1. extend the brick work ; I haven't done brick work, but hey its not load bearing so I'd give it a go. I do like the brick.

2. remove the brick and build up a suitable floor pad with durock and tiles

3. build an extension and cover the horizontal brick with a new tile to make it all one.

4. 3 and tile the chimney to match

5. 2 and tile the chimney to match

Thanks for any thoughts!

Edit: I'd like to add that I DO have a doggie; she is up laying by one of the electric ( ugg ) heaters with no fire going :(
 

Attachments

  • IMG_2198.jpg
    IMG_2198.jpg
    94.6 KB · Views: 372
  • IMG_2199.jpg
    IMG_2199.jpg
    93 KB · Views: 390
  • IMG_2200.jpg
    IMG_2200.jpg
    66.3 KB · Views: 365
My .02 - If you like the brick, maybe hire a mason to remove the leading edge of 1/2 bricks on the first row, and the two radius corners. Remove the cut end bricks on each side of the next 3 rows in. Put in new brick to make the ends square to the existing. Lastly add a few more rows in front for clearance plus one or two rows to be sure. A good mason could possibly match the bricks. If the mortar is off color, an angle grinder can be used to remove some old mortar in the joints and new mortar run into to make it all match.

This thread may do better in the DIY.

Nice looking hearth. It beats my fireplace install.
 
I would personally keep the brick and do as you said in suggestion number 1. I think your hearth looks great, and it really wouldn't be very hard to extend your brick. If you have some basic masonry skills it would go pretty smooth. Read up on matching mortar on the internet, it will help you get the new mortar to match the old mortar.
 
I agree with fishingpol and Overkill, the brick looks great, try to extend it.
 
Thanks everyone;

I am leaning towards the brick extension; I''m trying to find someone that will take on a small job like that.
 
Here's the contrarian view....

I'm doubting that you, or even a skilled mason would be able to extend that brick so as you wouldn't look at it and easily see that it was cobbled onto the existing hearth. (If you have any bricks around from the original construction, that would change my opinion.) Bricks come in almost an infinite number of textures, colors and sizes. Mortar is almost as hard to match perfectly. You could match it 99%, and still it would be very noticeable. Not to a visitor, but you are going to be the one staring at it night after night. I'm not saying don't do it, but just have realistic expectations of what it will look like.

What I might do instead is cut a uniform strip of carpeting from around the entire hearth pad, at a width that will bring you into compliance. Assuming that the exposed strip of concrete is clean enough, you could put some concrete stain on it to dress it up. Do a border of wood or metal around the cut edge of the carptet. Easy, looks good, and cheap.
 
ploughboy said:
Here's the contrarian view....

I'm doubting that you, or even a skilled mason would be able to extend that brick so as you wouldn't look at it and easily see that it was cobbled onto the existing hearth. (If you have any bricks around from the original construction, that would change my opinion.) Bricks come in almost an infinite number of textures, colors and sizes. Mortar is almost as hard to match perfectly. You could match it 99%, and still it would be very noticeable. Not to a visitor, but you are going to be the one staring at it night after night. I'm not saying don't do it, but just have realistic expectations of what it will look like.

What I might do instead is cut a uniform strip of carpeting from around the entire hearth pad, at a width that will bring you into compliance. Assuming that the exposed strip of concrete is clean enough, you could put some concrete stain on it to dress it up. Do a border of wood or metal around the cut edge of the carptet. Easy, looks good, and cheap.

Good input; I would hate to tear up the hearth but of course I and esp the mrs want it to look good as well. If it didn't match reasonably well, you're right, I'd notice.
 
Thing is too, you're not going to know until it is, literally, set in concrete! I once made the mistake of believing a mason when he told me that he could match the mortar on an existing stone hearth surround. Didn't happen. Really, not even close. The reason being is that you truly don't know the shade of the mortar until it cures. You can approximate with a grout sample, but even that depends on how much water is used to mix it, how the joints are struck, etc. The patina that builds up on a horizontal surface over years is not something you can easily duplicate, and you either have to scrub the entire surface down with acid or other solvent to brighten the entire surface, losing that nice patina, or you skim new mortar over every grout line, which does the same thing. Third method I guess is to cut out all the mortar and repoint it all.....expensive, and messy. The bricks also get that patina, especially around a stove where soot and ashes are constantly falling onto them and getting swept into the nooks and crannys over the years. Even if you had bricks on hand from the same original manufacturing run, they are going to be many shades brighter than your old ones. There are good masons, and bad masons, of course. Some of them qualify as true artists, and I'm not saying that you couldn't find a guy/gal who could pull it off, but...

If you cut out a uniform strip of carpeting on all three sides, it would provide a nice transition from the carpet to the hearth. Ideally, it would be the width of the small section of baseboard on the left of the stove, as you face it. And yeah, you could tile that area over with something that compliments the brick. A nice quarry tile would look good, I'm thinking.

How many inches do you lack on the front of the hearth?
 
Madison makes a good point. Doesn't have to be brick at all and a stone hearth is always attractive. Doesn't have to be one slab, and could be any kind of stone you wanted. If you lack only a few inches in depth, an overhang would probably get you there...no need to enlarge the actual footprint underneath.
 
I'm really guessing that I'm either ok or it'll be a couple inches. The Installers are coming to check it out on Tuesday AM so I'll know for sure. Then they return the following Tuesday for the install. I DO like the idea of the stone on top though; but thats not gonna happen in a week. more of an over the summer thing.

The ideas have really kicked my mind into gear.

thanks again
 
Thanks for all the input; It looks like I don't need to make any adjustments, but I did get some great ideas for what I may do when we start the reno.

Hopefully I'll be posting up burn-in pics this time next week!
 
Status
Not open for further replies.