Hello From French Farmland

  • Active since 1995, Hearth.com is THE place on the internet for free information and advice about wood stoves, pellet stoves and other energy saving equipment.

    We strive to provide opinions, articles, discussions and history related to Hearth Products and in a more general sense, energy issues.

    We promote the EFFICIENT, RESPONSIBLE, CLEAN and SAFE use of all fuels, whether renewable or fossil.

ctreitzell

Feeling the Heat
Dec 23, 2023
360
France
My first post, Just saying hello. We started heating supplement with wood last year and the learning curve from old school (no air intake/ mix of green and dry to "extend" burn times) to new school (continuous over-fire concerns) is mountain ranges of issues...so before I start dragging up zombies and repeating 1000 year questions, I thought I oughta say hello.

The short story is I'm a California born and raised been living in the UK/Europe since 1997. Currently out in the French countryside; farmland just north of Le Mans.

cheers,
_todd
 
Welcome and cheers, although I had a couple of beers last night. First in a couple months. Currently catching up here with a cup of joe.
There's a lot to ponder over here with newer burn technologies. First tip, get ahead on your wood supply. 2yr plan works..... burning wood processed 2 yrs ago.
 
  • Like
Reactions: ctreitzell
Bonjour, et Joyeux Noel.
I had to look up the Panadero Delice. It's a very clean-looking design. The stove looks like it's all window. Does the glass stay clean?
I look forward to hearing about your burning experiences with it.
 
  • Like
Reactions: ctreitzell
Welcome and cheers, although I had a couple of beers last night. First in a couple months. Currently catching up here with a cup of joe.
There's a lot to ponder over here with newer burn technologies. First tip, get ahead on your wood supply. 2yr plan works..... burning wood processed 2 yrs ago.
Thanks All Night!

There really is a lot to get to grips with this new "tech".

I have a range of firewood over like an 8 year cycle...long story
I have some apple that I've been coveting for years. I started buying in wood last year because we decided to supplement our electric heaters with wood fire. So I'm behind on buying in.

My current vendor mostly supplies oak and beech. This year he's delivered a lot of wet ash that will have to wait a season or two. At least.

I must improve my drying methods; it is wet here...this past year was very wet...essentially 6mos of spring and no summer...I've never spent so much life energy cutting greenery and dealing with unusual weed situations

I'll get into in more detail later
 
Bonjour, et Joyeux Noel.
I had to look up the Panadero Delice. It's a very clean-looking design. The stove looks like it's all window. Does the glass stay clean?
I look forward to hearing about your burning experiences with it.
@begreen I've read quite a few your posts, thanks for the welcome 😃

I deeply appreciate a great resource like hearth.com forums

The Délice is essentially a Dover which is exclusive to big store outlets; then the big store handles the customer support/ warranty etc.
https://panadero.com/product/dover-ecodesign/

Last year (2022) we found an Invicta at our most local big hardware store...I don't recall the model...they had three in stock...we went home to see if we could make that stove work to our existing flue. Went back to the store next day and all three Invictas had been sold! This was due to the rush on wood stoves last year in fear of the high electricity price hike.

Then we kind of panicked. My wife went to Le Mans to check stock at Castorama. Castorama literally had three stoves left in stock at the end of October with no new stock coming until Feb 2023! 😨 And the Délice could "easily" be adapted to our flue. Ugh, easily...not really, I'll cover that later. Suffice to say we didn't have any choice.

So, these Panadero stoves have a baffle design which throws the flame/ smoke to the front of the stove so the window ceramic is continually cleaned in that manner. Frankly, pretty dangerous. In use, I've figured it out.

But really, these Panadero stoves are more about looking at the pretty fire in a minimalist design rather than a workhorse home heat generator. I have a lot of complaints about the stove. I'm hoping to ramp my knowledge and figure out the next stove, cuz I don't know how much longer I can cope with this stove!

So, instead of writing it all out now...I'll just start interacting on the forum.
 
Hello and welcome to the greatest firewood forum on the planet! 😊
thanks for the kind welcome...I look forward to getting into the wood sub-forum too!
 
You have a leg up on most as you've burned in old simple stoves so you understand the burning of wood for heat. Many get overwhelmed by the science and can't grasp that man has been burning wood in a metal box without dying for a long time.
 
You have a leg up on most as you've burned in old simple stoves so you understand the burning of wood for heat. Many get overwhelmed by the science and can't grasp that man has been burning wood in a metal box without dying for a long time.
Thanks Eman!

hey, I've been burning fires for a long, long time :)...stoves, open fires

many scenarios I shant go over
old habits die hard, too
so, gotta be willing to re-frame and change to flow with the new methodology

In my current situation we replaced an old Esse (which I have never found a photo online of). That stove ate wood up fast with zero air intake control or air control of any kind. The chimney connection was cast iron straight out the back through a 2' thick stone wall feeding a single length of 5 meter long dual wall insulated hanging on a single homemade gallows bracket.

economizing wood volume burned and greatly improving heat value inside seemed the way to go. And the Panadero does do that, but cold starts and low air intake restarts can equal a dangerous home full of smoke when the flue temp falls too far...which is never more than 2-3 hours without overloading or over firing🤦‍♂️

I hope to arrive at some better solutions via this forum. I'm spending far too much life energy on keeping a fire going 24/7 in the required seasons.

currently I use a hair dryer via outside inlet to pre-heat the flue before cold start or air increase re-start...so I just keep the fire going
 
If the stove is still being vented with a long, cold, horizontal run, that could be the draft bottleneck. Pictures are always helpful.
 
  • Like
Reactions: ctreitzell
If the stove is still being vented with a long, cold, horizontal run, that could be the draft bottleneck. Pictures are always helpful.
pics forth-coming :)
I'm prepared to hear how utterly illegal my install is

yes, I'm currently unable to vent out the top or 90° elbow directly out the back without significant works
a couple of 45° is also not currently feasible without a full relocation
my horizontal run is about 4' (1.2 meter) to a 90°
which is stated not to do in the Panadero install details

I'll share pics and show my use case in due course
I'll be the poster child for showing how NOT to install a stove for a while
until I can afford a new install

further, in my area, there are very, very few, if any capable flue installation professionals

I apprenticed as a carpenter straight out of high school and worked as a carpenter for several years before specializing in repairing and resanding wooden floors

Since being in Europe, I've renovated three properties which are all currently rental properties. I did the majority of those works as general and laborer...just to point out my understanding of working on residential buildings. I'm not saying I'm an expert in all facets, just highly capable and I know when to call in a specialist. Here in the french countryside, it's difficult to get anyone out here...and if they are actually capable when they get here has to be paid to be proven. :)
 
Last edited:
OK, got into the pics, converted a bunch and uploaded to flickr

This removal of old and new install is really very documented...I even have films of our first ever cold start

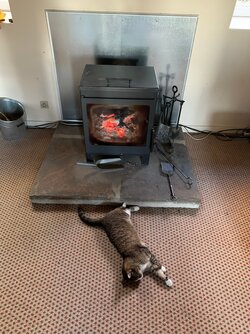
I'll start with a recent photo:
53420495828_897b8f3971_o.jpg
17 yr old Fifi worshipping her dieu
 
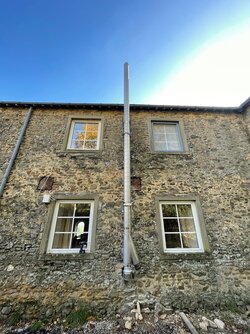
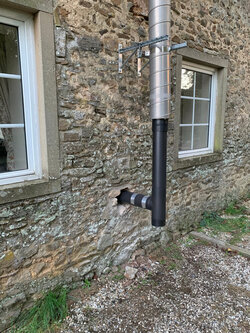
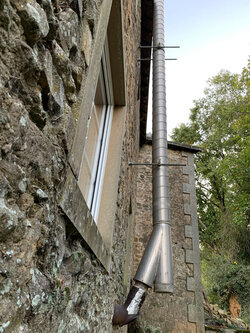
Work in progress full chimney; shows the setting, house type.
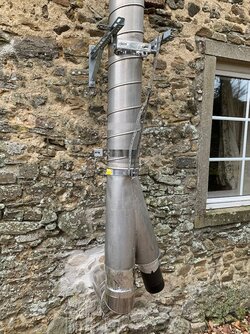
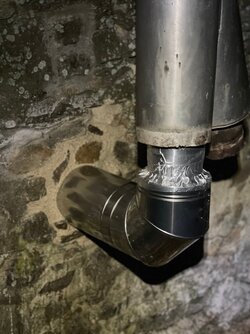
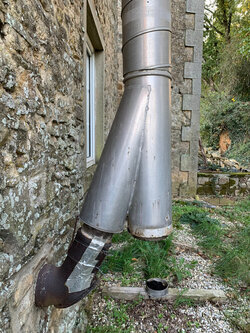
In this photo the connection from new stainless dbl wall to old angle and "cleanout" is taped with thermal rated tape. There is a Poulait vitreous adapter from 120mm to 130mm which I do not have a photo of; this connects the inner stainless 90 to the inner steel of that custom Y. All female connections pointing downward. Insulation in the Y was upgraded/added to with the green correct insulation as there were voids. I also insulated the connection by hand, tightly jointed rigid insulation which I only compressed enough to ensure continuous insulation which I then taped over...I do not have photos of that process either.
53419419907_598c0d4318_o.jpg
UGH! looks like a couple photos don't work...must be too heavy...I'm hosting them on flickr, tho...? (mod edit - fixed)
53419415537_a83e4d7053_o.jpg 53420347311_2af39a9014_o.jpg

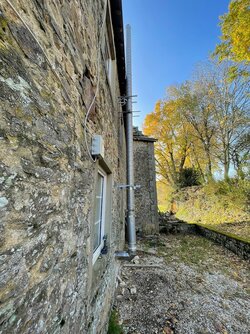
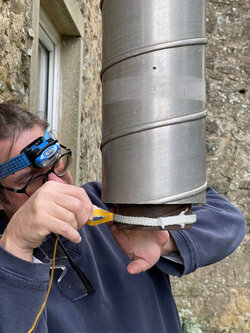
Nearly finished here; The galvanized strap is simply a safety valve. I'll get a current pic, but this is nearly what is outside now. Yes, there is no way to sweep the section from the Y to the stove. A T with access would have put the chimney section too far from the gallows brackets. Only way to sweep is from the stove...or move the stove...inside pics to come. I pre-heat this flue with a hair dryer by removing the cap on the black vitreous part on the Y.
53420502743_4444307e56_o.jpg
 
Last edited by a moderator:
You're right, that's a crazy flue setup. There are no insulated 90º elbows sold here. Instead a tee is always used at the bottom. This is better constructed to take the weight at the bottom of the chimney. It takes up no more room than an elbow. The tee also completely eliminates the jerry-rigged connection at the bottom and the cleanout Y.

Just speculating here, but I suspect this flue system is balky to start until the chimney warms up, then it probably sucks like tornado. The net effect being smoky starts with smoke spilling out of the stove at first, then near instant consumption of the fuel load. If so, this is more of a flue system issue than a stove issue.

The cute Fifa of course is oblivious to all these woes and grateful for the heat.

PS: there's no need to use flicker as an intermediary. Just downsize the pictures to less than 1000 pixels across. These pictures are 4032 x 3024 pixels at 300 dpi. They are too large straight out of the camera (or phone). I've resized a few them for you this time so that they are viewable. The others did not post due to size.
 
Last edited:
  • Like
Reactions: ctreitzell
ok, thanks on the photo advice
it's xmas, I'm doing other stuff than editing photos
I usually make the photos work before posting
I just got in a rush to put something up

So this bb code doesn't just pull thru from the source? ...it's re-rendering it on hearth.com server?
anyway, when I get it down, I'll post others

like I said, poster child for doing it wrong right now

-there is pretty much no load on the 90°...those gallows brackets are holding all the weight incredibly well

I'll share the original set up...which is pretty much this with cast traversing the wall and a single dodgy bracket...which broke the cast...I have a close friend who is a structural engineer and consult with him on these bearing issues and best practices. He felt it was much wiser to NOT disturb the stone work too much...so we are coping with the flue for now

again, a T will take the flue off the gallows bracket without changing the 1 meter length out the stove thru the wall. I could easily get longer brackets at a fraction of the cost of replacing the expensive dbl wall run

to cold start this, I heat the flue with a hair dryer for 7 min...(with a better hair dryer like a Valera it would be faster)...I make my cold start teepee fire first...heat the flue...and it draws immediately, very little, if any smoke in the room...that's why I run it 24/7...cold start on this can take 2hrs

what I hadn't realized until you point it out is the heat gets sucked out fast with the 9-10 meter rise...so if enough heat isn't generated in the firebox...BANG, the flue is too cold and a slow, smoky restart will just smoke. at the stove...again, I'm not sure a vertical will solve the issue...clearly a suitable draw needs to be achieved...which I reckon's gonna be expensive

So I suppose increasing the flue diameter will decrease the draw over such a high rise...180mm dbl wall is very, very expensive
 
Last edited:
You need to use insulated chimney pipe, not galvanized spiral duct. Especially if it’s the main dwelling. That’s going to be a creosote factory and a chimney fire waiting to happen.

I use it in my pole barn for my stove out there but I have maybe a handful of fires a year out there and understand the risks it can cause.
 
  • Like
Reactions: ctreitzell
You need to use insulated chimney pipe, not galvanized spiral duct. Especially if it’s the main dwelling. That’s going to be a creosote factory and a chimney fire waiting to happen.

I use it in my pole barn for my stove out there but I have maybe a handful of fires a year out there and understand the risks it can cause.
it is insulated double wall pipe! that 5meter section is insulated dual wall! at least at the end at the bottom there is insulation... I haven't inspected inside further up

I don't think I have a creosote problem; certainly not with dry wood...I only have issues if wet wood goes in; later fires burns the creosote right off the stove.
 
Last edited:
@begreen for how long can members edit posts? 24hrs? that's very, very short

It appears to be less than that...my post from 0856 above is no longer editable that I can see
 
Work in progress full chimney; shows the setting, house type.
In this photo the connection from new stainless dbl wall to old angle and "cleanout" is taped with thermal rated tape. There is a Poulait vitreous adapter from 120mm to 130mm which I do not have a photo of; this connects the inner stainless 90 to the inner steel of that custom Y. All female connections pointing downward. Insulation in the Y was upgraded/added to with the green correct insulation as there were voids. I also insulated the connection by hand, tightly jointed rigid insulation which I only compressed enough to ensure continuous insulation which I then taped over...I do not have photos of that process either.
View attachment 321369
UGH! looks like a couple photos don't work...must be too heavy...I'm hosting them on flickr, tho...? (mod edit - fixed)
View attachment 321371 View attachment 321372

Nearly finished here; The galvanized strap is simply a safety valve. I'll get a current pic, but this is nearly what is outside now. Yes, there is no way to sweep the section from the Y to the stove. A T with access would have put the chimney section too far from the gallows brackets. Only way to sweep is from the stove...or move the stove...inside pics to come. I pre-heat this flue with a hair dryer by removing the cap on the black vitreous part on the Y.
View attachment 321367
this post is all screwed up now...photos are in the wrong place

I guess we don't get time to fix our posts?

I seem to only be allowed to edit for about 6hrs...? that's far too short!
 
Dbl wall...this 5meter section was installed by the previous owner when I bought the place.
There is green insulation in the space between the outer and inner pipe...at least at the bottom.
I'm putting firetape to test single wall which we rejected after our tests. Single wall was suggested to us to install by our local "big box" hardware store. Talk about dangerous!

Chimney_ConxToOld_FireTape_IMG_2069.JPG

Here is the single wall for the test...long since dismantled
Chimney_Ext_SingleWall_RHS_IMG_0945.JPG Chimney_Ext_SingleWall_IMG_0946.JPG
Inside:
FlueInstall_SingleWall_Test_Top_IMG_2058.JPG
when we fired up; this coupler leaked what we thought was creosote, yet I believe it was the paint cure starting...far too hot, just madness to even suggest it IMO
 
This is the Esse that was installed in the house when we first rented and later purchased the property
yes, we used this for several years. Even had it swept a couple times.
Stove_Esse_InSitu_IMG_0868.JPG
We rented this house with this Esse having 3 broken glass slats; yes, previous owner put glass in the door on the right😨. We did have fires with the slats broken. I researched and learned about clear ceramic and purchased some slats and here they are installed. Obviously this photo is from warm season with all the candles on the stove!
Stove_Esse_unidentified_IMG_0891.jpg
Much more critically; the flue...cast which was smaller than the stove outlet. This photo is from a time when we had stopped using the stove for a few years...just before starting disassembly.
Chimney_Original_Passthru_Int_IMG_0870.JPG

Exterior flue . The a big chunk of the cast elbow had fallen off. I showed and friend and he "fixed it" for me with some barbed wire😨
Chimney_Original_Passthru_Ext_IMG_0880.jpg
A wide view showing the lower bracket broken...only the upper bracket holding this up...and some bailing wire on the rafters.
Chimney_OriginalInstall_Side_IMG_0886.JPG

I'll be back later with some more horror stories, ready to be admonished :)
 
There are no insulated 90º elbows sold here. Instead a tee is always used at the bottom. This is better constructed to take the weight at the bottom of the chimney. It takes up no more room than an elbow. The tee also completely eliminates the jerry-rigged connection at the bottom and the cleanout Y.
The T that was available to me last year was larger than the 90° elbow. We purchased from:
https://tubage-center.fr/
we purchased 180mm Inox double wall (Inox= stainless steel)

Tubage Centre no longer has 180mm diameter that we installed...it is 175mm...I'd have to contact them to investigate if the 175mm is compatible...highly doubtful

I have other, much more dangerous issues here that require my attention (barn demo)...
 
this T would probably work to replace the elbow
https://tubage-center.fr/tuyaux-double-paroi-isoles/125-mm-inox?page=2
the connection from this new stainless Convesa brand has a tight fit into that Y...connection to the spiral from the Convesa 175mm/125mm is too loose...hence why we kept the Y

I see that Tubage Center has changed their syntax from 180mm to 175mm...which is what we have...I realize I haven't shared the photos of the horizontal run...which is miles better than that single wall!
 
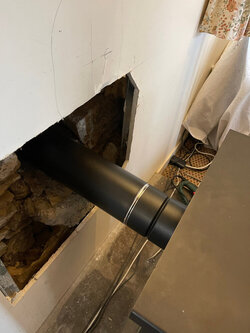
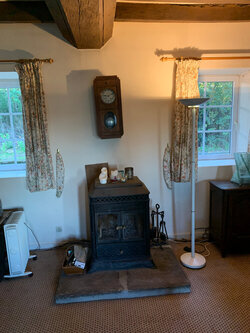
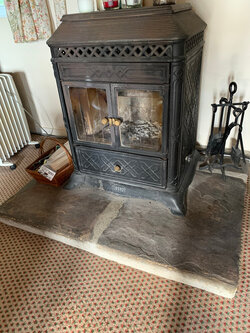
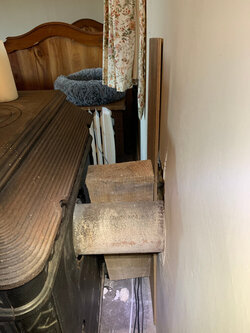
Here's the current double wall stainless Convesa flue out the back of the Panadero Delice/ Dover stove.
Realize the wall is 2 feet thick stone. We could not exit the wall higher due to bearing wood beams. The steel wall covering was suggested by the local big box store and reflects heat beautifully...the steel essentially stays cool all the time
Stove_PanaderoDelice_RHS_Wide_20221207_IMG_0971.JPG

Stove_PanaderoDelice_Flue+SteelTrimFinish_IMG_0974.JPG


There's no wood behind, just steel framing and fire resistant drywall
Stove_PanaderoDelice_FlueThruDrywall_IMG_0964.JPG

Stove_PanaderoDelice_FlueThruInsulation_Int_IMG_0963.JPG

flue going thru 2feet of stone wall from inside
Chimney_DblWall_PassThruStone_B4Fill_IMG_2424.JPG

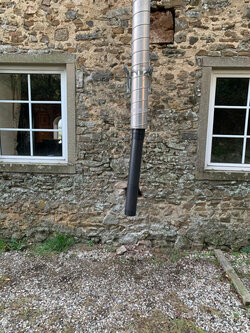
same pic as above, but in context: outside. On the main flue, I insulated by hand as I described in the post above...we didn't take photos cuz insulation on the phone, not fun. I'll have to replace the elbow with a T soon and will photo it then. The wall bracket where the spiral meets the Y is tightened on. The gallows are galvanized and the flue brackets are stainless...I have fiber washers insulating contact between the two. Yeah, it's a temp solution we'll replace in the next year. These photos are from Nov2022.
Chimney_CloseWithGallows_IMG_0975.JPG

Chimney_Ext_Close_TapeJobs_IMG_0979.JPG