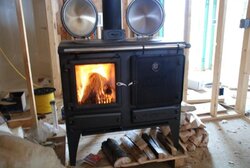
Help me assemble an Esse Ironheart

  • Active since 1995, Hearth.com is THE place on the internet for free information and advice about wood stoves, pellet stoves and other energy saving equipment.

    We strive to provide opinions, articles, discussions and history related to Hearth Products and in a more general sense, energy issues.

    We promote the EFFICIENT, RESPONSIBLE, CLEAN and SAFE use of all fuels, whether renewable or fossil.
Status
Not open for further replies.

tuolumne

Member
Mar 6, 2007
177
Vermont
I am not technically incompetant by any means, but the Esse manual lacks a good deal (can't blame translation issues here) and I have a few extra pieces that aren't shown in the exploded diagrams. First, there appears to be a secondary damper on the flue connection box. It does not totally block the opening, but would certainly restrict the draft. It has only two positions. I am sure I have it installed correctly, but what is the function? At the front of the flue connector is a removable iron skirt. I assume this is for inspection? There is a piece of lightgage metal with fireproof insulation glued to it that fits this opening. Should the insulation be in or out? Also, I have two cap screws (approx. 1/4" bolts x 2" long with allen head) that do not appear to have a home. Lastly, there are two rods describing a rough Z-shape that are threaded at one end. What are these and where do they go? None of these parts appear on the diagram. Anything else I should know before loading her up?
 
Bump....I burned all day today without these parts installed. This cook stove is unbelievable. The burn control is great, glass stays clear, and there is a suprising amount of control for oven temps by diverting the flue gas. However, I still don't know where those parts belong....no mention of them in the instructions or diagrams.

Edit: The lever doohickey is visible in the side shot, next to the flue. I also attached a picture of the Quadrafire 7100 install just to show why I'm such a happy camper!
 

Attachments

  • 003.jpg
    003.jpg
    32.2 KB · Views: 525
  • 004.jpg
    004.jpg
    44.3 KB · Views: 565
  • 005.jpg
    005.jpg
    54.5 KB · Views: 583
Boy, that is the largest firebox I've seen on a cook stove. Very nice. Thanks for the pics.

I think you are on the right track and would guess that the secondary draft control is a regulator, perhaps to help give consistent oven temps over a long bake time? The little door at the base of the flue does indeed look like an inspection port. Nice stove. Can't wait for the cooking report.
 
Man I would love one of those in the expanded kitchen, which may happen this summer. What did that cost you?

Do you have a pic of the oven door open?
 
I can't help ya too much on the assembly of this stove, but I gotta say it does appear to be sitting on some type of kiln dried lumber frame/foundation and further appears to be just inches from the exposed studs behind, including the chimney pipe.....

Now, I ain't no professional, but my gut tells me this is NOT installed as per code.....correct me if I'm wrong.

I see a house fire waiting to happen here. When I installed my Oslo we went to extremes to ensure a safe install, proper clearances, etc.
 
http://www.esse.com/pdfs/manuals/woodburning-install.pdf

It does say in this online manual the rear distance to combustibles is to be 400mm, which is about 16 inches.

Also, it is interesting to note the picture on the website shows firewood packed tightly and neatly directly below the stove, I wonder how safe that is?

Like I said, I don't have this unit, never even saw one, but if it burns wood, it gets hot, I'd check some clearances if I were you.
 
I wouldn't worry about the pallet below as a temporary platform (I do it here almost daily). The clearance to the wall does concern me though?
 
tuolumne said:
I am not technically incompetant by any means, but the Esse manual lacks a good deal (can't blame translation issues here) and I have a few extra pieces that aren't shown in the exploded diagrams. First, there appears to be a secondary damper on the flue connection box. It does not totally block the opening, but would certainly restrict the draft. It has only two positions. I am sure I have it installed correctly, but what is the function? At the front of the flue connector is a removable iron skirt. I assume this is for inspection? There is a piece of lightgage metal with fireproof insulation glued to it that fits this opening. Should the insulation be in or out? Also, I have two cap screws (approx. 1/4" bolts x 2" long with allen head) that do not appear to have a home. Lastly, there are two rods describing a rough Z-shape that are threaded at one end. What are these and where do they go? None of these parts appear on the diagram. Anything else I should know before loading her up?

Gotta say that is one cool looking stove! Is that also a clean burning woodstove or is it exempt because it's a cookstove?

Ray
 
It's exempt because it's a cookstove, BUT if I remember correctly they've included some clean-burn technology in it to bring it near modern standards.
 
Don't worry about the clearances, this is a tempory install until the finishes are done. I need heat to do that! This stove does have radiation plates on all sides, and I could touch it anywhere except for the front during a full burn. With the radiation shield below being 2" under the stove, you probably could stack wood underneath without a problem. I will take a picture of the oven next time I'm over there. This stove does have a lot of clean burn features, and I had a nice secondary burn going in the baffles. The glass stays sparkling clear! I burned the 7100 for the first time today, and that one doesn't keep the glass as clean. I paid $7000 for the Esse and the Quad. If I recall correctly, they were about the same price each. I think retail is a little over 4k. That's a big investment, but oil isn't getting any cheaper either.

Still wondering if anyone knows what those z-shaped rods and cap screws were for.....
 
Did you get your ESSE cooker put together? The 2 "Z" shaped stainless steel threaded metal pieces are handles that screw into the cook top for safe and easy removal. The extra hex-head screws are spares just in case the screws that hold down the cook top are lost or misplaced.
 
Thanks! That makes sense. The cooktop was fully assembled when I got it. I've used this stove as our primary heat since February. It has been great through the construction phase. I'ved used the cooktop to make coffe, tea and hot chocolate, and for a variety of other cooking. I have broiled steaks in the oven, but no bread yet. I'm sure we'll be using this stove quite a lot more when we move in.
 
Status
Not open for further replies.