Home made Seton Help!

  • Active since 1995, Hearth.com is THE place on the internet for free information and advice about wood stoves, pellet stoves and other energy saving equipment.

    We strive to provide opinions, articles, discussions and history related to Hearth Products and in a more general sense, energy issues.

    We promote the EFFICIENT, RESPONSIBLE, CLEAN and SAFE use of all fuels, whether renewable or fossil.
Status
Not open for further replies.

DaveS

New Member
Hearth Supporter
Feb 13, 2009
1
Northern, Mi
HI,

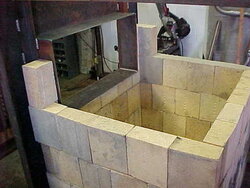
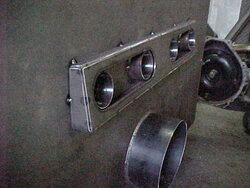
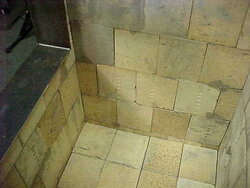
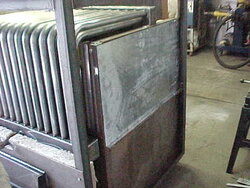
I am starting to build my own boiler. It is similar to a seton, but not based on any one in particular. My question has to do with the combustion air. Is the refactory just a box with the pipes dead heading in the bottom wall or is there some sort of distribution system that goes under the wood or in the bottom refactory. Any thoughts would be helpful or pictures if possible. Thank you
 
My retired 7 month old Adobe(semi-Seton clone) had a forced combustion air . Not many pictures of the interior of these units-didn't see anything on the Greenwood site. There is a nice cutaway picture of a Seton on their site-- www.rohor.com These are both natural draft units . Here are some pictures of my big paperweight with an interior shot of the draft holes in the bottom refractory-- https://www.hearth.com/econtent/index.php/forums/viewthread/15542/P120/

Good luck!!
 
Combustion air comes from a manifold type box on the back of the boiler. The "box" is what the combustion damper is mounted to. Some companies use flexible exhaust pipe . These pipes go through the back of the boiler where the exhaust gases/smoke pre-heat the combustion air. Then the pipes go through the refractory about 8" to 10" high from the bottom of the boiler. My unit also has a tube that feeds the fire from underneath... The combustion air pipes are about a 10* - 15* down slope angle from the backside of the boiler "manifold box" to where they enter the firebox.
 
How many air pipes, and what diameter should they be?

Given that there are several sizes of furnace, is there some rule-of-thumb that tells you how many airpipes to use with what cross-sectional area, for any given boiler size?

Also, are there any rules-of-thumb about sizing heat exchangers?

Seton-type boilers look very 'build-able'. Are there hidden pit-falls for a woild-be builder to watch out for?
 
I built my own by studying every photo that i could find. The Rohor web site and the Seton web site both have a lot of detailed photos. You can even get an operators manuel from the Rohor site. Also look at everything you can find on Greenwoods site. They are very buildable if you have any fabrication skills, a lot of cutting and welding. Go for it!
 
Jesse,

What size boiler did you build?

Do you recall offhand about how much your boiler cost in materials?
How much for the refractory cement? Steel? Insulation? Sheetmetal skin?

Did you make the heat exchanger?

How did it all work out? Do you have the boiler inside, or outside? Smoke problems?

How long does a load of wood last? Does the boiler start and stop often -- like, on and off a couple of times every hour during a burn?

What kind of wood do you burn? Big wood? Little wood (small round wood and splits)? Softwood?

About how much wood do you burn a year?

Questions, questions! There's nothing like the personal experience of people who have actually done stuff!

Regards,
Smee
 
Smee said:
Jesse,

What size boiler did you build?

Do you recall offhand about how much your boiler cost in materials?
How much for the refractory cement? Steel? Insulation? Sheetmetal skin?

Did you make the heat exchanger?

How did it all work out? Do you have the boiler inside, or outside? Smoke problems?

How long does a load of wood last? Does the boiler start and stop often -- like, on and off a couple of times every hour during a burn?

What kind of wood do you burn? Big wood? Little wood (small round wood and splits)? Softwood?

About how much wood do you burn a year?

Questions, questions! There's nothing like the personal experience of people who have actually done stuff!

Regards,
Smee

I modeled mine after the Seton W-130. I spent $1200 on material for the boiler, and $1400 for the plumbing. All my steel came from the local surplus dealer, basically scrap price. The form-able refractory that I priced was outrageous. I went with industrial grade fire brick that I ran across for a case off beer. The insulation cost me $75. I made the pressure vessel out of 1 1/4" ( Seton uses 3/4" ) because that was the die I had to work with in the bender.

The boiler is in an out building 200' from the house. I often do get smoke while loading, would not put this unit in a living space. I burn anything I can get my hands on this year. Mostly standing dead. First fire was November, but very rushed because I need heat in October. I spent weekends building this thing and wasn't able to stock up on wood. Have not been able to keep track of the amount of wood used so far.

I have no storage, can get up to 14HR burn depending on weather and amount loaded. I try not to use splits but will throw a couple in now and then. My door is 16x30 and I have stuffed pieces nearly that size in it. My damper cycles at least 3 times an hour. Still going through the learning curve and have had to change out a couple of plumbing parts,but haven't bought any propane and the house has been at 74 since November.
Jesse
 
Here are some pics of the air tubes :
 

Attachments

  • air tubes.jpg
    air tubes.jpg
    29.7 KB · Views: 930
  • greenwood refractory.jpg
    greenwood refractory.jpg
    18.9 KB · Views: 1,058
  • IMG_0047.jpg
    IMG_0047.jpg
    11.5 KB · Views: 916
  • 29e9_3.jpg
    29e9_3.jpg
    77.5 KB · Views: 1,044
Reply for Smee
I am about 60% into building a Seton/greenwood type model 100 furnace.I have been working on it nights and weekends since November.
I estimated the cost to be about $3500.00
The price of steel has dropped greatly,and varies so you have to call around. also the steel suppliers have a short rack of small pieces already cut.
The price of the refractory varies also. depending on the temp range and density,Ie KS-4 vs Mizzou.
The heat ex is not difficult. I used a harbor freight pipe bender.
I am using four 2 inch s/s flex exhaust pipes (J.C. whitney)
you will need more for a larger size furnace.

As far as pitfalls.
You will be using pictures to do your build, not plans
so it will not be exact.
If you are serious about building your own, This forum
is the best place to get the information that you will need.
 
Jesse, jimnj, Sparke, Henfruit 2.Beans too --

Thanks VERY MUCH! Jesse, -- your experience is inspiring. The Few, the Proud, the HomeBuilders! No 'Stoves-of-Indentured-Servitude' for you guys. You clear your initial investments in the first year.

Maybe by next year I'll be able to join you. You can tell by the other threads that I am nuts about this Russian Kuznetsov masonry boiler stuff. But if you put up a sketch of the cross section of a Seton boiler, and a Kuznetsov boiler, they look remarkabley similar. Actaully, all it would take to turn a Seton boiler into a Kuznetsov boiler would be a 3/4 inch slice down the back refractory wall of the firebox. This would convert it from forced gas flow (chimney draft), to 'free gas flow' (free movement of gasses). There are some distinct advantages to taking advantage of gas boyancy and letting the cool gasses sink and find a more direct path to the exit pipe, mostly having to do with increased efficiency. But from the sounds of things, you are getting pretty good results as.

Thans again. I like the bit with the firebrick. Can you post pictures?

Regards
Smee
 
Smee

Here is the almost free brick in the building stages. Jesse
 

Attachments

  • MVC-028S.JPG
    MVC-028S.JPG
    19 KB · Views: 858
  • 16.JPG
    16.JPG
    18.2 KB · Views: 872
  • MVC-028S.JPG
    MVC-028S.JPG
    19 KB · Views: 832
  • MVC-032S.JPG
    MVC-032S.JPG
    16.2 KB · Views: 803
Very nice Jesse. How are you holding the bricks together? I'd be afraid of dropping a piece of wood and knocking them loose.
 
I used a pre-mixed 2000* mortor I got from the local fire place shop, but really only used it as a sort of glue to hold the brick untill I backed it with bolt in place steel panels.
 

Attachments

  • MVC-015S.JPG
    MVC-015S.JPG
    24.1 KB · Views: 948
Thank you! I used to work in sheet metal, and did a lot of different types of fabrication.
 
Nice work Jesse! Two suggestions while you are still fabricating. 1. Make yourself an ash pan. Just remove some of the bricks in the center. Weld a compartment on the bottom for ash pan. Where you removed brick build up with flat stock about an inch below fire brick. Install a cast iron grate. It takes forever for these units to cool down enough to take ashes out. I am sooo glad I have an ash pan. 2. I don't see any insulation in the front of the boiler. I assume you have not installed it yet?

How are you pressure testing the the vessel?

Again, nice work!
 
Hello Sparke The boiler is done now, Ive been using it since November. The photos do not show the insulation in the front, but it's there. I do not have an ash pan,but do like your idea. I put 2 layers of brick on the bottom and it would be very easy to remove a few of the first layer and do as you have suggested. Actually I have gotten pretty good at cleaning ashes out with out loosing any water temp. I capped both ends of the vessel and aired it up to 100psi, left it overnight, no loss in the morning so I called it good. Bethel told me that's the way they test them.

Thanks for the advice Jesse
 
I will be updating my boiler soon. I am putting on SS skins with access to the Hx. Many other small changes. I will post pics of the upgrade. I will take some shots of the ash pan set up for you. Pictures are better then words...
 
sparke said:
I will be updating my boiler soon. I am putting on SS skins with access to the Hx. Many other small changes. I will post pics of the upgrade. I will take some shots of the ash pan set up for you. Pictures are better then words...

I agree, I would like to see those photos. Thanks Jesse
 
Hello Jesse, what parts of Indiana are you from, as I'm in northern Illinois. I'm very interested in building a boiler like a seton. I've been collecting material for over a year now and have most of the things I need to start this spring. Did you ever think of buying plans of the seton boiler or is that even an option any more. I'm not bashing yours or any other project, but would also like to hear if any one purchased them plans and how did it go. Reason I say is I'd like to do it once, as material is not cheap nor is time. What other advice can you, or willing, to give. Fabrication will be the easy part for me, but doing this hopefully will be a one time deal. Sorry for the ramble. Thanks, Joe.
 
Joe, I'm in Columbia City, about 20 miles west of Fort Wayne. I did look into buying the plans but the cost was just to much, at that time Fred was selling them for $700. I noticed they are not advertised on his site anymore. Since Bethel took over, maybe there not available. I know 2beans has talked about a buddy who bought the plans. He may be able to give some info on what there all about. I will say that once you get the theory in your head, building it is pretty easy. the nice thing about not having the plans is you tend to make things the way you want, and the size you want. I will help any way I can.
Jesse
 
hi jesse, i have greenwood 100 no storage. iwas thinking of adding a in line damper to work with the air inlet damper. but after reading your post ,you feel it do not improve in the idle mode to conserve less heat up the chiminey and extend the burn time? thanks patrick.
 
Patric
When my boiler is at idle, for the first half of the burn, it smokes some. I unhooked the flue damper and manually operated it between open and closed. I found no difference in what was coming out of the stack when doing this. I wasn't able to find any advantage to having the flue damper damper closed with the intake closed. I did notice that with these to being linked together, I sometimes got smoke from around the intake door.(even with a good silicone gasket seal) I'm not saying that there isn't some sort of advantage to it, but at this time I haven't figured out what it would be. It is an easy thing to do, doesn't require a lot of time or money, and does make for a nice draft control damper. (I get a lot of wind (sometimes) on those days I shut that a little as to lengthen my burn time a little longer, I do not have storage.) So put one in and see what you think. I will switch computers and post a picture of my setup. Jesse
 
Status
Not open for further replies.