Jotul F118 Black Bear Hearth & Wall Shield - Begins

  • Active since 1995, Hearth.com is THE place on the internet for free information and advice about wood stoves, pellet stoves and other energy saving equipment.

    We strive to provide opinions, articles, discussions and history related to Hearth Products and in a more general sense, energy issues.

    We promote the EFFICIENT, RESPONSIBLE, CLEAN and SAFE use of all fuels, whether renewable or fossil.
Status
Not open for further replies.

BlankBlankBlank

Minister of Fire
Oct 12, 2011
564
PA
Finally worked out the stove issue. Talked with dealer who took the Jotul F 602 and gave full credit. Purchased Jotul F 118 Black Bear. The Black Bear is twice as heavy as the F 602. My brother-in-law helped me bring the Black Bear in the house today. While I initially carried the F 602 in the house by myself, I wouldn't have even considered carrying the Black Bear alone.

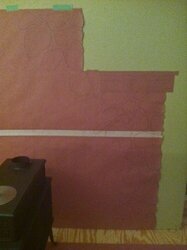
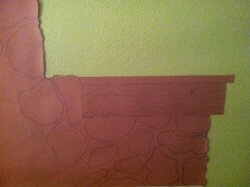
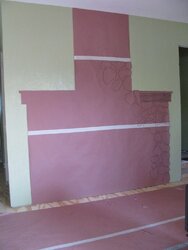
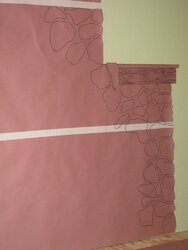
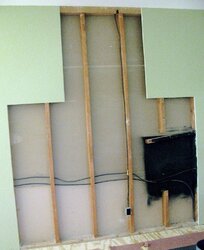
I got the Black Bear set up in the anticipated location to aid in the hearth and heat shield design. Making progress. Tonight my wife and I worked on the general layout. Then after she dozed off I started the mock up of the heat shield on red rosen paper that I taped to the wall using painter's tape. Take a look at the pictures.

More posts to come during the next couple weeks as I work toward completing the installation. The start is the most time consuming so far. Now that we're narrowing in on what we want progress should be easier to make.
 

Attachments

  • Mockup 2.jpg
    Mockup 2.jpg
    101.4 KB · Views: 688
  • Mockup 4.jpg
    Mockup 4.jpg
    162.9 KB · Views: 574
  • Mockup 3.jpg
    Mockup 3.jpg
    170.7 KB · Views: 584
Does the non-combustible shield you are putting on that wall there to reduce clearances? Are you planning / need to put an air space behind it to keep in line with the manufacturer's specs? How far will the stove be from there?

Looks like you'll be putting stone up. I've never tried it but heard that the mud needs to be absolutely perfect for the job to go smoothly. One of these day's I'd like to give doing that a try.

pen
 
pen said:
Does the non-combustible shield you are putting on that wall there to reduce clearances? Are you planning / need to put an air space behind it to keep in line with the manufacturer's specs? How far will the stove be from there?

Looks like you'll be putting stone up. I've never tried it but heard that the mud needs to be absolutely perfect for the job to go smoothly. One of these day's I'd like to give doing that a try.

pen

I'm cutting out the drywall where the heat shield will be located and replacing with 1/2" Durock cement board. Fastend to the Durock will be steel studs 3 5/8" deep. Attached to the steel studs will be 1/2" Durock cement board. There will be a 1" opening at the base and the tops of the wall between each steel stud to allow for cooling. Attached to the outer layer of Durock will be steel mesh. A scratch coat will be applied to it. After the scratch coat cures, I begin installing river rock by back buttering each rock. Afterward, I'll mortar all the joints.

As for the stove and pipe clearances, according to Jotul's manual for the Black Bear, the stove can be as close as 8.5" from the combustible surface when a protected surface is installed. The single wall pipe can be as close as 12.5" from the nearest combustible surface. The nearest combustible surface in my planned wall assembly is the face of the 2"x4" studs located behind the the entire heat shield assembly. The heat shield assembly will be about 6.5" thick, including all the layers of cement board, air space, mortar, and river rock. So my stove could be set as close as 2" from the heat shield. I'm placing it 5". The single wall pipe can be as close to the heat shield as 6". I'm going with 9". So to combustibles my stove will end up being 11.5" away and my single wall stove pipe will end up being 15.5" from combustibles.

The hearth will be made up of a 1/2" Durock bottom layer with 1" Micore board and a top layer of 1/2" Durock. Tile will be set on top to finish it out. This will provide R 2.86, which exceeds the requirements for just about any stove that I would want to use in this space in the future. The Black Bear requires no insulation in the hearth, just non-combustible surface.

The hearth dimensions will exceed the requirements of the Black Bear, so that any other stove that we might want to install here in the future will be possible without any modifications.

The planning stages have taken a good amount of time to get right. I should begin construction this week. I'lll post photos and a description of my process.
 
Well, progress has been very slow. I decided to go with River Rock over my heat shield, which I ordered about two weeks ago. As far as I can tell, it will ship this week, so I should have my River Rock by next weekend. For the structure of the heat shield, I decided to go with 20 gauge steel studs instead of the stock 25 gauge. I had to wait a week and a half for those, which arrived at the end of this past week.

I broke "ground" today, so to speak, when I laid out the cut lines on the drywall and began cutting the drywall out. I had to stop short to get ready to see my son perform in a play this evening, as well as pick up a load of wood that a fella gave to me but needed it out this evening.

I've posted a picture of the mock up. There is also a better picture detailing the expected stone appearance. Tomorrow I'll post pictures in the next stages of "surgical" demolition.
 

Attachments

  • F118 Project Mock Up.jpg
    F118 Project Mock Up.jpg
    62.9 KB · Views: 478
  • F118 Project Heat Shield Detail.jpg
    F118 Project Heat Shield Detail.jpg
    64.5 KB · Views: 500
I am looking forward to this install. Your avatar looks great BTW. One of the best ones I've seen so far.
 
Continuing the project, albeit slowly. I removed the drywall on Saturday. From the photo below you can see the shape of the heat shield as it begins unfolding.

The mock up really helps to get a sense of space and much easier to add paper or cut paper on the mock up rather than testing on the drywall, etc. I would encourage anyone considering/planning a stove install to use red rosin paper taped to the wall with painter's tape to mock up their design first. I also now have the red rosin paper mock up laid on the floor to dry run my stones to be sure the layout is pleasing and that there are enough stones to do it, etc. Then I'll just place each stone on the wall directly from the dry run laid out on the floor. But I'm getting way ahead of myself right now.

As you can see I've got to move the electrical outlet. There is also a surprise in the right hand bottom corner area of the cut out: a section of the stud was cut and nailed horizontally. and the backside of the drywall was painted black. I can only wonder what was going through the head of some idiot. Additionally, I found a book in the bottom of one of the stud cavities. The title of the first chapter was "Anyone Can Work With Wood". I suspect some poor fellow just couldn't bear to live with himself and that book. LOL
 

Attachments

  • 3 - F118 Project Remove Drywall.jpg
    3 - F118 Project Remove Drywall.jpg
    123.7 KB · Views: 453
LOL. That's pretty funny. I wonder if that was to get a bit more depth for a tv cabinet or something like that?
 
BeGreen said:
LOL. That's pretty funny. I wonder if that was to get a bit more depth for a tv cabinet or something like that?

Well there might be something to it BeGreen. Though I'm really at a loss. The picture doesn't really do this catastrophe justice. Glad this will be a relatively easy fix.
 
fishingpol said:
I am looking forward to this install. Your avatar looks great BTW. One of the best ones I've seen so far.

Fishingpol, thanks for the complement. All I did was photograph my stove and then format the picture to get what you see. I'll keep posting more stuff during the nex couple days.
 
WoodNStuff said:
Continuing the project, albeit slowly. I removed the drywall on Saturday. From the photo below you can see the shape of the heat shield as it begins unfolding.

The mock up really helps to get a sense of space and much easier to add paper or cut paper on the mock up rather than testing on the drywall, etc. I would encourage anyone considering/planning a stove install to use red rosin paper taped to the wall with painter's tape to mock up their design first. I also now have the red rosin paper mock up laid on the floor to dry run my stones to be sure the layout is pleasing and that there are enough stones to do it, etc. Then I'll just place each stone on the wall directly from the dry run laid out on the floor. But I'm getting way ahead of myself right now.

As you can see I've got to move the electrical outlet. There is also a surprise in the right hand bottom corner area of the cut out: a section of the stud was cut and nailed horizontally. and the backside of the drywall was painted black. I can only wonder what was going through the head of some idiot. Additionally, I found a book in the bottom of one of the stud cavities. The title of the first chapter was "Anyone Can Work With Wood". I suspect some poor fellow just couldn't bear to live with himself and that book. LOL

I was a contractor at one time....I wonder what that was all about?
 
Looks like a real cool hearth so far. The stone is pretty easy to put up. When you're ready for the stones to go up, it helps to put the mortar around the back edges of the stone, leaving a small open space in the back middle of stone. This helps add suction as the mortar dries and holds it in place better, but being a contractor, you may have already known that. Best of luck.
 
Status
Not open for further replies.