
Didn't see a ton of how-to's on this, so here goes. My upper air chamber/secondary manifold was in rough shape, and has been since I got the stove 7 years ago. I've been having a hard time controlling the thing, and while I had hoped to wait till the end of the season, I was wondering if leaks in the manifold were contributing to my issues.
Before. Yuck. I had taken the stainless part of the manifold out a few weeks ago and tried to hammer it back into shape. It started to fall apart with the hammering.

The side panels *should* be removable (I think) without removing the manifold, unless the burn shields are warped/cracked. In my case, I had replaced the cast plates with zircar panels. They're a touch thicker than the iron, and I probably should have cut them a bit smaller. As it stands, mine aren't coming out unless I break them or at least loosen the whole upper baffle. Also, the stainless piece apparently is cemented directly to the baffle. Mine wasn't, and I'm not sure if I did that the last time I took everything apart. So in addition to the cement on the edges, there are three bolts holding it on, 2 in the front and one in the middle towards the rear. BTW, everything on the stove is a 10 mm head. A couple of tight spaces that a 3/8" ratchet had a hard time getting to. 1/4" made things easier.
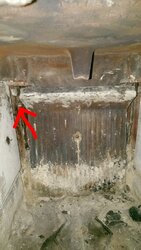
During my inspection I did notice a point of air entry into the stove. Shining light inside, you can see this gap on the left rear upper corner. The leak would be in the path of the exhaust however (above the upper baffle), so I don't think this would contribute to it running hot, right?

The upper baffle is held in place with 2 bolts behind the rear baffle. I think the upper baffle needs to be broken free to then remove the rear baffle.

Rear baffle next. One bolt, and it's cemented in place as well. You'll need to remove the rear heat shield to get to the nut on the other side. You can see (maybe) that the bolt snapped on the right side.

Rear baffle removed.

Now, at this point, it REALLY looks like the upper baffle should be able to be removed without further disassembly. I mean, REALLY. I spent an hour messing with it. There's even a relief cut into the new one to help clear a protrusion on the inner wall.
Don't know if you can see, but this is with the baffle *almost* removed; the rear left has cleared the ledge that it rests on, but I couldn't get better than that.

Finally gave up and decided to remove the top. It's held in place with 4 bolts, on either side of the cook plate and upper exhaust port. Again, you can see that the baffle really wants to clear that ledge in the back.

I wasn't able to tilt the baffle enough to clear the lugs on the side of the stove holding the top on. There are 4 of these bolts holding the top on.

At this point, the front and rear pretty much fell off. They're just cemented in place and held on by the top. You might want to put a strap around the stove to keep them from falling off once you start to try to maneuver the air chamber out.

Here's the new part. Quite a few gaps between the stainless and cast parts.


The new part went in much easier than the old part came out.

So it took forever to clean everything out and re-cement. For the reassembly, IIRC, the rear baffle needs to be bolted back in place before securing the new air chamber in order to get everything aligned correctly. I cemented the air chamber to the rails that it rests on. Also cemented the rear of the air chamber to the rear wall (you can see the area in the 7th pic, near the exhaust). Lastly, cemented the gap between the rear baffle and the upper baffle. Maybe overkill, since it was pretty tight. Did not cement the cook top in place, as it doesn't appear that this is the case on the new ones. Again, I don't think an air leak there would do much, but correct me if I'm wrong. Here's the finished product. Won't get a chance to fire it up until tuesday, I'll update then.

Hopefully this is of help to someone!
EDIT: 2 notes. The sides are held on by bolts to the bottom of the stove, which are beneath 2 burn panels on the bottom. I didn't mess with that. All in all, took me 3-4 hours. A solid hour could have been saved had I either just taken everything apart to begin with, or had that air chamber been removed without full disassembly. Or if the front and rear panels could have been left on, that would have saved a lot of time as well.
Before. Yuck. I had taken the stainless part of the manifold out a few weeks ago and tried to hammer it back into shape. It started to fall apart with the hammering.
The side panels *should* be removable (I think) without removing the manifold, unless the burn shields are warped/cracked. In my case, I had replaced the cast plates with zircar panels. They're a touch thicker than the iron, and I probably should have cut them a bit smaller. As it stands, mine aren't coming out unless I break them or at least loosen the whole upper baffle. Also, the stainless piece apparently is cemented directly to the baffle. Mine wasn't, and I'm not sure if I did that the last time I took everything apart. So in addition to the cement on the edges, there are three bolts holding it on, 2 in the front and one in the middle towards the rear. BTW, everything on the stove is a 10 mm head. A couple of tight spaces that a 3/8" ratchet had a hard time getting to. 1/4" made things easier.
During my inspection I did notice a point of air entry into the stove. Shining light inside, you can see this gap on the left rear upper corner. The leak would be in the path of the exhaust however (above the upper baffle), so I don't think this would contribute to it running hot, right?
The upper baffle is held in place with 2 bolts behind the rear baffle. I think the upper baffle needs to be broken free to then remove the rear baffle.
Rear baffle next. One bolt, and it's cemented in place as well. You'll need to remove the rear heat shield to get to the nut on the other side. You can see (maybe) that the bolt snapped on the right side.
Rear baffle removed.
Now, at this point, it REALLY looks like the upper baffle should be able to be removed without further disassembly. I mean, REALLY. I spent an hour messing with it. There's even a relief cut into the new one to help clear a protrusion on the inner wall.
Don't know if you can see, but this is with the baffle *almost* removed; the rear left has cleared the ledge that it rests on, but I couldn't get better than that.
Finally gave up and decided to remove the top. It's held in place with 4 bolts, on either side of the cook plate and upper exhaust port. Again, you can see that the baffle really wants to clear that ledge in the back.
I wasn't able to tilt the baffle enough to clear the lugs on the side of the stove holding the top on. There are 4 of these bolts holding the top on.
At this point, the front and rear pretty much fell off. They're just cemented in place and held on by the top. You might want to put a strap around the stove to keep them from falling off once you start to try to maneuver the air chamber out.
Here's the new part. Quite a few gaps between the stainless and cast parts.
The new part went in much easier than the old part came out.
So it took forever to clean everything out and re-cement. For the reassembly, IIRC, the rear baffle needs to be bolted back in place before securing the new air chamber in order to get everything aligned correctly. I cemented the air chamber to the rails that it rests on. Also cemented the rear of the air chamber to the rear wall (you can see the area in the 7th pic, near the exhaust). Lastly, cemented the gap between the rear baffle and the upper baffle. Maybe overkill, since it was pretty tight. Did not cement the cook top in place, as it doesn't appear that this is the case on the new ones. Again, I don't think an air leak there would do much, but correct me if I'm wrong. Here's the finished product. Won't get a chance to fire it up until tuesday, I'll update then.
Hopefully this is of help to someone!
EDIT: 2 notes. The sides are held on by bolts to the bottom of the stove, which are beneath 2 burn panels on the bottom. I didn't mess with that. All in all, took me 3-4 hours. A solid hour could have been saved had I either just taken everything apart to begin with, or had that air chamber been removed without full disassembly. Or if the front and rear panels could have been left on, that would have saved a lot of time as well.

")