
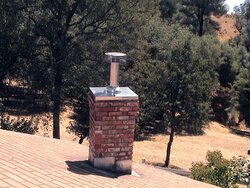
<div class="bbWrapper">Just did the chimney reline for my pellet stove. There are two pipes, one for exhaust and one for fresh air. The one close to you with a separated cap is for fresh air, a 3" alimiumn pipe. The one for exhaust is 3" stainless steel pipe specially for pellet stove. I need your professional advice to see is there anything was done wrongly. <a href="http://www.flickr.com/photos/lmei007" target="_blank" class="link link--external" data-proxy-href="/talk/proxy.php?link=http%3A%2F%2Fwww.flickr.com%2Fphotos%2Flmei007&hash=b27b1091a000fa008fd5039c344bcb79" rel="nofollow ugc noopener">http://www.flickr.com/photos/lmei007</a><br />
<br />
thanks</div>
just did reline, need your professional advice
- Thread starter lmei007
- Start date
-
Active since 1995, Hearth.com is THE place on the internet for free information and advice about wood stoves, pellet stoves and other energy saving equipment.
We strive to provide opinions, articles, discussions and history related to Hearth Products and in a more general sense, energy issues.
We promote the EFFICIENT, RESPONSIBLE, CLEAN and SAFE use of all fuels, whether renewable or fossil.
You are using an out of date browser. It may not display this or other websites correctly.
You should upgrade or use an alternative browser.
You should upgrade or use an alternative browser.
- Status
- Not open for further replies.
<div class="bbWrapper">Man, that is B. U. butt ugly. Rain is just asking to head down the flue. Sorry to be harsh, but there are lots of problems here. <br />
<br />
First, the original cap is too small and not totally protecting the flue. Second, there is no top cap plate covering the entire clay flue pipe. Third, there is no rain collar on the pipes. Fourth, no cap on the air intake. and I'm sure there's more, but you get the picture, that is a real hack job. Take the original flue cap off and chuck it. Get a proper cap plate made with cut outs for the two pipes. Then go straight up with each pipe, put on rain collars and get a simple cap for the air intake. Seal the cap plate and attach to the chimney.</div>
<div class="bbWrapper">Not trying to bust your chops<br />
or anything, but I don't understand why you did it<br />
that way when you asked all the questions<br />
here and we all told you how to do it and even<br />
showed you pictures of the parts needed. <br />
<br />
You should have removed that existing chimney cap,<br />
and topped the flue with a pellet vent chimney cone<br />
secured to the flue then capped. Since you brought<br />
the fresh air vent up you would probably have to cut<br />
a hole in the chimney cone base to allow the fresh air<br />
vent access to the outside. I never saw a pellet vent<br />
cap plate with two cut outs but that doesn't mean<br />
they don't exist. <br />
<br />
My install is similar to the pic put up by Begreen<br />
except I have a second flue for my oil furnace so<br />
the plate and chimney flashing cone on mine only<br />
covers the fireplace flue.</div>
<div class="bbWrapper"><blockquote data-attributes="" data-quote="BeGreen" data-source=""
class="bbCodeBlock bbCodeBlock--expandable bbCodeBlock--quote js-expandWatch">
<div class="bbCodeBlock-title">
BeGreen said:
</div>
<div class="bbCodeBlock-content">
<div class="bbCodeBlock-expandContent js-expandContent ">
Man, that is B. U. butt ugly. Rain is just asking to head down the flue. Sorry to be harsh, but there are lots of problems here.
</div>
<div class="bbCodeBlock-expandLink js-expandLink"><a role="button" tabindex="0">Click to expand...</a></div>
</div>
</blockquote>That is the purpose I posted here. I need your professional view and then I will improve it. Thank you BeGreen!<br />
<br />
<blockquote data-attributes="" data-quote="BeGreen" data-source=""
class="bbCodeBlock bbCodeBlock--expandable bbCodeBlock--quote js-expandWatch">
<div class="bbCodeBlock-title">
BeGreen said:
</div>
<div class="bbCodeBlock-content">
<div class="bbCodeBlock-expandContent js-expandContent ">
First, the original cap is too small and not totally protecting the flue.
</div>
<div class="bbCodeBlock-expandLink js-expandLink"><a role="button" tabindex="0">Click to expand...</a></div>
</div>
</blockquote>There are three flues. I found this problem two days ago. And I bought another two 9"x13" caps (<a href="http://www.homedepot.com/webapp/wcs/stores/servlet/ProductDisplay?storeId=10051&langId;=-1&catalogId=10053&productId=100561912&marketID=39&locStoreNum=2674" target="_blank" class="link link--external" data-proxy-href="/talk/proxy.php?link=http%3A%2F%2Fwww.homedepot.com%2Fwebapp%2Fwcs%2Fstores%2Fservlet%2FProductDisplay%3FstoreId%3D10051%26langId%3B%3D-1%26catalogId%3D10053%26productId%3D100561912%26marketID%3D39%26locStoreNum%3D2674&hash=d768cd34c4a1085313f47f0f9cb6aeee" rel="nofollow ugc noopener">http://www.homedepot.com/webapp/wcs...ductId=100561912&marketID=39&locStoreNum=2674</a>) and was planned to redo all of them but I was lazy. It looks like I have to do so.<br />
<br />
<blockquote data-attributes="" data-quote="BeGreen" data-source=""
class="bbCodeBlock bbCodeBlock--expandable bbCodeBlock--quote js-expandWatch">
<div class="bbCodeBlock-title">
BeGreen said:
</div>
<div class="bbCodeBlock-content">
<div class="bbCodeBlock-expandContent js-expandContent ">
Second, there is no top cap plate covering the entire clay flue pipe.
</div>
<div class="bbCodeBlock-expandLink js-expandLink"><a role="button" tabindex="0">Click to expand...</a></div>
</div>
</blockquote><br />
If I install a cap for all of them separately, do I still need a plate for those two without metal pipe?<br />
<br />
<blockquote data-attributes="" data-quote="BeGreen" data-source=""
class="bbCodeBlock bbCodeBlock--expandable bbCodeBlock--quote js-expandWatch">
<div class="bbCodeBlock-title">
BeGreen said:
</div>
<div class="bbCodeBlock-content">
<div class="bbCodeBlock-expandContent js-expandContent ">
Third, there is no rain collar on the pipes. Fourth, no cap on the air intake.
</div>
<div class="bbCodeBlock-expandLink js-expandLink"><a role="button" tabindex="0">Click to expand...</a></div>
</div>
</blockquote>Does it need a rain collar if the pipe is inside and under a cap? By the way, the air intake is the one extended from the old cap and has its own small cap.<br />
<br />
<blockquote data-attributes="" data-quote="BeGreen" data-source=""
class="bbCodeBlock bbCodeBlock--expandable bbCodeBlock--quote js-expandWatch">
<div class="bbCodeBlock-title">
BeGreen said:
</div>
<div class="bbCodeBlock-content">
<div class="bbCodeBlock-expandContent js-expandContent ">
and I'm sure there's more, but you get the picture, that is a real hack job. Take the original flue cap off and chuck it. Get a proper cap plate made with cut outs for the two pipes. Then go straight up with each pipe, put on rain collars and get a simple cap for the air intake. Seal the cap plate and attach to the chimney.
</div>
<div class="bbCodeBlock-expandLink js-expandLink"><a role="button" tabindex="0">Click to expand...</a></div>
</div>
</blockquote>This was my original plan but there are two many things I need to do:<br />
1. get ride of the original cap which is too small;<br />
2. install two 9" x 13" cap for the side flues;<br />
3. install the stainless steel pipe with its plate and cap in the middle flue;<br />
4. drill a hole on the stainless steel plate for the air intake;<br />
<br />
What I did was much easier .... I will redo it soon.<br />
<br />
thank you guys.</div>
<div class="bbWrapper">Don't forget to offset the air intake from the exhaust. Make the exhaust higher, that way you won't be sucking exhaust into the air intake.</div>
<div class="bbWrapper"><blockquote data-attributes="" data-quote="Hogwildz" data-source=""
class="bbCodeBlock bbCodeBlock--expandable bbCodeBlock--quote js-expandWatch">
<div class="bbCodeBlock-title">
Hogwildz said:
</div>
<div class="bbCodeBlock-content">
<div class="bbCodeBlock-expandContent js-expandContent ">
Don't forget to offset the air intake from the exhaust. Make the exhaust higher, that way you won't be sucking exhaust into the air intake.
</div>
<div class="bbCodeBlock-expandLink js-expandLink"><a role="button" tabindex="0">Click to expand...</a></div>
</div>
</blockquote><br />
Right now the air intake is face up and higher than the exhaust. I will make it face down and go down a distance.</div>
<div class="bbWrapper">Your existing cap that covered all three flues didn't<br />
have a block off plate so I don't think it's imperative<br />
for the other two but, you should get the chimney<br />
cone with built in base block off plate for the pellet vent.<br />
<br />
I don't have the storm collar on mine. We put a heavy<br />
layer of silicone where the flex pipe/chimney cone/cap<br />
come together so not a drop of water gets in.</div>
<div class="bbWrapper"><blockquote data-attributes="" data-quote="lmei007" data-source=""
class="bbCodeBlock bbCodeBlock--expandable bbCodeBlock--quote js-expandWatch">
<div class="bbCodeBlock-title">
lmei007 said:
</div>
<div class="bbCodeBlock-content">
<div class="bbCodeBlock-expandContent js-expandContent ">
<blockquote data-attributes="" data-quote="Hogwildz" data-source=""
class="bbCodeBlock bbCodeBlock--expandable bbCodeBlock--quote js-expandWatch">
<div class="bbCodeBlock-title">
Hogwildz said:
</div>
<div class="bbCodeBlock-content">
<div class="bbCodeBlock-expandContent js-expandContent ">
Don't forget to offset the air intake from the exhaust. Make the exhaust higher, that way you won't be sucking exhaust into the air intake.
</div>
<div class="bbCodeBlock-expandLink js-expandLink"><a role="button" tabindex="0">Click to expand...</a></div>
</div>
</blockquote><br />
Right now the air intake is face up and higher than the exhaust. I will make it face down and go down a distance.
</div>
<div class="bbCodeBlock-expandLink js-expandLink"><a role="button" tabindex="0">Click to expand...</a></div>
</div>
</blockquote><br />
Run both striaght up, any bends or elbows you put in it is only more resistance to the air/exhaust flow.</div>
<div class="bbWrapper"><blockquote data-attributes="" data-quote="zeta" data-source=""
class="bbCodeBlock bbCodeBlock--expandable bbCodeBlock--quote js-expandWatch">
<div class="bbCodeBlock-title">
zeta said:
</div>
<div class="bbCodeBlock-content">
<div class="bbCodeBlock-expandContent js-expandContent ">
Your existing cap that covered all three flues didn't<br />
have a block off plate so I don't think it's imperative<br />
for the other two but, you should get the chimney<br />
cone with built in base block off plate for the pellet vent.<br />
<br />
I don't have the storm collar on mine. We put a heavy<br />
layer of silicone where the flex pipe/chimney cone/cap<br />
come together so not a drop of water gets in.
</div>
<div class="bbCodeBlock-expandLink js-expandLink"><a role="button" tabindex="0">Click to expand...</a></div>
</div>
</blockquote><br />
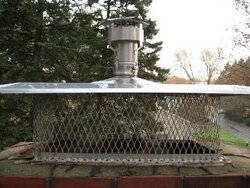
My original plan was like this photo.<br />
<br />
But if I install cap for each flue separately, I have to think about how to avoid water flows from one cap to another flue. And also there is an overlap between the middle one and side caps. I have to cut the plate of the middle flue a little otherwise the middle flue plate will be fixed together with side cap. Not easy to do, that was why I gave up and went with the easier way.<br /></div>
Attachments

<div class="bbWrapper"><blockquote data-attributes="" data-quote="lmei007" data-source=""
class="bbCodeBlock bbCodeBlock--expandable bbCodeBlock--quote js-expandWatch">
<div class="bbCodeBlock-title">
lmei007 said:
</div>
<div class="bbCodeBlock-content">
<div class="bbCodeBlock-expandContent js-expandContent ">
<blockquote data-attributes="" data-quote="zeta" data-source=""
class="bbCodeBlock bbCodeBlock--expandable bbCodeBlock--quote js-expandWatch">
<div class="bbCodeBlock-title">
zeta said:
</div>
<div class="bbCodeBlock-content">
<div class="bbCodeBlock-expandContent js-expandContent ">
Your existing cap that covered all three flues didn't<br />
have a block off plate so I don't think it's imperative<br />
for the other two but, you should get the chimney<br />
cone with built in base block off plate for the pellet vent.<br />
<br />
I don't have the storm collar on mine. We put a heavy<br />
layer of silicone where the flex pipe/chimney cone/cap<br />
come together so not a drop of water gets in.
</div>
<div class="bbCodeBlock-expandLink js-expandLink"><a role="button" tabindex="0">Click to expand...</a></div>
</div>
</blockquote><br />
My original plan was like this photo.<br />
<br />
But if I install cap for each flue separately, I have to think about how to avoid water flows from one cap to another flue. And also there is an overlap between the middle one and side caps. I have to cut the plate of the middle flue a little otherwise the middle flue plate will be fixed together with side cap. Not easy to do, that was why I gave up and went with the easier way.
</div>
<div class="bbCodeBlock-expandLink js-expandLink"><a role="button" tabindex="0">Click to expand...</a></div>
</div>
</blockquote>That looks good but I would vent them outside, keep the soot off those hardwoods...... :cheese:</div>
<div class="bbWrapper">water from the two outer caps will run onto the middle one and then flow off the middle one into the flue on the outer. maybe yo could add one more liner tile to the center flue so you can tie all the caps together</div>
<div class="bbWrapper"><blockquote data-attributes="" data-quote="JohnnyBravo" data-source=""
class="bbCodeBlock bbCodeBlock--expandable bbCodeBlock--quote js-expandWatch">
<div class="bbCodeBlock-title">
JohnnyBravo said:
</div>
<div class="bbCodeBlock-content">
<div class="bbCodeBlock-expandContent js-expandContent ">
water from the two outer caps will run onto the middle one and then flow off the middle one into the flue on the outer. maybe yo could add one more liner tile to the center flue so you can tie all the caps together
</div>
<div class="bbCodeBlock-expandLink js-expandLink"><a role="button" tabindex="0">Click to expand...</a></div>
</div>
</blockquote>They are not at the same height and the center one is higher than outer caps.</div>
<div class="bbWrapper">How about do the following to fix those issues:<br />
<br />
1. fix the existing cap issue by attach an extra metal to the left side making the existing cover longer;<br />
2. put a metal net on the left side flue to keep small animal from that flue;<br />
3. lower the new exhaut pipe to make more space; OR open a hole on existing cap to let the exhaust pipe goes up the cap and then use its good look small cap with its top plate;<br />
4. turn the air intake 180 making it face down for fresh air; OR open a hole on existing cap to let the air intake pipe goes up the cap then there is no need of bending;<br />
<br />
I will do the damper block off to separate inside and outside.<br />
<br />
Any suggestion? Is there any safty issue or code violation on the current situation?</div>
<div class="bbWrapper">Before I can comment I need to visualize the whole picture. What are the 3 flues for? One we know is for the fireplace (now has the 2 pellet stove pipes). What position does that flue hold (middle?) What are the other two flues for? <br />
<br />
It sounds like you will not be able to solve this with off the shelf home depot parts. Once we have the full picture, then a solution should be more apparent.</div>
<div class="bbWrapper"><blockquote data-attributes="" data-quote="BeGreen" data-source=""
class="bbCodeBlock bbCodeBlock--expandable bbCodeBlock--quote js-expandWatch">
<div class="bbCodeBlock-title">
BeGreen said:
</div>
<div class="bbCodeBlock-content">
<div class="bbCodeBlock-expandContent js-expandContent ">
Before I can comment I need to visualize the whole picture. What are the 3 flues for? One we know is for the fireplace (now has the 2 pellet stove pipes). What position does that flue hold (middle?) What are the other two flues for? <br />
<br />
It sounds like you will not be able to solve this with off the shelf home depot parts. Once we have the full picture, then a solution should be more apparent.
</div>
<div class="bbCodeBlock-expandLink js-expandLink"><a role="button" tabindex="0">Click to expand...</a></div>
</div>
</blockquote><br />
This ranch house we just bought has two firplaces: one on the main floor, one on the basement. The house has also a oil burner for hot water heating. Those three flues are for them. From the left to right:<br />
<br />
Flue 1 : for basement fireplace which is not covered corrected by the existing cap;<br />
Flue 2: for main floor fireplace where we are installing a pellet stove;<br />
Flue 3: for the oil boiler, the existing heating system;<br />
<br />
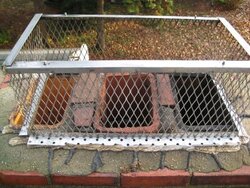
I think the previous owner was cheated by the guy installed the existing cap. I will not pay him/her if the cap installed like that. But maybe he/she had difficulty to get a proper cap to install because he/she could not install three caps (no space) and also could not find a big enough cap to cover all three flues.<br />
<br />
Some photos when I was planning this project.<br /></div>
Attachments

<div class="bbWrapper">lmei to do it right you have to get rid of that<br />
current cap that covers all three. It's just not<br />
going to work with that in place.<br />
<br />
It looks like the base of the pellet vent chimney flashing<br />
is too big and that's why you won't be able to fit the<br />
other two caps, yes? If so, you can trim the base to<br />
fit better - with the right tools of course.<br />
<br />
Looks as if you'll also need to cut a hole in it to<br />
allow for the fresh air vent to pass through.<br />
Definitely a little bit more of a pain in the ass than<br />
the normal install but still do-able with the right tools<br />
and instruction.</div>
<div class="bbWrapper">OK, multiple problems to solve here. I can see why this is perplexing you, it is a bad design to start with. That is, the original chimney flue design is somewhat flawed. It should have a height difference between the flues. Otherwise there is the potential for smoke from one chimney being pulled down or affecting the other. This is definitely going to take a custom fit cap. The problem is compounded by the fresh air intake for the pellet stove. <br />
<br />
Before doing anything, draw out your plan on paper and post it here. That is so much cheaper than buying unnecessary pieces. <br />
<br />
Craig, is there an extendaflue combo that covers this type of installation?<br />
<br />
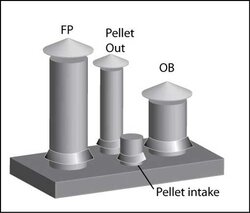
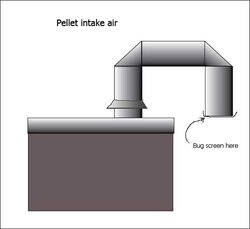
Here is a rough illustration of what I am thinking, please feel free to poke at it and suggest changes. I don't have a lot of time of experience in making elbows, so for the pellet air intake you'll have to visualize this on the drawing. I've added a crude illustration, but here is what I propose. Onto the pellet air intake stub, put a 90* elbow, then a 6" stub to clear the chimney, then add another elbow pointing down toward the roof. Cover the end with 1/8" hardware cloth screening to keep bees and bugs out.<br /></div>
Attachments
<div class="bbWrapper"><blockquote data-attributes="" data-quote="BeGreen" data-source=""
class="bbCodeBlock bbCodeBlock--expandable bbCodeBlock--quote js-expandWatch">
<div class="bbCodeBlock-title">
BeGreen said:
</div>
<div class="bbCodeBlock-content">
<div class="bbCodeBlock-expandContent js-expandContent ">
Here is a rough illustration of what I am thinking, please feel free to poke at it and suggest changes. I don't have a lot of time of experience in making elbows, so for the pellet air intake you'll have to visualize this on the drawing. I've added a crude illustration, but here is what I propose. Onto the pellet air intake stub, put a 90* elbow, then a 6" stub to clear the chimney, then add another elbow pointing down toward the roof. Cover the end with 1/8" hardware cloth screening to keep bees and bugs out.
</div>
<div class="bbCodeBlock-expandLink js-expandLink"><a role="button" tabindex="0">Click to expand...</a></div>
</div>
</blockquote><br />
I like your drawings and your propose, BeGreen.<br />
<br />
"then a 6" stub to clear the chimney" means to have a 6" diameter pipe or to have 6" length of 3" diameter horizontal pipe?</div>
<div class="bbWrapper">Begreens approach seems like oversimplifying to me.<br />
<br />
I could be wrong, but I think that with a little modding,<br />
those three caps can exist together. I see no problem<br />
with them being at the same level other than of course<br />
the fresh air intake. Never heard of smoke getting sucked down<br />
into a 15+ ft flue. If that were possible then one cap covering<br />
two and three flues would never exist and I see them on tons<br />
of homes that have multiple flues.<br />
<br />
If this were mine, I would see if it's feasible to #1, trim the sides of the base<br />
of the chimney flashing for the pellet stove so as to be able to comfortably fit the other two <br />
caps on either side, and #2, see if I could use a hole saw to cut a hole in the base<br />
to bring the fresh air intake up through it. If both of these proposed ideas worked,<br />
I would get the pellet pipe and stove all set up and leave the other two flues to deal with<br />
in the Spring when it's warmer. Nothing is going to nest in them in Massachusetts in the winter,<br />
and waiting a few months isn't going to harm the insides of the flues. <br />
Just my 2c, and oh, I don't claim to be a "professional" pellet stove installer<br />
by any means.</div>
<div class="bbWrapper"><blockquote data-attributes="" data-quote="lmei007" data-source=""
class="bbCodeBlock bbCodeBlock--expandable bbCodeBlock--quote js-expandWatch">
<div class="bbCodeBlock-title">
lmei007 said:
</div>
<div class="bbCodeBlock-content">
<div class="bbCodeBlock-expandContent js-expandContent ">
<blockquote data-attributes="" data-quote="BeGreen" data-source=""
class="bbCodeBlock bbCodeBlock--expandable bbCodeBlock--quote js-expandWatch">
<div class="bbCodeBlock-title">
BeGreen said:
</div>
<div class="bbCodeBlock-content">
<div class="bbCodeBlock-expandContent js-expandContent ">
Here is a rough illustration of what I am thinking, please feel free to poke at it and suggest changes. I don't have a lot of time of experience in making elbows, so for the pellet air intake you'll have to visualize this on the drawing. I've added a crude illustration, but here is what I propose. Onto the pellet air intake stub, put a 90* elbow, then a 6" stub to clear the chimney, then add another elbow pointing down toward the roof. Cover the end with 1/8" hardware cloth screening to keep bees and bugs out.
</div>
<div class="bbCodeBlock-expandLink js-expandLink"><a role="button" tabindex="0">Click to expand...</a></div>
</div>
</blockquote><br />
I like your drawings and your propose, BeGreen.<br />
<br />
"then a 6" stub to clear the chimney" means to have a 6" diameter pipe or to have 6" length of 3" diameter horizontal pipe?
</div>
<div class="bbCodeBlock-expandLink js-expandLink"><a role="button" tabindex="0">Click to expand...</a></div>
</div>
</blockquote><br />
6" stub of 3" pipe if needed. You may be able to make this work by just mating 2 elbows together (to create an inverted U) and not need the 6" filler stub. If the 2 elbows together clear the edge of the chimney, then no need for the connector.</div>
<div class="bbWrapper"><blockquote data-attributes="" data-quote="zeta" data-source=""
class="bbCodeBlock bbCodeBlock--expandable bbCodeBlock--quote js-expandWatch">
<div class="bbCodeBlock-title">
zeta said:
</div>
<div class="bbCodeBlock-content">
<div class="bbCodeBlock-expandContent js-expandContent ">
Begreens approach seems like oversimplifying to me.<br />
<br />
I could be wrong, but I think that with a little modding,<br />
those three caps can exist together. I see no problem<br />
with them being at the same level other than of course<br />
the fresh air intake. Never heard of smoke getting sucked down<br />
into a 15+ ft flue. If that were possible then one cap covering<br />
two and three flues would never exist and I see them on tons<br />
of homes that have multiple flues.
</div>
<div class="bbCodeBlock-expandLink js-expandLink"><a role="button" tabindex="0">Click to expand...</a></div>
</div>
</blockquote><br />
Do you mean overcomplicating things? Could be, I'm all for a simpler approach. Maybe Rod, Shane or Craig have one. <br />
<br />
As to the multiple flue issue, it's very real. That's what the extendacap system cures. Search through the threads in the main forum for people complaining about smells in the basement and 2nd fireplaces. Some folks just put up with it, others find it intolerable. <br />
<br />
<a href="http://www.extendacap.com/" target="_blank" class="link link--external" data-proxy-href="/talk/proxy.php?link=http%3A%2F%2Fwww.extendacap.com%2F&hash=1bfec1727efc45224a11b83110a83eb3" rel="noopener">http://www.extendacap.com/</a></div>
<div class="bbWrapper">I too have experienced this. My father in-law has a 3 flue chimney, one gas, one pellet and one on the outside at a sitting area. when you use the outside fireplace you get the smell of smoke in the basement. all three flues are the same height.</div>
<div class="bbWrapper"><blockquote data-attributes="" data-quote="moralleper" data-source=""
class="bbCodeBlock bbCodeBlock--expandable bbCodeBlock--quote js-expandWatch">
<div class="bbCodeBlock-title">
moralleper said:
</div>
<div class="bbCodeBlock-content">
<div class="bbCodeBlock-expandContent js-expandContent ">
I too have experienced this. My father in-law has a 3 flue chimney, one gas, one pellet and one on the outside at a sitting area. when you use the outside fireplace you get the smell of smoke in the basement. all three flues are the same height.
</div>
<div class="bbCodeBlock-expandLink js-expandLink"><a role="button" tabindex="0">Click to expand...</a></div>
</div>
</blockquote><br />
I guess that is because there is no damper block off. If we have a damper gate, we close it when that fireplace is not in use and the warm air cannot go through it. When we use it, we open the gate and that fireplace is warmer than outside, no air will come down.</div>
- Status
- Not open for further replies.
Similar threads
- Replies
- 8
- Views
- 719
- Replies
- 3
- Views
- 2K
- Replies
- 1
- Views
- 519
- Replies
- 6
- Views
- 510
- Replies
- 0
- Views
- 290