Hello All,
I have what I believe to be a relatively simple problem, and I am just looking for the best option to resolve it; I don't know what direction to go in. I used search and saw a lot of threads with this topic, so kindly bear with me if it has been covered previously") Also, please refrain from simply saying something like "Call the person who installed the liners" as I know this is an option and am looking for a reasonably priced, sustainable DIY fix at this time.
Also, please refrain from simply saying something like "Call the person who installed the liners" as I know this is an option and am looking for a reasonably priced, sustainable DIY fix at this time.
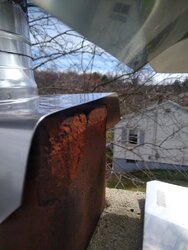
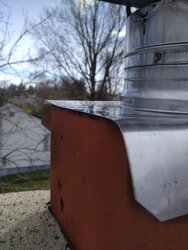
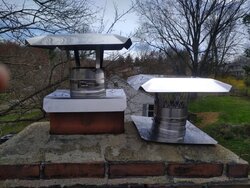
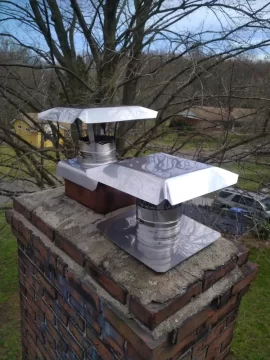
A few years back I had dual stainless steel liners dropped in and connected to my All Nighter (1st floor) and furnace (basement). The prior owners of the house had neglected the chimney and had no caps on either flue - the clay liners were simply exposed. After installation of the new furnace (lower of the two flues in attached pictures) the clay liner began disintegrating up top, which I noticed in the spring when up on the roof to clean the gutters and chimney. So, when the new liners were dropped, one sits flush with the top of the chimney while the stove side is higher.
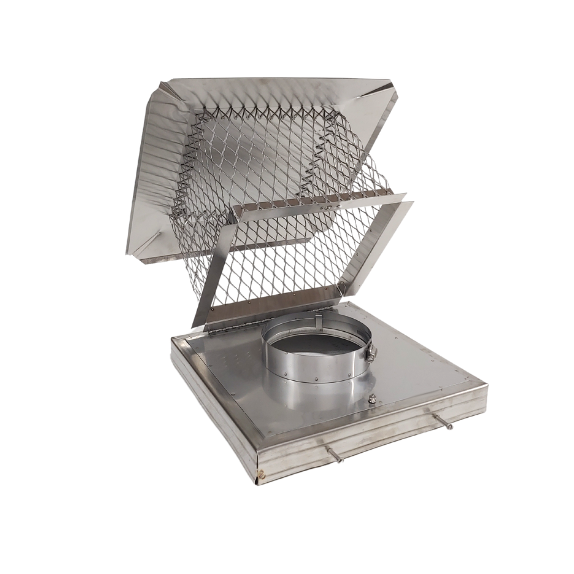
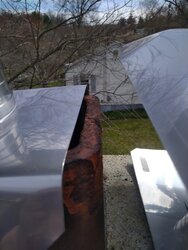
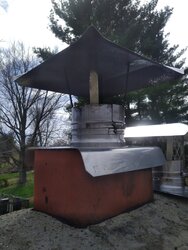
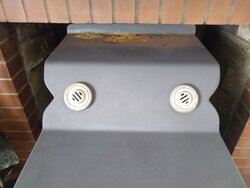
The caps installed with the liners essentially anchor them in place (see photos). My problem is that whenever there is a harsh storm or a lot of rain (and there has been a good amount in New England this spring), the stove side flue shifts to either side and a bit of water finds its way down, eventually reaching the top of my stove (see picture). Note that in several of the pics I dramatically pushed the flue to either side to show how much play there is. As you can see in the pics, there isn't much collar overhang for water to be able to deflect away from dripping into the clay flue liner when it is set in a centered position to cover the liner.
So far I've thought of getting some sort of extended collar to add on and also trying to better anchor the current collar to stay in place in storms (though the latter option isn't as appealing as I feel there needs to be more overhang to effectively divert water flow away from the clay flue liner). I've also considered a dual liner cap, but wonder about having to replace the current caps (which hold the liners in place) to be lower for the dual cap to fit over them and still look/work "right".
Thank you for reading, any thoughts, links to potential fixes, and insights are much appreciated.
Regards,
Speedle
I have what I believe to be a relatively simple problem, and I am just looking for the best option to resolve it; I don't know what direction to go in. I used search and saw a lot of threads with this topic, so kindly bear with me if it has been covered previously
Also, please refrain from simply saying something like "Call the person who installed the liners" as I know this is an option and am looking for a reasonably priced, sustainable DIY fix at this time.A few years back I had dual stainless steel liners dropped in and connected to my All Nighter (1st floor) and furnace (basement). The prior owners of the house had neglected the chimney and had no caps on either flue - the clay liners were simply exposed. After installation of the new furnace (lower of the two flues in attached pictures) the clay liner began disintegrating up top, which I noticed in the spring when up on the roof to clean the gutters and chimney. So, when the new liners were dropped, one sits flush with the top of the chimney while the stove side is higher.
The caps installed with the liners essentially anchor them in place (see photos). My problem is that whenever there is a harsh storm or a lot of rain (and there has been a good amount in New England this spring), the stove side flue shifts to either side and a bit of water finds its way down, eventually reaching the top of my stove (see picture). Note that in several of the pics I dramatically pushed the flue to either side to show how much play there is. As you can see in the pics, there isn't much collar overhang for water to be able to deflect away from dripping into the clay flue liner when it is set in a centered position to cover the liner.
So far I've thought of getting some sort of extended collar to add on and also trying to better anchor the current collar to stay in place in storms (though the latter option isn't as appealing as I feel there needs to be more overhang to effectively divert water flow away from the clay flue liner). I've also considered a dual liner cap, but wonder about having to replace the current caps (which hold the liners in place) to be lower for the dual cap to fit over them and still look/work "right".
Thank you for reading, any thoughts, links to potential fixes, and insights are much appreciated.
Regards,
Speedle
Attachments
-
 IMG_20200405_135327.jpg103.5 KB · Views: 167
 -
 IMG_20200405_135336.jpg97.7 KB · Views: 163
 -
 IMG_20200405_135346.jpg139.6 KB · Views: 156
 -
 IMG_20200405_135357.jpg104.9 KB · Views: 160
 -
 IMG_20200405_135412.jpg257.4 KB · Views: 146
 -
 IMG_20200405_135420.jpg179.5 KB · Views: 165
 -
 IMG_20200405_135429.jpg126.9 KB · Views: 171
 -
 IMG_20200422_115855.jpg106.6 KB · Views: 177
Last edited: