M55 question, comment, complaining, wah!

  • Active since 1995, Hearth.com is THE place on the internet for free information and advice about wood stoves, pellet stoves and other energy saving equipment.

    We strive to provide opinions, articles, discussions and history related to Hearth Products and in a more general sense, energy issues.

    We promote the EFFICIENT, RESPONSIBLE, CLEAN and SAFE use of all fuels, whether renewable or fossil.
Status
Not open for further replies.

vinny11950

Minister of Fire
May 17, 2010
1,794
Eastern Long Island, NY
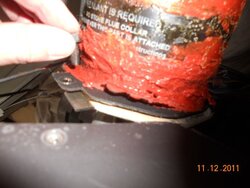
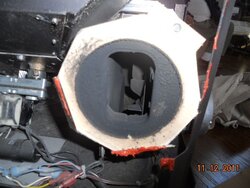
So while redoing my install, I disconnected the Exhaust started tube from the stove motor housing. Enviro designed a one bolt, easy to screw system. However, by looking at the old gasket in between the two pieces I could see ash marks all the way to the outside of the gasket. Also, the gasket was really compressed by the bolt side, but on the opposite side it was much thicker and less compressed, making me think that side does not get enough tension to make a tight fit. As you can see from the motor housing picture, the Exhaust tube is supposed to jam itself on the opposite side of the bolt system and create enough pressure to seal it. Those folded lips of metal are supposed to hold it.

but playing around with it while i have it apart, there is slack even when i tighten the bolt all the way down. Granted, it was without the gasket on, but it looks like more slack than what a gasket can fill. Even then, it should be a little tighter. Enviro should just add two more bolts to make more secure.

To fix I am thinking of creating some kind of bolt clamp to tighten that end, or fold those flaps a little tighter, though I am not sure if I can do it well enough.

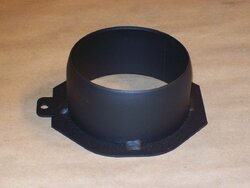
Secondly, the Exhaust starter tube is made of two pieces, a tube and a flange that is welded on. As you can see, there are 4 spot welds only. though, the flange seems pretty tightly compressed into the tube, on mine there was some warping and I could even see a little day light in between the flange and tube. The point here is that this tube sees a lot of stress being the connection point, so a uniform weld around the tube and flange would prevent this from failing, especially with exhaust fumes coming out. I ended up carefully hammering the gap to close and then siliconed up.

Let's see how it works when I am finished.

Any ideas from the M55 owners or anyone else, would be greatly appreciated.
 

Attachments

  • Picture 016.jpg
    Picture 016.jpg
    38.7 KB · Views: 276
  • Picture 022.jpg
    Picture 022.jpg
    46.9 KB · Views: 292
  • 50-2068_photo3.jpg
    50-2068_photo3.jpg
    159.3 KB · Views: 312
  • 50-2043_photo4.jpg
    50-2043_photo4.jpg
    101.1 KB · Views: 294
Siliconing the gap is good. Using two gaskets should seal it up. Or buy the lytherm that is 1/8" thick and make your own. Much cheaper that way and will probably be thick enough without having to double up the gaskets. I got some from ebay for $10shipped...

http://www.ebay.com/itm/Pellet-Stov...032?pt=LH_DefaultDomain_0&hash=item2eb84d1130

The M55 cast insert does not have the one bolt setup. It has 4 bolts, so this is not a problem with it.

I would email Enviro and let them know about this. It may just be that they missed the tolerances on your particular stove a little. Can you modify the part so that it squeezes the gasket more evenly? Seems like you could bend the two tabs that lock it into place such that it would be forced closer to the gasket on that side?

Edit: Or buy some metal sheet and cut some shims which you would place between the tabs and the adapter. This should squeeze it closer to the gasket. It probably wouldn't take a very thick shim, maybe 1/32"? You could silicone the shim onto the adapter in the correct spot so that it stays. Just brainstorming for you...

Edit2: Just re-read your post...yeah, it seems like it might be pretty easy to just bolt it with another couple of bolts. Might even be good enough with machine screws. The downside with this is that it appears the bolts would have to go thru your gasket which is doable, but not the best.
 
I pinched/squeezed the flanges on a M55 steel to seal it better. I used a pair of Sheet Metal vice grips and gently squeezed it tighter. Seemed to do the trick. I didn't see a leak with My adapter or the M55 steel I worked on. But if it leaks seal it with silicon. Or have it welded.

I think they are trying to make these easier to work on for both the tech's and us DIY homeowners.
 

Attachments

  • THE-OR~2.jpg
    THE-OR~2.jpg
    8.2 KB · Views: 272
thanks, guys, i will try all these options. today i am taking a break from the project. i need to think things out, rest, and watch some football in the glory of 62 degree electric heat.
 
i do like the idea of the one bolt system, it does make it easier to work with as you don't have to disconnect the stove adapter from the stove. easy. i just think one more bolt would not be that much harder to do.

on another note, i read the stove manual end to end, and never read anything about the easy one bolt system connection. might be something you want to share with your customers, especially on a pellet stove where so much maintenance is done by the owners.
 
....

i just love the smell of silicone in the morning, it smells like,... i smells like victory over leaky pipe.
 
I didn't think about the adapter. I bet it would make getting to any other bolts you might add harder. If I were you, I'd find a couple of pieces of sheet metal and create a shim. This way you retain the one bolt system.

Cheap shim material can be found at your local box store. I use electrical box covers and then cut out whatever I need....

http://www.lowes.com/pd_55761-427-8...pl__0__s?Ntt=electrical+box+cover&facetInfo;=
 
JT and Flynfrfun, I fixed the connection by doing a Frankenfix.

I sandwiched two 1/8 lytherm gaskets together with orange silicone, then bent a little bit more the tabs/lips on the connector with the sheet metals fliers and then used some more silicone inside the tube on the connection point (used the good old finger method - put some silicone on the finger and spread all around, little by little). In the end, the joint felt a lot tighter with no play. I think it now compresses enough to seal.

Fly, I tried creating a shin and an outside/edge clamp, but nothing held, and there is very little space to work with. However, I am not a metal workshop guy, so I am sure more skilled workers could have made it work.

Thanks for the advice and ideas, guys.
 
Status
Not open for further replies.