This weekend is going to be my installation of my insert. Wish me luck...
Background...
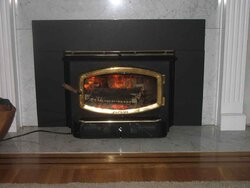
A neighbor gave me an older Olympic insert. He upgraded to a OWB and wanted to get rid of the insert sitting in his garage. So I took it off his hands. The stove had some exterior rust from the direct connect he used, and from sitting for a year or so. Plus the glass on the door was broken.
My house is a contempory colonial with a pretty open floor plan built in 2002. About 2200 sqft with a split stairs off the living room and a 2 story foyer including a ceiling fan up there. In the living room is a large fireplace, marble hearth and surround and exterior chimney in great shape. I am currently heating the house with forced air using propane. With the $1 a gallon (currently $3.12) increase from last year, my heating bill run about $600 for just over a month with the temp set at 63 degrees. So I cannot wait for the stove to be working.
Prep Work...
I wire brushed and sanded the entire stove and painted with metallic black stove paint. It came out really nice. Even the wife was impressed. When she first looked at the stove she did not want to put in house. Now it looks like it came off the showroom floor. Tonight I will be sanding the surrounds and painting them.
I purchased a new glass, glass gasket and door gasket. That will be put together tonight as well. The door itself is solid brass, and needed some TLC. I ended up sanding down the bad spots, using a special buffer pad to get rid of any scratches and then some wadding polish to make it shine. For being 10 years old, it came out great. Not perfect, but good enough. The only problem I have with the door is that all the screws for the glass hardware were broken off. I was able to drill out 6 out of 8 of them, but two will not go. One I know has a broken drill bit inside since I did that one, and the other one I think has a drill bit from the previous owner because nothing will touch it. Tonight I am going to tap the new screw holes that I drilled and I got some smaller screws to make new holes for the two I cannot drill out.
I ended up buying a new fan motor for the insert. The old fan motor only had OFF-LOW-HIGH speeds and no thermostat in it. Plus only one of the fan motors worked. The one that did work was making all kinds of noise. So I brought the new fan assembly.
Chimney...
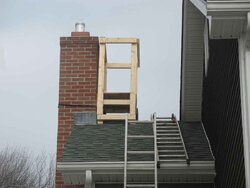
I went all out when buying a new liner for the chimney. I brought a duraliner rigid double lined and insulated for the top 20 feet, and a 5 foot flex to connect to the insert. (Thanks Hogzwild) VentingPipe.com send me an 8 inch flex by mistake, but the sent the correct item out and I am all set now. I will say that the difference between rigid double walled and the flex is HUGE. I wish I had a straight shot up the liner to do it all in rigid. But I have to move about 1 foot off center from the top of the stove to the clay liner. My current liner is 13x13 so dropping this down should not be a problem at all.
I have a steel wire brush to clean out the existing liner and that will take place on Saturday. In the future I will get the poly brush for the liner.
Roof...
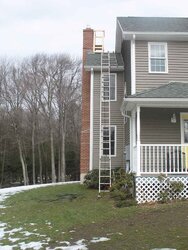
My chimney top is about 30 some odd feet off the ground. My roof pitch is about 45 degrees. I ended up getting a 40 foot ladder to reach the chimney, but I will be working off the roof. When I went up on the roof to measure the chimney, I almost did not make it down! Snow was making me slid too much. So I went to the local ladder store and got some roof hooks. I can now hook these onto the peak, and then attach a straight ladder (borrowed from in-laws) so getting onto the roof and off will no longer be a problem. As for doing the work, the chimney is directly on the peak, so standing there is not an issue, it was just getting on or off the roof. I might have to build a small step, since the top of the chimney is about should high. I will use wood and secure it to chimney with a strap.
Clearences...
My mantel is too low, so I had to buy the big ugly mantel sheild. The top of mantel is fine, but the fancy trim work underneath is too low. I might in the future put a sheild directly under the mantel using cermanic spacers, but for right now I will deal with the ugly heat sheild. The only other clearence issues I have is the hearth front. I am missing about 3-4 inches. Currently the hearth from the front of the fireplace is 19 3/4 inches. But the insert will stick out about 6-8 inches onto the hearth. So I need to extend the hearth a little. I check the manual and all I need is a 26 guage steel (0.018 thick) and I am good. So I will place a 26 guage peice of steel on the floor and cover it with a hearth rug or even do something in tile.
So I am pretty much all set for the installation this weekend. Here are my plans...
Tonight -
Get the glass installed on the door and all gaskets in place.
Sand down the surrounds and apply stove paint to them.
Friday -
Get the material needed for the block off plate and hearth extension.
Pick up other odds and ends, such as high temp silicone (for liner cap)
Start getting everything ready for Saturday install and maybe start cutting the damper or start the block off plate.
Saturday -
Clean the chimney.
Cut out damper (if not done on Friday night).
Install the liner.
Install the insert.
Make block off plate.
If everything is good, open windows and start fire! If not, anything left over will be done on Sunday.
I will keep this updated to let everything know how it is going. But if things go smoothly I should have a fire in the insert Saturday night.
Background...
A neighbor gave me an older Olympic insert. He upgraded to a OWB and wanted to get rid of the insert sitting in his garage. So I took it off his hands. The stove had some exterior rust from the direct connect he used, and from sitting for a year or so. Plus the glass on the door was broken.
My house is a contempory colonial with a pretty open floor plan built in 2002. About 2200 sqft with a split stairs off the living room and a 2 story foyer including a ceiling fan up there. In the living room is a large fireplace, marble hearth and surround and exterior chimney in great shape. I am currently heating the house with forced air using propane. With the $1 a gallon (currently $3.12) increase from last year, my heating bill run about $600 for just over a month with the temp set at 63 degrees. So I cannot wait for the stove to be working.
Prep Work...
I wire brushed and sanded the entire stove and painted with metallic black stove paint. It came out really nice. Even the wife was impressed. When she first looked at the stove she did not want to put in house. Now it looks like it came off the showroom floor. Tonight I will be sanding the surrounds and painting them.
I purchased a new glass, glass gasket and door gasket. That will be put together tonight as well. The door itself is solid brass, and needed some TLC. I ended up sanding down the bad spots, using a special buffer pad to get rid of any scratches and then some wadding polish to make it shine. For being 10 years old, it came out great. Not perfect, but good enough. The only problem I have with the door is that all the screws for the glass hardware were broken off. I was able to drill out 6 out of 8 of them, but two will not go. One I know has a broken drill bit inside since I did that one, and the other one I think has a drill bit from the previous owner because nothing will touch it. Tonight I am going to tap the new screw holes that I drilled and I got some smaller screws to make new holes for the two I cannot drill out.
I ended up buying a new fan motor for the insert. The old fan motor only had OFF-LOW-HIGH speeds and no thermostat in it. Plus only one of the fan motors worked. The one that did work was making all kinds of noise. So I brought the new fan assembly.
Chimney...
I went all out when buying a new liner for the chimney. I brought a duraliner rigid double lined and insulated for the top 20 feet, and a 5 foot flex to connect to the insert. (Thanks Hogzwild) VentingPipe.com send me an 8 inch flex by mistake, but the sent the correct item out and I am all set now. I will say that the difference between rigid double walled and the flex is HUGE. I wish I had a straight shot up the liner to do it all in rigid. But I have to move about 1 foot off center from the top of the stove to the clay liner. My current liner is 13x13 so dropping this down should not be a problem at all.
I have a steel wire brush to clean out the existing liner and that will take place on Saturday. In the future I will get the poly brush for the liner.
Roof...
My chimney top is about 30 some odd feet off the ground. My roof pitch is about 45 degrees. I ended up getting a 40 foot ladder to reach the chimney, but I will be working off the roof. When I went up on the roof to measure the chimney, I almost did not make it down! Snow was making me slid too much. So I went to the local ladder store and got some roof hooks. I can now hook these onto the peak, and then attach a straight ladder (borrowed from in-laws) so getting onto the roof and off will no longer be a problem. As for doing the work, the chimney is directly on the peak, so standing there is not an issue, it was just getting on or off the roof. I might have to build a small step, since the top of the chimney is about should high. I will use wood and secure it to chimney with a strap.
Clearences...
My mantel is too low, so I had to buy the big ugly mantel sheild. The top of mantel is fine, but the fancy trim work underneath is too low. I might in the future put a sheild directly under the mantel using cermanic spacers, but for right now I will deal with the ugly heat sheild. The only other clearence issues I have is the hearth front. I am missing about 3-4 inches. Currently the hearth from the front of the fireplace is 19 3/4 inches. But the insert will stick out about 6-8 inches onto the hearth. So I need to extend the hearth a little. I check the manual and all I need is a 26 guage steel (0.018 thick) and I am good. So I will place a 26 guage peice of steel on the floor and cover it with a hearth rug or even do something in tile.
So I am pretty much all set for the installation this weekend. Here are my plans...
Tonight -
Get the glass installed on the door and all gaskets in place.
Sand down the surrounds and apply stove paint to them.
Friday -
Get the material needed for the block off plate and hearth extension.
Pick up other odds and ends, such as high temp silicone (for liner cap)
Start getting everything ready for Saturday install and maybe start cutting the damper or start the block off plate.
Saturday -
Clean the chimney.
Cut out damper (if not done on Friday night).
Install the liner.
Install the insert.
Make block off plate.
If everything is good, open windows and start fire! If not, anything left over will be done on Sunday.
I will keep this updated to let everything know how it is going. But if things go smoothly I should have a fire in the insert Saturday night.
") Keep us posted. And good choice to go with the double wall, it cleans real easy, and gather very little creo-dust when ya burn it hot.
Keep us posted. And good choice to go with the double wall, it cleans real easy, and gather very little creo-dust when ya burn it hot.