Need Install help with my EKO40

  • Active since 1995, Hearth.com is THE place on the internet for free information and advice about wood stoves, pellet stoves and other energy saving equipment.

    We strive to provide opinions, articles, discussions and history related to Hearth Products and in a more general sense, energy issues.

    We promote the EFFICIENT, RESPONSIBLE, CLEAN and SAFE use of all fuels, whether renewable or fossil.
Status
Not open for further replies.

James Ascherl

Member
Hearth Supporter
Jun 6, 2010
78
Hinckley, Ohio
Hi Everyone. After about a year of researching and almost nightly logging on at the boiler room, I broke down and bought my EKO 40 and had it delivered in July. Now as the "burning" weather is approaching, I am in panic mode.
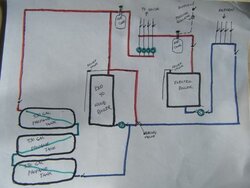
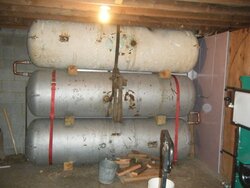
I have a 3700 sq ft home in northern Ohio. I heat with hot water baseboard radiators and an electric boiler. The electric boiler has 4 heat zones but only 1 circ pump and 1 thermostat. In other words, when the house calls for heat it dumps into all four zones equally. I plan on tying in my EKO to all 4 zones but am hoping to control each zone with its own thermostat. I have attached a sketch of my layout, and am hoping someone will please review this and give me their blessing or steer me the correct way. I have already stacked my 3 (330 gal) propane tanks in the basement. and have several hundred dollars of copper piping, valves, and fittings standing by. I recently replaced all of the valves and copper coming out of the elec boiler with new ball valves and copper.
Can someone look over my sketch and tell me what needs to be corrected and added. I am not sure of where to put the circ pump(s) or whether to use zone valves or pumps.
I also do not know where pressure/temp gauges need to be or how many to install.
Where does the aquastat go? Ive seen some attached to EKO yet mine seems to strap directly to the piping.
I have many pics of my tanks etc.
I would appreciate anyone's input. and will have multiple followup questions i'm sure.
 

Attachments

  • EKO sketch.jpg
    EKO sketch.jpg
    25.5 KB · Views: 576
I have very limited system knowlege. The one thing that does stand out for me is your storage tanks. These are 330 gal each & should be able to stand upright, they will stratify better like this. You want to run into the tops of the tanks with a feeder pipe & charge them all downwards with the mixer you show(probably an ESBE). You need to run equal length piping between tanks. The others can help better, Randy
 
eyebrows is right. think of the storage tanks like batteries. the negative on a battery would be the cold water (return to the boiler water) in a tank. The positive would be the hot water and the top of the tanks. It is best to connect these tanks together with headers, one header for the tank bottoms and one header for the tank top. Also take the time and invest in areas for temp gauges for each tank. Also in each header. This may seem like a plact to shortcut on expenses but you will want to know what they are doing.You will need gauges at the top, middle, and bottom of the tanks. Try and put them at the same placement on each tank.

Another thing is you need the return line to be on the other side of the mixing valve you have in the drawing.

You may get lots of input here, so be careful not to go with any one opinion alone (including my own).
 
barnartist said:
eyebrows is right. think of the storage tanks like batteries. the negative on a battery would be the cold water (return to the boiler water) in a tank. The positive would be the hot water and the top of the tanks. It is best to connect these tanks together with headers, one header for the tank bottoms and one header for the tank top. Also take the time and invest in areas for temp gauges for each tank. Also in each header. This may seem like a plact to shortcut on expenses but you will want to know what they are doing.You will need gauges at the top, middle, and bottom of the tanks. Try and put them at the same placement on each tank.

Another thing is you need the return line to be on the other side of the mixing valve you have in the drawing.

You may get lots of input here, so be careful not to go with any one opinion alone (including my own).

I have to disagree on the tanks, I'd keep them in series as drawn. As far as vertical vs. horizontal... vertical may be slightly better but I
think plenty of people have shown horizontal works pretty darn well.
 
I have 2 - 330 tanks piped in series like yours in fact mine are not even stacked but at the same level but because they are plumbed in series they act if they were stacked or as 1 - 660 tank,as far as stratification this is not an issue ,the hottest water is always available out of the "top" tank.

Return from tanks should be before the mixing valve not after so you will have boiler protection.
 
A single expansion tank could be placed on the return line between the two boilers that way all circulators will be pumping away from the point of no pressure change and the system would not be confused.

The headers on the 2 boiler could be connected and from there the circulators could be pumping into their respective zones.

Do you have any flow controls or check valves installed so when one boiler is running it is not heating the other? You certainly would not want to heat storage with the electric boiler.Circulators with IFC (internal flow controls are any easy way to take care of this.

I would think any aquastat would be on the supply side as close to boiler as possible to read the hottest temps.
 
Is the eko in heated space as well ? What is your plan for burning - all the time or heat up the storage and let the eko cool ? Right now it looks as if you are using the storage as a hot water volume extension and do not plan on turning the storage on of off or otherwise isolating it from the boilers. Might be fine but in my case my eko is outside in a cold shop and rapidly pulls out all the heat it put in if not treated as a separate "zone". Many here with pressurized storage have experience in isolating the storage from the boiler loops depending on what you are trying to achieve.
 
Wow! Thanks for all the input. I guess I didn't know that the tanks were gonna be the big issue. I spent the latter part of the summer on the tanks and wanted to resolve the tank issues first so I did not get the "I'll get around to storage someday" problem. You will see in the attached photo that they are here to stay the way they are. Just to touch base with the tank issues: They are 9 feet in length and I have 92" from floor to ceiling, so unless I cut a hole in the kitchen floor and put the kitchen table over them, they aint gonna go on end. Likewise, I could not even stand them on their feet. I had to turn them on their side and put the feet to the back wall. Hence the hardwood blocking. If you look at the picture the return line enters near the floor on the left (by the sledge hammer) and the supply line is near the ceiling on the right. I do plan on putting 3 temp gauges (the stick on digital ones)

Forgive me here, but i am going to reply to everyone's threads by memory here.
The EKO is immediately to the right of me as I took the picture. Yes, everything is inside in the same room. The EKO will be my primary heat with (5 acres of woods) I plan on running it to heat the house and tanks, and letting it cool til the tanks get cold.
The info about the return line and mixing valve is very valuable info.
I guess I could have eliminated a exp. tank and air eliminator, but since the one is already installed on the elec boiler, I am assuming a second one is not going to hurt. After $8,000 bucks and climbing whats another $200 right? lol!
I have struggled with flow issues in my mind and not sure how to prevent the elec boiler from feeding the EKO and storage and running up my elec bill ($1200/mo in January) I am not worried about the EKO heating my elec boiler as there is a relatively small additional volume of water. I'm assuming pump placement has alot to do with this part of the equation.
Pumps vs valves, backflow preventers, dump zones all have my head spinning. Any and all input on this would be greatly appreciated.

My goal is to get my system running in a few weeks. And then be able to post my photos with comments as I have learned that everyone's systems vary and photos seem to really show the different obsticles that are faced.

Thanks to all who commented. When I'm all done I can send each of you a copper Tee or elbow as a gift as I have piles of them!
 

Attachments

  • EKO tanks.jpg
    EKO tanks.jpg
    41.8 KB · Views: 405
burn baby 2010 said:
Wow! Thanks for all the input. I guess I didn't know that the tanks were gonna be the big issue. I spent the latter part of the summer on the tanks and wanted to resolve the tank issues first so I did not get the "I'll get around to storage someday" problem. !

Nice job on the tanks. If you can do it, vertical is probably preferable, but there are many examples of two tanks stacked horizontally that are performing very well, and three tanks should be event better for stratification.

But wood blocking, I don't know, could generate a lot of afraidium.

I'm dying to know how you got the tanks stacked with so little headroom to work with.

Cheers --ewd
 
thanks dudley for your compliments. I have to admitt the storage process was overwhelming at first. As I started trying to figure out the storage I realized that if I went with the standard 500 gallon tanks, I would have to knock out 2 concrete walls in the basement. When I found someone selling scrap 330 gallon tanks, I raced across the state of Ohio to buy one. The seller admitted they were a bastard size, but assured me that he could locate 2 more. A few weeks later he called and said he had 2 more.
The tanks sat in my driveway for a couple of months before I got the courage to start messing with them. The first thing I did was purchase a standard pallet jack on craigs list for $50. This was a godsend. After filling them a few times with water and a few gallons of lemon scented bleach, I pretty much got the stink out. (Its entertaining to ask the woman at the checkout as you are buying 15 gallons of bleach if it is enough to get blood off of walls and carpeting)
I drilled the holes out at the end with a 2-1/4" hole saw. This was suprisingly easy after I realized that you MUST lube the bit with oil. I ovaled out the holes with a simple grinder and files so the nipples would stick out level.
Since I was still not satisfied with the cleanlines of the tanks, and I could not get my power washer nozzel into the factory openings, I found that the 2-1/4" holes I drilled were more than sufficient to stick a power washer nozzel in.
When my welder friend showed up to weld the nipples on, I was informed that galvenized steel nipples won't weld, so back to the hardware store to buy 6 more black pipe nipples. the first of many mistakes but this one only cost me $30 or so.
My welder spent an entire day welding the nipples. He loaned me a pressure gauge with a filler nozzel that I fit into the drain on the tanks. As I began pumping the tanks up, we discovered multiple air leaks around the nipples. The culpret was slag that had not been knocked off properly. I spent the next day grinding down the welds, digging out the slag and then coating the welds with solder. (I am an expert solderer with access to some pretty hefty soldering irons) After pumping them up to 30psi, that part was complete. I was able to pull the tanks into the basement with the pallet jack and a makeshift dolly. (Fortunately my setup is on ground level so no issues with steps) The first one obviously had no problems. The second one was stacked with an engine lift. This was a bit hairy since the legs of the lift would hit the bottom tank causing the lift to want to tip forward. With a bit of muscle, we got tank #2 in place. It didn't take long to realize that tank #3 would be next to impossible. I had been on craigslist for months trying to find a foot operated pallet stacker with no avail. My friend insisted that his place of work had a forklift that was narrow enough to fit through my two 34" doorways. The next Saturday we drove to Cleveland with his truck and trailer, picked up the lift. That little Clark lift was driven right into the basement.We found that lifting the forks high enough to reach the top of tank #2 caused it to bump the floor joists above. This was rectified by putting 2 4x4s on the forks and bingo! we were good to go.

I know you cringe at the idea that they are stacked on treated 6x6. My first plan was to weld some angle iron on to the tanks to mke them stack, but I made a template of the circumfrence of the tanks, and used a chainsaw to cut a cradle into each 6x6 to prevent the tanks from rolling. My plan is to bolt some vertical supports to the floor and ceiling and insulate the tanks. I do question whether the concrete will hold the 9000 lbs or so once they are filled.

I have photos of the entire process that I will likely post once my project is complete.
 
burn baby 2010 said:
I know you cringe at the idea that they are stacked on treated 6x6. My first plan was to weld some angle iron on to the tanks to mke them stack, but I made a template of the circumfrence of the tanks, and used a chainsaw to cut a cradle into each 6x6 to prevent the tanks from rolling. My plan is to bolt some vertical supports to the floor and ceiling and insulate the tanks. I do question whether the concrete will hold the 9000 lbs or so once they are filled.

Actually I used wood to support my vertical tank, although it's on the bottom so I don't expect to have as much heat stress as you may get in your situation. Any information I've found has very little to say about how well wood holds up above 150 degF, but I'm going to go ahead with it anyway. I've got reference measurements to check to see if anything starts to go anywhere through the years.

Unless there's some poor footing under the concrete, 4500 pounds on 100 square inches of concrete is next to nothing.

--ewd
 
Two steel "wheel chocks", a threaded rod, and some nuts and you would have a pretty permanent stop for the tanks. You may want to consider blocking the tanks in and/or cable to the wall in case you get the odd earthquake.
 
I'd sure put a little more time in on securing those tanks. Wood supports would scare me. Even very minor movement could wreak havoc on your plumbing. Not to mention risk of falling. Just my two cents.
 
Can someone look over my sketch and tell me what needs to be corrected and added. I am not sure of where to put the circ pump(s) or whether to use zone valves or pumps.

If it were me I would take a close look at the very last sticky note from nofossil - simple pressurized system since your setup seems to be very similar and the sticky has a nice diagram of how to layout the tank , boiler, electric , etc. That would give you the use of storage you describe.
 
I would vote on welding those tanks in place and get them bolted to back wall at a minimum, floor and ceiling in front would be nice too.
Ed I have plywood sides in my (steel) dump truck and hauled Hot Mix Asphalt all summer with no signs of breakdown. HMA when dropped into truck is 325F to 350F and can sit in there for up to an hour before it's used for road surface.
Rob
 
Status
Not open for further replies.