New Hearth - Help Needed

  • Active since 1995, Hearth.com is THE place on the internet for free information and advice about wood stoves, pellet stoves and other energy saving equipment.

    We strive to provide opinions, articles, discussions and history related to Hearth Products and in a more general sense, energy issues.

    We promote the EFFICIENT, RESPONSIBLE, CLEAN and SAFE use of all fuels, whether renewable or fossil.
Status
Not open for further replies.

ToastyCT_MDT

New Member
Sep 23, 2014
10
Seymour
Hello all,

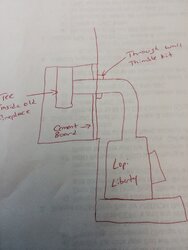
Having a hearth built around our new wood stove and need some direction as to what would be the best way to connect the chimney liner to the black pipe coming from the stove.

I've read to use a masonry thimble...not sure if that's the correct path.

Questions:

How is the thimble attached to the stone/dura-rock?
With the thimble will there be enough access in the event I need to purchase a new liner?
What thimble should i go with? I assume a standard single wall thimble would suffice since there will be no combustables in the area.

I have a attached a picture for reference. We will be blocking in the existing fireplace and we will be going with a Lopi Liberty free standing stove.

New Hearth - Help Needed

Thank you
 
Last edited by a moderator:
Welcome. Can you sketch out the design plan for us? The Liberty is a top vented stove. Were you intending to come right off the stove with an elbow? That is generally not the best practice. Maybe it will work if the draft is very strong, not sure. How tall is this liner?
 
Welcome. Can you sketch out the design plan for us? The Liberty is a top vented stove. Were you intending to come right off the stove with an elbow? That is generally not the best practice. Maybe it will work if the draft is very strong, not sure. How tall is this liner?

I will try my best to sketch out something a little later.

I would not run an elbow straight out of the stove, i would anticipate a 2-3 foot section before the elbow into the liner. The length of the liner is about 13 feet.
 
The Liberty has a minimum flue system requirement of 15ft. The elbow and horiz. run are going to reduce draft making the shown flue essentially more like a 10 ft chimney. With insufficient draft the stove could underperform quite a bit if secondary combustion does not occur.

I'm not sure what to do in this setup. The liner should terminate in a cleanout tee with the snout connecting normally to a rear vented stove flue. I suppose it could transition to regular stove pipe after the cement board wall, but how would one clean it? Would the cement board panel be removable? If not perhaps there is enough flex in the liner to connect to the stove pipe but then what hold pieces in place makes this a permanent cleanable system?
 
The only idea I can come up with (with safety in mind) would be to build your hearth at ground level, install a T clean out in the back of your chimney and pipe using double wall from the stove to the clean out using 45 deg elbows instead of a 90 deg elbow.
You will want to add a block off plate to the underside of the fireplace above the t-connection with roxel insulation. You may need an anchor plate and a length of class chimney pipe at the top of your existing chimney outlet to create the proper draft.
The finishing work is going to be key, perhaps some blue stove or field stone on the hearth pad then natural culture stone on the walls and into the fire place with regular cement "to hold in place" to tie it all together.
please remember to respect the clearances of the stove and chimney pipe. If you terminate the liner in the fireplace with a double wall t (clean out) then run double wall pipe out the fireplace and into the stove the double wall can be with 6" from a combustible.
 
The Liberty has a minimum flue system requirement of 15ft. The elbow and horiz. run are going to reduce draft making the shown flue essentially more like a 10 ft chimney. With insufficient draft the stove could underperform quite a bit if secondary combustion does not occur.

I'm not sure what to do in this setup. The liner should terminate in a cleanout tee with the snout connecting normally to a rear vented stove flue. I suppose it could transition to regular stove pipe after the cement board wall, but how would one clean it? Would the cement board panel be removable? If not perhaps there is enough flex in the liner to connect to the stove pipe but then what hold pieces in place makes this a permanent cleanable system?

Ok - well I think I may have made a mistake not coming to this forum first.

The liner kit did come with a Tee and horiz piece, would i connect this to a thimble or thru wall kit in order to conduct cleaning? Could the thimble be a permanent solution?
 
The only idea I can come up with (with safety in mind) would be to build your hearth at ground level, install a T clean out in the back of your chimney and pipe using double wall from the stove to the clean out using 45 deg elbows instead of a 90 deg elbow.
You will want to add a block off plate to the underside of the fireplace above the t-connection with roxel insulation. You may need an anchor plate and a length of class chimney pipe at the top of your existing chimney outlet to create the proper draft.
The finishing work is going to be key, perhaps some blue stove or field stone on the hearth pad then natural culture stone on the walls and into the fire place with regular cement "to hold in place" to tie it all together.
please remember to respect the clearances of the stove and chimney pipe. If you terminate the liner in the fireplace with a double wall t (clean out) then run double wall pipe out the fireplace and into the stove the double wall can be with 6" from a combustible.

I can inquire about the hearth at ground level.

Why would i need double wall Tee inside the masonry fireplace? that will eventually be blocked and closed off with stone work with no combustible material in the area. Sorry for my ignorance I'm just trying to understand.

You mention a block off plate to the underside of the fireplace but above the Tee connection, i'm having a hard time visualizing this as the Tee would be higher (if im thinking of the correct Tee.
 
I'm the worst artist in the world, but here is my thoughts on the stove. Inside the existing fireplace the liner would drop down and attach to the T, then the T would extend to a masonry thimble. Then from the masonry thimble I would use black stove pipe down to the top vented wood stove
 

Attachments

  • New Hearth - Help Needed
    Woodstove.jpg
    165.1 KB · Views: 101
I've read that in order to use the DuraVent Masonry Thimble I will nee an adapter, does anyone know what adapter I will need for this installation?
 
Thanks for posting the sketch. It helps a lot. I've never done an installation like this so I am going to give how I would approach it, but there may be other ways or thoughts on the subject.

The first concern to address is the heat from the pipe. Is there masonry all the way up this wall? What is the white wall covering behind the picture of the flower? If this is sheet rock on wood furring strips it will need to be replaced for 12" above the top of the fireplace. You could run the cement board all the way up to that point using a strip of the cement board as a 1/2" shim under the main sheet at the top of the fireplace opening. Or just double up the cement board to 12" above the lintel. Then the "thimble" is really just a trim ring. If you are using single wall stove pipe you could just bring the snout of the tee out a few inches, put a trim ring around it and connect the stove pipe to the tee snout.

There are other alternatives. A simple thimble like this should work without adapters but it will keep the pipe 12" below the lintel. http://www.hardwarestore.com/wall-thimble-638259.aspx
 
Yes the installation on this is weird as the previous fireplace is floating off the floor. The masonry/stone wall will go up to about where the bottom of that picture is. The stove pipe should be well below the 12inch mark away from the sheet rock.
 
Question for the crowd...

Is the Tee piece needed? Can I just bend the chimney liner and connect right to the thimble?

If so what is the best way to connect the adapter to the chimney liner?

I should also mention that I have a 16x16 quarter in steel plate with a hole in it for the thimble to pass through and will use expanding bolts to secure in place in the event years down the road I need to access behind the wall to replace anything.
 

Attachments

  • New Hearth - Help Needed
    Fireplace 1.jpg
    118.4 KB · Views: 93
  • New Hearth - Help Needed
    Fireplace 2.jpg
    95.9 KB · Views: 92
From my personal experience I see two problems with bending the SS flex liner 90 degrees at the bottom to replace a T- connector. First, when you don't have a T-connector, and just a 90 degree elbow, you create a chimney fire hazard. When creosote flakes off the sides of the liner or soot comes loose and falls down the flue it will pile up in that elbow rather than fall into the lower cavity of the T-connector. Since that debris is sitting in a spot where it will receive immense heat during certain burning situations it can ignite and set off a chimney fire. I had this exact thing happen to me on two occasions with a similar set up. Even if such a build up of soot/ash/ creosote doesn't ignite it will start to cut off your draft. I was surprised how much a small pile of this stuff affected a previous stove I had with such a set up.

Secondly, the SS flex liner is not nearly as durable as a SS T-connector. It's a challenge getting around a 90 degree elbow when doing chimney sweeps and I wouldn't want my brush or sooteater scraping the sides of a 90 degree bend in my liner every time I did a sweep. That bend will be hidden, unless you plan to remove that steel plate you mentioned every time you sweep, when you clean your flue.
 
  • Like
Reactions: Grisu
From my personal experience I see two problems with bending the SS flex liner 90 degrees at the bottom to replace a T- connector. First, when you don't have a T-connector, and just a 90 degree elbow, you create a chimney fire hazard. When creosote flakes off the sides of the liner or soot comes loose and falls down the flue it will pile up in that elbow rather than fall into the lower cavity of the T-connector. Since that debris is sitting in a spot where it will receive immense heat during certain burning situations it can ignite and set off a chimney fire. I had this exact thing happen to me on two occasions with a similar set up. Even if such a build up of soot/ash/ creosote doesn't ignite it will start to cut off your draft. I was surprised how much a small pile of this stuff affected a previous stove I had with such a set up.

Secondly, the SS flex liner is not nearly as durable as a SS T-connector. It's a challenge getting around a 90 degree elbow when doing chimney sweeps and I wouldn't want my brush or sooteater scraping the sides of a 90 degree bend in my liner every time I did a sweep. That bend will be hidden, unless you plan to remove that steel plate you mentioned every time you sweep, when you clean your flue.

Very good point...I will add the Tee/Snout, Just needed a good explanation for a friend who was asking. The steel plate is a convenience for access in the event something ever happens. and I need to get into the back without having to damage stone work.
 
Status
Not open for further replies.