New Heritage install vs. old house - concerned about flue draft & smokiness

  • Active since 1995, Hearth.com is THE place on the internet for free information and advice about wood stoves, pellet stoves and other energy saving equipment.

    We strive to provide opinions, articles, discussions and history related to Hearth Products and in a more general sense, energy issues.

    We promote the EFFICIENT, RESPONSIBLE, CLEAN and SAFE use of all fuels, whether renewable or fossil.
Status
Not open for further replies.

edthedawg

Minister of Fire
Hi all - new to the group and just did our first burn on our new Heritage 8021. I plan to post the saga of the install (especially the hearth) but first I'm concerned about the amount of smoke this first burn experienced inside the stove. Our house is 123 years old and we had a 6" dia. stainless liner put into the chimney last year, w/ a damper at the top (cord w/ handle hangs @ left of fire box). The liner has to be at least 30 feet long (6 ft in room + 1 ft floor + 8 ft 2nd floor + 1 ft floor + 8 ft in attic + 6 feet outside = 30') and we knew it would never work for plain fires in our shallow firebox - just smoked the house up - so we'd have to add a draft inducer (fan @ top of flue) if we wanted it to ever be used in such a way. We still don't have a draft inducer now that the Heritage is installed. We also opted not to hook up a fresh air feed to the stove.

I attached some pix:

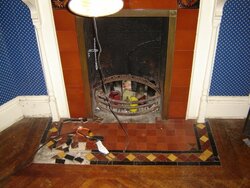
h1.jpg = the fireplace before we started this year - liner installed previous year.
h2.jpg = the first hearth I built (3 wks ago) and then discovered was woefully inadequate - shoulda read that book better! dangit :(
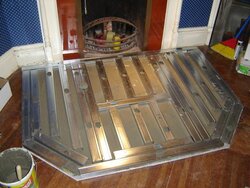
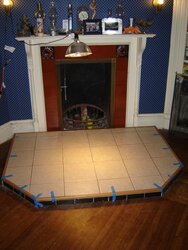
h3.jpg = steel beams set in mortar bed on Durock for new 68" x 48" x 3" raised hearth (built 2 wks ago)
h4.jpg = finished raised hearth - $19 (total!) of the best (cheapest!) tiles Home Despot sells.
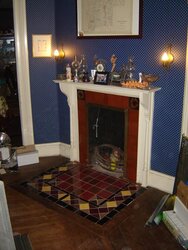
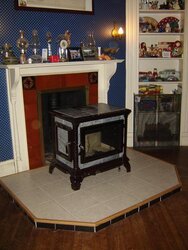
h5.jpg = Heritage installed - yay!
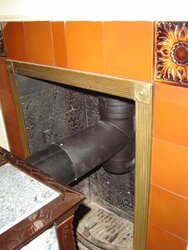
h6.jpg = detail of the T-connection to the flue.

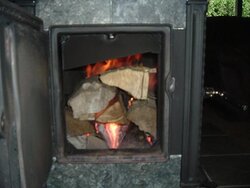
So there's the background, here's the concern: we did our first burn tonight and smoke just CHURNS inside this thing. It was a tiny burn, of course - nothing big, so we didn't get the pipes barely warmed up, so I understand that might be our biggest help (getting the flue fully heated up). While just burning the coals out, the firebox sat for a good hour filled with churning smoke. Opening the front door seemed to help a tiny bit in terms of clearing it out, but I'm really curious if people here feel my best bet is to go and hook up the fresh air intake - will it really make that much of a difference?

And has anyone ever seen cases of very tall chimneys like ours necessitating the installation of a draft inducing device?

Any help y'all can offer will be much appreciated - this is a great resource, very helpful while building my hearth!

-Ed
Stafford Springs, CT
 

Attachments

  • h1.jpg
    h1.jpg
    55.3 KB · Views: 378
  • h2.jpg
    h2.jpg
    57.7 KB · Views: 366
  • h3.jpg
    h3.jpg
    56.7 KB · Views: 386
  • h4.jpg
    h4.jpg
    46.9 KB · Views: 377
  • h5.jpg
    h5.jpg
    54.5 KB · Views: 393
  • h6.jpg
    h6.jpg
    50.2 KB · Views: 382
That smoke rolling in the box was just because of the cold fire in a big and cold soapstone stove. I wouldn't change a thing until you have a chance to get a hotter fire in there. Really it will take a pretty long time to get the stone warm enough that it will let enough heat escape to the flue to creat enough draft to get ripping. Expect a half hour at full throttle before you get to 300 degrees on the stove top. More and finer kindling will reduce the "smoke" stage.

On your tee detail: Is the male end of the pipe supposed to stick into the tee? Seems like all stovepipes are set to allow creasoste to run back into the stove and your male end is pointing against that flow.

Am outside air setup likely has nothing to do with it and to verify this you can open your front door while it is smoking in the box.
 
Is the horizontal pipe level or pitched uphill towards the chimney?
 
You know I thought of the male-female connection when we did it - We got the stainless tee up in there and then I think it was just easier to crimp the black pipe stub off the back of the stove. But you're right - it should be done the other way. Trying to think of some way to replace the stub w/ an uncrimped piece, and add crimping to the stainless. The inspector didn't even catch this one...

The horizontal section is also almost perfectly that - horizontal. Should it have more of a slope up? I don't recall the installation manual saying it needed slope.

Thx for the feedback!

-Ed
 
Yes, it must slope uphill. Smoke does not like to go downhill. The pitch of the pipe should be at least 1/4" per ft. That can make a very big difference in controlling smoke spillage.
 
Use small 1/2" kindling for the first break in fires. Anything larger will smolder and create the smoke storm assuming you don't have major draft problems.

That horizontal section doesn't look too long to me to create much of a problem. I bet the smoke was a combo of small fire & wood too large.
 
The first fire was tiny wood - all small stuff. Today we tried to get it a little hotter but i can't even seem to get a full size log to burn inside for very long. It's drawing very well - if I crack open the ash pan door it roars to life (i only do that for a second or two). but I'm struggling to find any arrangement of wood and/or combination of primary airflow setting that actually generates a sustained fire. My little Rutland magnetic thermometer on the cooktop surface isn't even up to 200. This is a bit of a puzzle - kinda defying my usual campfire-building methodology.

On the good side, the smoke issue was definitely "just too cold all over" since it's not doing that at all today.
 
Sounds like it could be time to take a close look at the wood. What type of wood and how well seasoned is it? Does it bubble and fizz on the ends as it is getting hot? If you split open a chunk, is it cool and damp on the inside?
 
I bet your log is too big. Try building it up slowly. First kindling, then add 2 inch sticks.. then small splits .. on up to your log size.
 
Your smoking issue is probably due to poor draft. When that long liner is cold it is hard to get a good, strong, pulling draft. Try some newspaper next time - just crumple up a bunch of sheets into balls, place them in there, and light it up. Keep the door cracked if you need to in order to get enough air. If these burn well they will warm up the liner. When they have burned up try to get some kindling and smaller splits in there to get burning and work up from there.

If you've noticed there are many posts from beginning burners on how their fires are lighting and burning. I think a lot of it has to do with the early season. My insert starts and burns much differently when it's 30 degrees or below out compared to when it's 55 degrees outside. Right now I often need to keep my door cracked open to get enough air to get the fire going really well. Then I close the door and let the air controls handle it. When it is colder out I will not need to use the door as an aid - the draft will be great enough without it. It's all a learning process. Enjoy, but don't get too worried yet. Try to warm the flue before you light your wood.

MarkG
 
Thanks to all for the kind replies and the time spent w/ an admitted newbie. My neighbor came over today and they are very experienced woodstovers. She had it up and blazing in literally 45 seconds. it's been roaring nicely ever since. Looks like the biggest issue was just getting air uniformly underneath the logs. The wood is all decently dried red oak and birch, fully seasoned 1 year. She also gave us a couple of their own homemade firestarters (candlewax melted into little paper cups like McD's uses for ketchup) which worked impressively well. So we'll keep tinkering - holding at 300-350 for this burn. It'll be interesting trying to keep it running at anywhere near 600 but heeding MarkG's advice - it's a learning process and I'll see how things progress. Will likely let it cool down and do an ash dump tomorrow. Thinking it'll be interesting trying to "schedule" ash dumps since this thing holds its heat so well!

Looking forward to spending time learning and chatting here - thanks again!

-Ed
Stafford Springs, CT
 
It's great that your neighbor came by. Good tip about being sure that air can get through the logs. Fire needs air.

Following Hearthstone's guidelines you'll want to keep it under 600. Shoot for a steady 400-500 and be happy.
 
Good job, all of my stoves have rolled smoke until the draft builds up enough.

On the ashes, you'll be scooping them out hot if you are to be burning the is thing all winter. I use a welding glove with the protection up to near my elbox since even if you scoop all of the ashes out the stone will still be hot. Oh and be careful not to remove all of the ash. The fire is much easier to start and maintain with at least an inch of ash build up at the bottom. The stove manual tells you this too and I agree.

I've posted this pic elsewhere but this is what your wood size and full load should look like. You can go a littel bigger on the split size if you're already up to 450. All of my wood is split in the 3-5 inch range meaning the smallest dimension is 3-5 inches. That is smaller than in the old days.
 

Attachments

  • lick em 007.jpg
    lick em 007.jpg
    32.4 KB · Views: 251
Smaller splits = must have. I tried burning a way-too-large log last night and woke up to a cool house (it was about 28F outside, 60-63F inside at 6am) and the fire was dead and gone. But the big split I stupidly tried to burn was still sitting there mostly untouched... I'll put it out of its misery when I get home (I tried reburning it but I'm sure it didn't stay lit). We were plenty toasty last night, where it was 70 thru most of the house and I was positively tickled to not be burning a drop of oil to do it.

The logging co. we got our wood from sent a LOT of large logs like this, however, so I'm curious what your best thoughts are for knocking a 8 or 9" split down into 3's. Just a plain old maul / sledge / wedge I'm guessing...

Also I just read Dennis' (aka Savage) thread on 'worried about the new guys' and I'm definitely one of them. I'm really struggling with balancing out the airflow in this Heritage. It wants to chug LOTS of air once it gets hot. I can get plenty of air circulation inside the firebox and get it ripping good, with the primary wide open, and it'll still suck the side door shut if I try to leave it just cracked open (not something I do other than right at the start). close the side door completely and a lot of the time the damn flames will just about go out. I've had mixed results trying to knock the primary down low and have it stay firing. My inner engineer is telling me the flue is drawing TOO hard at temperature, so trying to restrict the burn by closing the primary intake is just going to make it pull harder. The coal bed stays nice and red next to the 'doghouse' - it'll even erode a circular hotspot there - which again, makes me think of some kind of blowtorch effect going on. I'm going to try snapping a little video or something to show what it's doing...

This feeds my final concern, which is the surface temp. I've got to get myself a better surface temperature measuring device because the cheapsh*t magnetic thing I've got is about frickin useless, IMO. I've got a stainless flex liner, so it won't stick there. Putting it on the top center stone is also great for knowing how hot the fire was an hour ago, but if I'm concerned about how much A) heat I'm wasting by sending shooting up the flue (hint: I AM.) and B) how much creosote I'm generating (hint: I _REALLY_ AM) because the stupid thing claims to never go higher than ~350, then this just ain't cutting it... If I need to get it hotter to keep it from building up creosote and creating a hazardous condition, I've got to find some repeatable way of managing the airflow. In the other thread, rwilson seemed to note fairly similar performance attributes, so I'll be curious to see how he does, too... I also know I've just started and I'm probably way overthinking things but (ask my wife) I Just Do That.

In other news, I picked up the metal ductwork to plumb in a fresh-air feed. No more burning air I just worked so hard to heat! And we put in a floor grate / passthru from our bedroom to the living room below (Shotgun rooms go LR / FR / DR all wide open, and the Heritage is right smack in the center of the house, in the FR). Thanks again for the help and advice!
 
Well I am not too concerned with the flue pipe temp. Who really cares? The flue can be what 1200 degrees? On top of the fact that it doesn't really matter, the soapstone stoves never get nearly as hot as the steel plate guys. A stove that is made to cruise along at 400-500 degrees will likely never make hot enough flue gasses to satisfy the plate steel guys' criteria when their stoves are meant to cruise along at 600-800. As the manual states, monitor your stove temps and run it up until it approaches 600 or until you get enough heat. You'll want a decent thermometer but the standard rutland works for me. BeGreen turned me on to those fancy thermometers that I may just look into for a Xmas present. I bet that your meter is working just fine, at 350 you can touch the iron frame for about a second.

I would knock those splits down as you go. I do the same thing moving larger splits to the wood cart I will stop and split them up a bit. Usually only using a standard axe to get a range of split sizes.

I open the side door if the fire needs more air and will close the latch and then shut it on the latch so that it can't suck shut. Later I will lightly latch it which still allows leakage and then latch it tight before beginning to reduce the throttle.

The blow torch effect from the doghouse is normal and you will learn to use that to your advantage since it can blow air under the sideways stacked logs if you leave a little channel in the coals. That air will create good fire inside of the load and not just on the front face.

Once you get the stove top well past 350 and into the 500 range you will find it much easier to turn down the throttle and find that even larger splits will burn up. Don't sweat the creosote or wasted heat, neither are your problem yet. Right now work on getting the stove up to 500. You'll need reduced throttle 25-50% to get it to happen and then the stove will be a whole different animal. Once at 500 you will get good secondaries to reduce smoke and creosote and you will have the throttle at a very low setting to reduce heat wasted up the flue.
 
Last couple nights I've managed to get really good, hot burns going - about as packed inside the firebox, and the most active secondaries I can imagine making. And the Rutland (sitting on the steel surface between the top center blockoff plate and top center stone) still says 400 max. I know I got the stove hotter than before because it gassed the paint something fierce. Had the primary worked down to full-off (maybe 1/8"-1/4" left of 'off') and a full load went easily from 10pm to a nice hot coal bed at 6am which fired right back up for me.

My wood is definitely wet - it hissed and sizzled and spat for hours yesterday - so I know I need to make arrangements for drier storage (contrary to Woodstove Wife's insistence that her family never covered their wood piles growing up - they didn't, but that doesn't seem to be an OK way to do things!). Hopefully we can resolve our Wet Wood Woes and keep this thing firing nicely.

I picked up a ~0-1000F infrared thermometer cheap on eBay too - figure it'll help tell me if the Rutland is reading accurately for me, plus lets me more accurately measure the other pipe and surface temps.
 
It took cavemen a while to figure out fire , too.
 
Status
Not open for further replies.