
I think I'm doing pretty good so far but I need some feed back from the experts on a few things.
First is the hearth pad dimensions and clearances. The stove instructions say a minimum of 42"W x 44"D, I guess this assumes that the dimension behind the stove is at minimum clearance to combustibles right? The hearth pad I'm building is going to be larger than the minimum required so I should be fine as long as I keep to the clearances in the manuel that say that the hearth pad needs to extend a minimum of 8" on either side and 16" out the front. Doesn't NFPA 211 require 18" from the front or does the stove manuel take precedents? I think my hearth pad will be about 44"W x 48"D and butted to the wall in the back with the stove about 8" from the wall. Does this sound alright?
Next related question. The manuel says that there needs to be a minimum of 8" of non-combustible material that extends out the back of the stove but the minimum clearances to the wall are 7", I assume go with 8" to be safe? This brings me to my next question.
The chimney connection. My stove will have an outside wall behind it and I want to go directly out the rear of the stove through the wall and into the Tee. In reading the chimney manufactures (Simpson DuraTech) directions for installing a wall thimble it says that there must be a section of chimney that extends inside a minimum of 6" measured from the inside wall. I seem to remember reading somewhere (chimney manufactures FAQs) that the stove can not be connected directly to the chimney but needs to have a piece of connector pipe between the stove and the chimney. How can I connect the stove to the chimney and still be with in the clearances of 7" to 8" from the wall? Can I use a 2" piece of stove pipe? Is it even possible to install the stove and chimney in this configuration with the exhaust passing through the wall directly behind the stove?
Thanks,
Noah
") ) It would seem that this would be ok as long as there is a proper wall thimble and double wall pipe connects the stove to the thimble. Simpson makes an adjustable DVL 6" pipe that will go from 6" to 9" that might work for connecting the stove. FWIW, the Castine can get hot. My preference would be to exceed the recommended back clearance by at least a couple inches. And yes, you will need 18" of hearth in front of the stove door. Note that with rear-exit, the pipe must be pitched upward slightly. From my experience, the F400 does not like a level pipe for rear exit.
) It would seem that this would be ok as long as there is a proper wall thimble and double wall pipe connects the stove to the thimble. Simpson makes an adjustable DVL 6" pipe that will go from 6" to 9" that might work for connecting the stove. FWIW, the Castine can get hot. My preference would be to exceed the recommended back clearance by at least a couple inches. And yes, you will need 18" of hearth in front of the stove door. Note that with rear-exit, the pipe must be pitched upward slightly. From my experience, the F400 does not like a level pipe for rear exit. 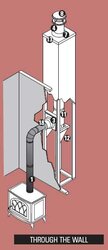
")


