
For an insert in a zero clearance fireplace to be legit the insert manufacturer liner manufacturer fireplace manufacturer and chimney manufacturer all need to allow the install.So is that the only way it would be legit with air-cooled chimney in a chase, if you ran an insulated liner inside of that? What else would work in a chase..standard Class A double-wall chimney, as would be used above a ceiling in a two-story house?
New owner and Buck stove woes
- Thread starter Stealthdude
- Start date
-
- Tags
- buck stove model 19
-
Active since 1995, Hearth.com is THE place on the internet for free information and advice about wood stoves, pellet stoves and other energy saving equipment.
We strive to provide opinions, articles, discussions and history related to Hearth Products and in a more general sense, energy issues.
We promote the EFFICIENT, RESPONSIBLE, CLEAN and SAFE use of all fuels, whether renewable or fossil.
You are using an out of date browser. It may not display this or other websites correctly.
You should upgrade or use an alternative browser.
You should upgrade or use an alternative browser.
Their inserts and the F45, F50 & F55 are steel at heart as well as the F370.What jotuls are plate steel? I didn't know they had any.
Ok thanks guysTheir inserts and the F45, F50 & F55 are steel at heart as well as the F370.
What fireplace is it installed in? Did the tech check the model number? And for the record there is no ul book that has products in.
I don’t know if I know the fireplace it was installed in. There was a steel surround around the back of the opening but I didn’t check for a model number on that. Sorry just was trying to take in the time I had with Simon
Got it. He had a book with parts in it to order from. We had a discussion about it not previously being UL listed but recently it showed up as being UL approved. He showed me the part in the book and then we went up to check and see what we had; turns out it was correct by his assessment
I should have specified that they are steel fire box with cast iron jackets; F45, F50, F55. It's been hard for me to find a backup stove, secondary burn, that has a steel box and rear-vents. The Jotul model that vents low enough for my lintel height is too much stove for my space. Not strictly secondary, but the same thing with the Woodstock steels; The IS would fit under my lintel but the AS is a better fit as far as output.
So is that the only way it would be legit with air-cooled chimney in a chase, if you ran an insulated liner inside of that? What else would work in a chase..standard Class A double-wall chimney, as would be used above a ceiling in a two-story house?
Does the insulation look like an R-13 batt you would find in a wall, or is it something stiffer? How did you end up putting in the baffle and insulation, insulation above the tubes and the stainless plate on top of the insulation, as it apeared in the diagram?
I don't guess you had time to get the cast collar attachment, so I'd be interested to see what was done with the stove's flue exit connection, and if it connects to an insulated liner inside the air-cooled chimney as bholler asked (I doubt it.) Pics would be great, if it's easy to get the top portion of the mesh surround off to get a camera in there. Seems like you may not be a big pic guy, though..
From your description, sounds like that 1.3 cu.ft. box may only heat the immediate area, living room and maybe master bedroom. But any amount of heat will beat propane only. You can play with ceiling fans or whatever you have at your disposal, to make use of the heat you do get out of the stove. You certainly won't get meaningful heat all night with the small stove.
I'm looking forward to hearing how the little 18 burns (visible secondaries, air control, etc.) now that you've got it closer to how it should be set up. The suspense is almost unbearable! I love new-stove fun!

The insulation looks a lot like r13 maybe a little stuffer. We put it on top of the baffle plate I thought we all agreed to that from the diagram? It is pretty floppy so I think it needs the plate to support it
I feel like I need a vocabulary glossary I say the wrong words here I think:
The liner actually slipped into the stove outlet. There is a stainless collar above the stove outlet that actually tightens down on the liner. Then it slips down into the stove output. Problem was it was hung up on the stove outlet lip and then created a room draft ish
We just put that screen back up and I have it running. If I keep the fire dead for a day or two I will try and get pics of the connection
I wish I could run convection fans so if I lost power it was not an issue. I may try and run some fans upstairs to try and promote circulation. The install tech had some good ideas regarding small fans to primitive moving heat where I wanted it ( I have done similar previously)
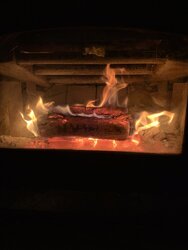
I will say this I finally have secondary ignition. It started to burn like I dreamed it would/ should. I am so hopeful this will work and continue doing so.
I am running it wide open to burn out any junk In the chimney.
So far we are up two degrees in 1 hour. It looks hopeful everyone keep their fingers crossed.
It smells like wood is burning finally and my house smells correct. God bless America!
So far we are up two degrees in 1 hour. It looks hopeful everyone keep their fingers crossed.
It smells like wood is burning finally and my house smells correct. God bless America!
Attachments

jatoxico
Minister of Fire
With all the threads I lose track, how's the wood supply? The difference between your poorly drafting install and one that drafts right with good wood. Gonna be a nice upgrade.
With all the threads I lose track, how's the wood supply? The difference between your poorly drafting install and one that drafts right with good wood. Gonna be a nice upgrade.
Hi Jat
Wood checked out good. I got my new moisture meter in and it was 13-15% on the stuff I am burning ( as a range I clocked a few 11s and a few 18s but what I have in the garage is 13-15. In the shed shelter is 14-18 of this years burning. Next years is 19-23).
I am dreaming of an upgrade but going to see if this meets my needs. The old lady would love for me my dreams to be crushed; somehow she doesn’t like spending my money
jatoxico
Minister of Fire
The diagram, components listed from bottom to top, are "tube, blanket, baffle plate." But as others mentioned, the insulation is usually on top of the baffle plate. That's why I suggested calling Buckstove for clarification. Probably a misprint in the manual, in all likelihood.The insulation looks a lot like r13 maybe a little stuffer. We put it on top of the baffle plate I thought we all agreed to that from the diagram? It is pretty floppy so I think it needs the plate to support it
I will say this I finally have secondary ignition. It started to burn like I dreamed it would/ should. I am so hopeful this will work and continue doing so.
Once you have a fresh load of wood charred and burned in a little bit, as you cut the air lower you should see big secondary flames in front of the tubes and less flames off the wood. Cutting the air as low as you can while still maintaining secondary combustion is the way to get the longest burns and wring the most heat out of the load, as opposed to having the air open further and sending more heat up the chimney. I think most folks cruise their stoves with the air almost closed to extract the most heat. And IMO the cooler you can keep the chimney inside that chase, the better.I am running it wide open to burn out any junk In the chimney.

The diagram, components listed from bottom to top, are "tube, blanket, baffle plate." But as others mentioned, the insulation is usually on top of the baffle plate. That's why I suggested calling Buckstove for clarification. Probably a misprint in the manual, in all likelihood.
Once you have a fresh load of wood charred and burned in a little bit, as you cut the air lower you should see big secondary flames in front of the tubes and less flames off the wood. Cutting the air as low as you can while still maintaining secondary combustion is the way to get the longest burns and wring the most heat out of the load, as opposed to having the air open further and sending more heat up the chimney. I think most folks cruise their stoves with the air almost closed to extract the most heat. And IMO the cooler you can keep the chimney inside that chase, the better.
Good comments thank you. I will call buck in Monday to verify the blanket orientation. I can’t see how it would work under the baffle plate it is just not stiff enough to do so.
I fell asleep....so presently rebuilding a hot fire and trying to do just that, cut back the air intake to see how low I can go. I don’t see huge secondary flames yet but it may be it doesn’t have enough heat ballast built in yet.
No issue waiting it out until I have a good set of coals for basis of consideration.
It’s nice to see wood burning and to know that my moisture content wasn’t the major issue. I thought I was going crazy with the initial feedback and no moisture meter. I checked my intermediate kindling prices and they are (a hilarious to me ) 9%. I recall kiln dried is 8%, so I may be close to doing that prep work correct
The actual response to the air control lever is nice. Before it just would not respond to more or less air either way.
My dogs are finally happy they have a warm spot to snuggle up to now
I am interested to hear about cruising spots further.... they have a marked location on the air intake rods and it seems close to appropriate regarding “low seting”
I get fearful of choking it down too far and the creating the creosote creating machine again. I can choke it down and have a small primary flame but no secondary’s; which seems good for long burn time but bad for the overall system and safety considering the amount of creosote I took out with the last cleaning
If I was smarter I would have added a flue temp pyrometer installed so I can try to control it better rather than visual. I hear poor reviews on the magnet types
Any tips to know where the sweet spot is for cruising and when to set it and walk away
Last edited:
jatoxico
Minister of Fire
To avoid dirtying up the system err on the side of more air while your figuring it out. Keep the primary fire burning briskly, a dark orange sooty looking fire needs more air. Dirty bricks and glass are a tip off and you can also go outside periodically and take a look at your emissions.
Reloads can be different than cold starts in that you can usually close the air sooner and to a greater extent because the system is preheated.
Fires and conditions vary a fair bit and secondary burn is a funny thing. It's not always the classic slow motion barbeque look, at least not through an entire burn cycle. As I said, set the air and get the fire where you want it then poke your head outside and verify that its running clean (you may sometimes see steam which only lasts for a few feet, actual smoke drifts away until it's diluted). If it looks good close the air a bit more let it settle and repeat.
To avoid dirtying up the system err on the side of more air while your figuring it out. Keep the primary fire burning briskly, a dark orange sooty looking fire needs more air. Dirty bricks and glass are a tip off and you can also go outside periodically and take a look at your emissions.
Reloads can be different than cold starts in that you can usually close the air sooner and to a greater extent because the system is preheated.
Fires and conditions vary a fair bit and secondary burn is a funny thing. It's not always the classic slow motion barbeque look, at least not through an entire burn cycle. As I said, set the air and get the fire where you want it then poke your head outside and verify that its running clean (you may sometimes see steam which only lasts for a few feet, actual smoke drifts away until it's diluted). If it looks good close the air a bit more let it settle and repeat.
Got it and I agree, that’s why I wa running lots of air to get it all heated up while I had a chance.
What color should I be aiming for? That may seem like a difficult question. To answer but if I can learn something then great
I am curious and confused in what looks good outside? My old one would make smoke and be happy, I understand these new ones should have very little smoke and ale just heat vapors what would be the hallmark visual of this is running correctly?
kennyp2339
Minister of Fire
Very little smoke to just heat waves is what you should be shooting for. Also the stove will run a little bit better with 1" layer of ash on the bottom bricks.I am curious and confused in what looks good outside? My old one would make smoke and be happy, I understand these new ones should have very little smoke and ale just heat vapors what would be the hallmark visual of this is running correctly?
jatoxico
Minister of Fire
Startup fires are gonna be cold and presumably are the cause of the majority of creosote that is formed. Once you get past that stage the fire should be a light orange/yellow even white.
When I stick my head outside my stove does not appear to be on when running right and I don't have to look much anymore to know that (but I still like to).
Get some way of taking a stove top temp and use that as another reference point (even if its off by a few deg). Then using the above info you'll pretty quickly get a good idea of how your doing.
Next on my agenda is to borrow a good pyrometer from work soon to shoot some temps. We calibrate them and have been good units for reference in historical sense. That said different temp range for application so let’s see how that device works.
I am still frustrated, it burns easier and the burn looks “nicer”, but the temp never gets above 69-70 in the living room now. I don’t even know how that is possible, I run it wide open to a range of 50% open air intake, and burns great, get secondary ignition, and feels like warm air comes out the front, but the room just never heats up; no discernible draft can be identified out of the doors or windows. The unit has been running all day and I have been home the last 10 hours to keep it fed full of wood
For reference the thermostat is located let’s say 20’ directly across from the wood burning unit. Main room it is heating is 15x20 ish with vaulted ceilings up to 20’ maybe?
Is there a good measurement method of what comes out of the stove. I want to be sure that when we are actually burning it is actually having the desired effect, not just being a gloried fireplace. Is there a BTU/flow measure that I don’t know if? I hate to keep referencing thermostat but it is what I have. The weather fortunately hasn’t changed much as it remains unseasonably rainy and warm in Ohio.
Any good ideas on how measure the effect or output of the stove?
Just for funsies I am going to run my furnace up to 73, and see how long we can maintain at that temp with just the wood burning unit.
Edit: answer is a little over an hour. We are back to 71 now.
Last edited:
Kenny- took your advice and actually added ashes back in to have that lower layer of insulation. I did push the air intake area and the bottom center In front of the door clean however just to be sure enough primary air is available
Looking at the EPA BTU output range for the Buck 18, I see the top end is 22400 BTU/hr. That's not much output. Then with the high ceiling, most of the heat is going up there.I am still frustrated, it burns easier and the burn looks “nicer”, but the temp never gets above 69-70 in the living room...Main room it is heating is 15x20 ish with vaulted ceilings up to 20’ maybe?
If you spend a lot of time in the stove room, a higher-output stove that is highly radiant (as opposed to a convective design) would feel warmer, if you sit within line-of-sight of the stove, not too far away. If you want to heat more of the house, a high-output convective stove might distribute heat throughout the space better. Or a radiant stove would keep more heat downstairs, but might roast you a bit if sitting very close to the stove. The attachment shows the outputs of the Buck models, for comparison with the 18.

If you want to switch stoves, you have a ton of research to do in order to make an informed decision. I wouldn't run out and buy the Hearthstone...just sit on what you've got now, until you can get up to speed. You'll need a leave of absence from work to do the amount of research needed to make a great choice..good luck.

")
Second link on this page..these BTU/hr. outputs generally conform to what I have observed in the stoves I've run. Bear in mind that although a stove may have a lower top-end output, with a bigger fire box it will produce substantial heat longer, over its longer burn cycle.
https://www.epa.gov/compliance/list-epa-certified-wood-stoves
Last edited:
kennyp2339
Minister of Fire
I believe the op's insert is currently installed in a zero clearance fire place, so things are extremely limited here.Looking at the EPA BTU output range for the Buck 18, I see the top end is 22400 BTU/hr. That's not much output. Then with the high ceiling, most of the heat is going up there.
If you spend a lot of time in the stove room, a higher-output stove that is highly radiant (as opposed to a convective design) would feel warmer, if you sit within line-of-sight of the stove, not too far away. If you want to heat more of the house, a high-output convective stove might distribute heat throughout the space better. Or a radiant stove would keep more heat downstairs, but might roast you a bit when sitting close to the stove. The attachment shows the outputs of the Buck models, for comparison with the 18.
View attachment 237575
If you want to switch stoves, you have a ton of research to do, to make an informed decision. I wouldn't run out and buy the Hearthstone...just sit on what you've got now, until you can get up to speed. You'll need a leave of absence from work to do the amount of research needed to make a great choice..good luck.
Second link on this page..these BTU/hr. outputs generally conform to what I have observed. Bear in mind that although a stove may have a lower top-end output, with a bigger fire box it will produce substantial heat longer, over its longer burn cycle.
https://www.epa.gov/compliance/list-epa-certified-wood-stoves
Oh yeah, right. He'll have to do the research laid out by bholler..stove, fireplace and liner makers would have to OK the chosen install in their documents.I believe the op's insert is currently installed in a zero clearance fire place, so things are extremely limited here.
Yep, I am just going to ride out this year until I have more time to get this situation evaluated further. A bigger firebox is in order and to do that is a lot of hearth work, to do that is a lot of research to get A to B; in which case I will probably do something larger then that version of the hearthstone. I was so hopeful that would fit the existing setup but no such luck with the high R value needed
Thanks for the BTU/hour chart.... that’s what I feared . Even running it at perfect operation it won’t ever get hot hot in the room, it just doesn’t have the capacity to do so
Thanks all
Thanks for the BTU/hour chart.... that’s what I feared . Even running it at perfect operation it won’t ever get hot hot in the room, it just doesn’t have the capacity to do so
Thanks all
jatoxico
Minister of Fire
As has been said around here in the past, if you're adding BTU's to the homes envelope you're headed in the right direction.
Similar threads
- Replies
- 11
- Views
- 1K
- Replies
- 4
- Views
- 1K
- Replies
- 6
- Views
- 678