
Since there still aren't a ton of threads showing installed Ashfords, as they're a relatively new model, I thought I'd share our experience. First off, I originally came to this forum as I found our existing Century FW270xxx to be quite lacking when it came to heating our 2200 sqft two-story home in the PNW. The thing would cook us out of the living room, but the rest of the house remained cold. Fires would also only last about 4 hours with the puny 1.6 cf box. I will say, it burned clean, made little creosote, and put on a nice fire show. But that's not enough!
After some convection analysis, I decided the living room wasn't the right place for a wood stove. After much research and deliberation, I then decided that a Blaze King Ashford 30.1 was the right stove for our home. I originally was dead set on an Alderlea T6, then a Hearthstone Mansfield; I came to my senses when I saw all the numbers.
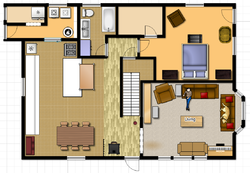
Forgive me if some of you have seen this already, but I thought it would be constructive to put everything in the same place. First is an image of our original layout, and next is the proposed floorplan. Notice that the house originally had two space-wasting brick hearths. They were beautifully built, but not needed. So, both are coming out. Next, you'll notice that the stove has been more centrally located in the second plan, and that the dining room wall is gone. Also, it was necessary to replace the laminate floor of the entry way with something non-combustible.
 [ATTACH172397[/ATTACH]
This is where all the hard work began. The old kitchen hearth used to hold a pellet stove (so I was told by the previous owner). Now it's just something that's in the way, so out it comes. The Harbor Freight rotary hammer was invaluable for this phase!

All done! Now what to do with the giant pile of bricks in the yard...
The piano won't take up permanent residence in this location, but it's out of the way for now, and the dining area already feels more spacious (even with a piano added).

Here's the offending wall that must come out. With it there, it would be too close to the stove--or the stove would be too close to the doorway. Something had to give.


These two had to be kicked out of the house so I could stop tripping over them while I worked. They were a little too interested in all the activity, and the white one has a habit of stealing any chunk of wood she can carry while your back is turned.
Unfortunately, the wall ended up being load bearing. I thought the joists above were running the other way, but apparently the two halves of my house differ from one another. We haven't been here long, and I'm still getting this place figured out. Eventually I want the post gone, but that will require an 18'x18"x3.5" beam, recessed into the ceiling and joists. The primary objective here is a warm family for the remainder of the winter, so that will wait for another time. Here's the wall and the "combustible" floor removed, with some of the new flooring installed. I had to get creative with my dog barricade to keep them off the wet mortar once they were allowed back inside.

Here's the tile I put down. It's a 36"x6" Italian porcelain, in a "Brazilian Pecan" pattern from Lumber Liquidators. It's a little trickier that regular tile, but not too bad overall.
Bruno is enjoying the tile as a nice cool surface, but not for long...
There were SIX wire drops inside that little wall I removed, so I had to move some things around. While I was at it, I decided to open up the exterior wall and add an outlet behind the future stove, as well as an outdoor outlet for our main porch. Since I already had to ruin the drywall to cross-drill some studs, I might as well install some slate....right?


This was probably the most interesting batch of slate I've seen at a store. It had fossilized moss and whatnot running through it.


The plan for the future is to make a mantle shelf to hang stockings off of (one of the wife approval factors), and the shelf will cover the large grout line below the mosaics.


I'm just putting the finishing touches on the floor.


The new stove location was finally ready. So, I stripped the stove down by removing the top, sides, front/door, and ash pan. Now lighter and more maneuverable, I built a custom "pallet" for it that would allow me to securely put the stove on a regular hand truck, and wheeled it inside. No pics, sorry.
Here she sits!

The next step was reframing the attic space, and cutting holes for the ceiling support and chimney flashing. The rain never let up, so I had to work quickly on the roof. I opted for a new Selkirk "Decorator" ceiling support, because I hate the rudimentary square boxes. Our old one looked homemade, and not in a good way.

Next I installed a new telescopic Selkirk double wall stove pipe. The old installation only used single wall, and it looked scabbed together. Unfortunately, I didn't have the foresight to get a new chimney adapter, and the old one looks a little silly mated to the fatter stove pipe. That's next on the to-do list. I moved the old chimney to it's new location, and fired up the Ashford! Please excuse the excessive assortment of fire pics...


It's pretty easy to see which dog requires less heat.

The next phase of the project involves removing the old Century stove and the hearth to free up some valuable space in the living room. Gotta have that all done by Superbowl Sunday!

First reports are that we are ecstatic! I stayed up late to watch the fire, and heard the furnace kick on. I ran over to the thermostat to discover that it was the air conditioning! That NEVER happened with the old stove. After 24 hours now, I'm still amazed that we never have to load this thing. I keep checking it to see if it needs wood....NOPE! And the whole house is warm. Almost too warm. I think we need some colder weather now.
After some convection analysis, I decided the living room wasn't the right place for a wood stove. After much research and deliberation, I then decided that a Blaze King Ashford 30.1 was the right stove for our home. I originally was dead set on an Alderlea T6, then a Hearthstone Mansfield; I came to my senses when I saw all the numbers.
Forgive me if some of you have seen this already, but I thought it would be constructive to put everything in the same place. First is an image of our original layout, and next is the proposed floorplan. Notice that the house originally had two space-wasting brick hearths. They were beautifully built, but not needed. So, both are coming out. Next, you'll notice that the stove has been more centrally located in the second plan, and that the dining room wall is gone. Also, it was necessary to replace the laminate floor of the entry way with something non-combustible.
[ATTACH172397[/ATTACH]This is where all the hard work began. The old kitchen hearth used to hold a pellet stove (so I was told by the previous owner). Now it's just something that's in the way, so out it comes. The Harbor Freight rotary hammer was invaluable for this phase!
All done! Now what to do with the giant pile of bricks in the yard...
The piano won't take up permanent residence in this location, but it's out of the way for now, and the dining area already feels more spacious (even with a piano added).
Here's the offending wall that must come out. With it there, it would be too close to the stove--or the stove would be too close to the doorway. Something had to give.
These two had to be kicked out of the house so I could stop tripping over them while I worked. They were a little too interested in all the activity, and the white one has a habit of stealing any chunk of wood she can carry while your back is turned.
Unfortunately, the wall ended up being load bearing. I thought the joists above were running the other way, but apparently the two halves of my house differ from one another. We haven't been here long, and I'm still getting this place figured out. Eventually I want the post gone, but that will require an 18'x18"x3.5" beam, recessed into the ceiling and joists. The primary objective here is a warm family for the remainder of the winter, so that will wait for another time. Here's the wall and the "combustible" floor removed, with some of the new flooring installed. I had to get creative with my dog barricade to keep them off the wet mortar once they were allowed back inside.
Here's the tile I put down. It's a 36"x6" Italian porcelain, in a "Brazilian Pecan" pattern from Lumber Liquidators. It's a little trickier that regular tile, but not too bad overall.
Bruno is enjoying the tile as a nice cool surface, but not for long...
There were SIX wire drops inside that little wall I removed, so I had to move some things around. While I was at it, I decided to open up the exterior wall and add an outlet behind the future stove, as well as an outdoor outlet for our main porch. Since I already had to ruin the drywall to cross-drill some studs, I might as well install some slate....right?
This was probably the most interesting batch of slate I've seen at a store. It had fossilized moss and whatnot running through it.
The plan for the future is to make a mantle shelf to hang stockings off of (one of the wife approval factors), and the shelf will cover the large grout line below the mosaics.
I'm just putting the finishing touches on the floor.
The new stove location was finally ready. So, I stripped the stove down by removing the top, sides, front/door, and ash pan. Now lighter and more maneuverable, I built a custom "pallet" for it that would allow me to securely put the stove on a regular hand truck, and wheeled it inside. No pics, sorry.
Here she sits!
The next step was reframing the attic space, and cutting holes for the ceiling support and chimney flashing. The rain never let up, so I had to work quickly on the roof. I opted for a new Selkirk "Decorator" ceiling support, because I hate the rudimentary square boxes. Our old one looked homemade, and not in a good way.
Next I installed a new telescopic Selkirk double wall stove pipe. The old installation only used single wall, and it looked scabbed together. Unfortunately, I didn't have the foresight to get a new chimney adapter, and the old one looks a little silly mated to the fatter stove pipe. That's next on the to-do list. I moved the old chimney to it's new location, and fired up the Ashford! Please excuse the excessive assortment of fire pics...
It's pretty easy to see which dog requires less heat.
The next phase of the project involves removing the old Century stove and the hearth to free up some valuable space in the living room. Gotta have that all done by Superbowl Sunday!
First reports are that we are ecstatic! I stayed up late to watch the fire, and heard the furnace kick on. I ran over to the thermostat to discover that it was the air conditioning! That NEVER happened with the old stove. After 24 hours now, I'm still amazed that we never have to load this thing. I keep checking it to see if it needs wood....NOPE! And the whole house is warm. Almost too warm. I think we need some colder weather now.

") (I'm using dog in the singular because I grew up with huskies and samoyeds, and they are not big fans of the stove.
(I'm using dog in the singular because I grew up with huskies and samoyeds, and they are not big fans of the stove. ") )
)


