Pics of My New Pacific Energy Summit(plus 1 of my Avalon)

  • Active since 1995, Hearth.com is THE place on the internet for free information and advice about wood stoves, pellet stoves and other energy saving equipment.

    We strive to provide opinions, articles, discussions and history related to Hearth Products and in a more general sense, energy issues.

    We promote the EFFICIENT, RESPONSIBLE, CLEAN and SAFE use of all fuels, whether renewable or fossil.
Status
Not open for further replies.

Jfk4th

Minister of Fire
Hearth Supporter
Feb 8, 2007
683
NY
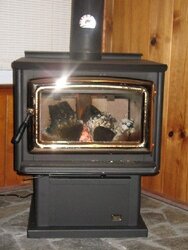
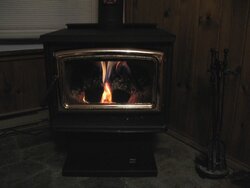
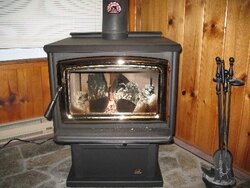
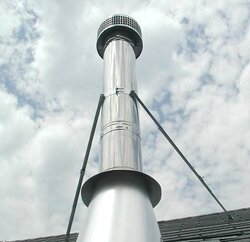
Hey Guys, I have finally taken some pics to show you of my new stove. It is surprising that with only 11 feet of chimney pipe I am getting such good burns, with very nice heat output (more than what I need). I am probably going to put an extra 5 feet of Class A pipe with brace, but it is no guarantee...How Can I complain with 8-10 hour burns with 3 logs (2 rounds, 1 split). I have not even packed the firebox full yet. Good news, the curring is getting a lot better (smoke alarms aren't going off anymore, smell is fading....)
Such a sharp looking stove. I tell ya, I have to get better at taking pics and putting them in the forum, the pics here truly do not show how sharp the stove is. The new door style with the little bearing that grips to close the door, is much nicer than the old style (for those that know what I am talking about).

The blower is very nice also, I like that feature of it turning on and off throught the day for the auto feature and the full time on feature. I have a Quadra Fire 5100 in my Living Room. YES I AM A FREAK, I HAVE THE JUST ABOUT THE BIGGEST STOVES QUADRA-FIRE AND PACIFIC ENERGY MAKE, and I still don't use them for my main heating source. I know I have to change something, I plan on next year trying to use wood as my main source of heat........ Well I didn't pay for the Quadra Fire, it came with the house, pretty sweet......
Like I was saying, my Quadra Fire stove has an auto feature that stays on when it gets hot enough and shuts off when it is cold plus the fulltime on feature (I like the Summit blower better, just my opinion).

Well I am going to do a "Tribute to Roosterboy" soon and do a video of my stove in action.... "Thank you Elvin....."

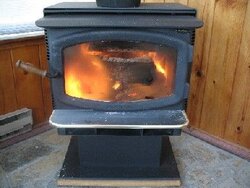
OK 3 pics of my new Summit and 1 of my 1 year old Avalon Pendleton that I sold (picture quality is bad on this one guys, it looks really "dirty")
 

Attachments

  • IMG_1757.JPG
    IMG_1757.JPG
    31.7 KB · Views: 773
  • IMG_1753.JPG
    IMG_1753.JPG
    58.4 KB · Views: 745
  • IMG_1751.JPG
    IMG_1751.JPG
    47.6 KB · Views: 833
  • pic2.jpg
    pic2.jpg
    23 KB · Views: 795
Now thats a thing of beauty. I am guessing your not disappointed anymore? Got used to the way the Summit burns I take it?
Glad your fears & disappointment are fading. Its an awesome stove, that will only get better as you get acquainted with it and find those sweet spots.
Congrats bro, good decision of stove and I think your won't be disappointed.
 
Looking good JFK...wait until you get that extra blow pipe installed... the performance will be alot better. :coolsmile:
 
8-10 hour burn time on 3 logs , awesome looking stove , all the heat you could want and your happy with it ......... don't get much better than that bro .

The nice thing about the pedestal model is the MONSTER ash pan. That thing is HUGE ........have you run the ash clean out system yet ? Super easy and no ash dust mess. That ash pan on your looks like it would hold 2 years worth of ash! Alright , maybe not 2 years. ;-P

Congrads JFK ! Ya gotz a he(( of a stove man.
 
Thanks for the props Roospike, Gunner, and Hogwildz. Yep, I am going to get that extra footage of pipe as soon as the weather gets warmer, I also might put in a damper (good idea or bad idea?) Love the video Gunner, I am going to join that "club" and do one myself, nice burn baby!!!!!!

I'll send some pics soon of what the out side looks like

Later
 
With 17ft of chimney you should not need a damper.
 
Gunner said:
With 17ft of chimney you should not need a damper.

I agree , I have a 20' class a SS chimney , stove top to full height (not measuring cap) being a full inside install and no need for a inline damper.

If your 11' now the extra pipe might help when the temps are warmer ( 40°-50° ) to help with extra draft , you'll just have to see how she does and go from there .
 
Gunner and Roospike, I am just worried about too much of a draft when I add the extra 6 feet. Adding 6 feet will increase my draft correct? If my draft is not too shabby now even when I close it completely down, won't adding 6 feet "rip through" wood without the ability to close to down a little more if need be? What do you think?
My brother in Law has a damper on his pipe, 18 feet of pipe, and I was quite pleased how his stove worked. He heats his house 24/7 like you guys do.
 
With my 20' of chimney i have no sign at all of a hard to control stove like over drafting.

Sense your new to the Summit i will say this ... you have to let the stove teach you how she likes to run. Its not hard to figure out but with all stoves you have to have an open mind and pay attention to how she behaves to different loads and different kinds of wood as well as what the temp is doing out side.

#1 If you load your stove up with a lot of smaller splits and char the wood for any extended period of time and then try to close her down you will get a hot running fire and a real hot stove. By changing the size of wood to large splits and rounds and how long your char the wood will make a difference on how hot your stove will run and how long it will run.

So with that said , make sure you look at how you load your stove and with what wood you load it with and how long your char the wood will make most of the difference.

I'd put on the extra pipe and forget about the draft damper , learn the stove and how to run the temps on her. forget about the extra damper. If your having issues change the way you load and burn and the very last thing i would do is look at putting a extra damper on the stove pipe.

A lot of experience on your model stove here so always ask if you have questions.

< pointing and shaking my finger @ U when i say it > NO Extra Damper ;-)
 
OK you sold me, when weather is better I will put the xtra pipe on and install a brace because I will have about 12 feet exposed from the roof.
Thanks again
 
Brace it good. What are your plains to brace 12" of pipe ?

Some thoughts ........... bracing the lower part and a brace at the upper part ?

I bought the brace kit for mine but its not quite as high as yours is going to be.

If your stove is drafting fine now why not just try a 3' section of pipe or a 4' section ?
You can add a 3' now and if you feel you need more you can always add another 3' or
4' section later if needed.
 

Attachments

  • 2.JPG
    2.JPG
    23 KB · Views: 488
JFK, let me tell you about my setup as I recently put in a damper.

I had my stove and chimney "professionally" installed (due to insurance co)

Stove is on the main floor of a 2 story, I have about 22ft total of Excel chimney, 7ft of that is out of the roof and i'm using doublewall stovepipe.

Immediately after the first fire I knew something was wrong...I could here air being sucked in at the stove collar to doublewall connection. I called the dealer and they came out to re&re with cement for a better seal. There is a stove pipe adapter that you use to connect from the collar of the stove to doublewall pipe and this sometimes has a tendency to leak air they told me.

After they sealed the connection with cement everything was great for about 2 months, then I started to notice quite an increase in my draft, it was alot colder at this time so I chocked it up to the colder temps after ruling out everything else. I didn't have as much control as before so I decided to install a damper.

When I removed the double wall to install the damper I noticed that most of the cement was gone from the stovepipe adapter and that they had made the connection and then put cement on, instead of putting the cement on then slipping the pipes together.

I went ahead and installed the damper and also used a new stovepipe adapter and made sure to seal it VERY well with cement.

Right away I had full control again without using the damper, although I couldn't hear it like before I'm positive that the stovepipe adapter connection was leaking air. Now I have a damper in my pipe that I don't need. I've never had to use it since I put it in, even with the last few nights being -10F and the stove fully loaded. It's not hurting anything sitting there but it was a waste of money, a $15 stovepipe adapter and some cement was all I needed.

Lesson learned, if you want it done right do it yourself.

15ft is the bare min required, I can't imagine you'll need a damper at 17ft but I could be wrong.
 
I agree with Roo add 3' and see how it works out. Lets not go nuts till you have to.

Note it seems a lot of stoves suffer from flue collar to pipe connector problems the more found the more this connection needs to be sealed IT
wreaked havoc in a couple everburn stoves. They plain do not opperate right without a decent seal there.

As for the inline damper Worry about that when nothing else works I agree with Gunner and Roo it is not necessary/
 
Excellent input Gunner .............

It does a few things , it backs up my reasoning to not putting on a damper because more then likely if you need a damper its another issue with the stove and or pipe or learning curve that needs to be addressed with the stove.

Also when i was installing my stove i bought all the calss A pipe pipe and kit ( and brought it home that day ) and had to order the double wall set up. We (the store and I) were kinda unsure of all that was really needed for the double wall so we ordered the double wall stove adapter ( as you have Gunner ) the telescoping 5' double wall pipe , a damper section and some top adapter piece.

When i had the class A fully installed and the stove in place i opened up the double wall and installed just the telescoping section and it fit perfectly with nothing else needed. :cheese:
So i kept the damper section and took back the two adapters for the double wall pipe and let the store manager know what was going on with the install for future reference to future stove installers as well as himself. Ran the stove for 3 months and didnt even show a sign of needing the damper so i took it back too. I used the return $$ as credit because i buy from the store all the time so no loss to them.

With all the stoves i have run over the years they all had dampers and adjustable air inlets so i was kinda worried about a stove that had ONLY one air control. ( you old timers know what i'm talking about )

My question to Gunner is .........is your double wall pipe solid or is it the telescoping style ? Have your tried to install it with out the adapter ?
 
My question to Gunner is .........is your double wall pipe solid or is it the telescoping style ? Have your tried to install it with out the adapter ?

My doublewall is 5Ft telescoping.

You could install the doublewall without the adapter but, I don't know how well it would seal. You would end up with the collar of the stove between the inner and outer layers of stovepipe. One more thing if you don't use the adapter the holes on the doublewall will not line up with the hole on the stove collar so you will have to drill new ones. 5 different people I spoke to said your supposed to use the stovepipe adapter with doublewall.

IMO these adapters made for going from a collar to doublewall are VERY poorly designed, they need to be thicker and tighter fitting to the collar. Drawing the screws to tight will cause a gap to open up in the middle between the screws.
 
He only has 11ft of chimney, the bare min required "per" PE is 15ft. So he needs atleast 4 ft.
 
Gunner I agree but I think it was reported that m the manul t says the measure ment is from the bottom floor or base of the stove that would add a couple ft to the 11 ft. If I understand it correctly. that's why I suggested the 3'
 
No screws in my stove collar ............

When the double wall pipe is installed i put 3 screws in the middle of the double wall pipe where they meet and i put 3 screws in the top pf the pipe where the double wall meets the ceiling support.

No draft issues to report and no pipe movement.

Right or wrong , this is how i installed my pipe so if one feels its not correct then please do not install this way but it work for me so if ya wants to try it feel free. I have had it installed this way for two seasons with no issues.
 
Very interesting Roo, so you have the collar inside the two layers of pipe with no screws?

I don't know whats right or wrong I just used the adapter cause everyone said I needed it, I didn't think it was an option without. Oh well
 
elkimmeg said:
Gunner I agree but I think it was reported that m the manul t says the measure ment is from the bottom floor or base of the stove that would add a couple ft to the 11 ft. If I understand it correctly. that's why I suggested the 3'

Good eye ;-) elk
 
elkimmeg said:
Gunner I agree but I think it was reported that m the manual t says the measure ment is from the bottom floor or base of the stove that would add a couple ft to the 11 ft. If I understand it correctly. that's why I suggested the 3'

Yes, In the manual it states to measure from the top of the stove to the top of the chimney pipe ( not counting the cap height ) for full length measurement of chimney.
 
Gunner said:
Very interesting Roo, so you have the collar inside the two layers of pipe with no screws?

I don't know whats right or wrong I just used the adapter cause everyone said I needed it, I didn't think it was an option without. Oh well

The only pic i could find ........... The inside pipe is inside of the collor and the outside pipe is on the outside.
 

Attachments

  • 2.JPG
    2.JPG
    31.1 KB · Views: 304
Manual currently says from the bottom of the "appliance" Spike.

Edit: So for the Summit it would be chimney height plus 31" for total flue height.
 
BrotherBart said:
Manual currently says from the bottom of the "appliance" Spike.

Edit: So for the Summit it would be chimney height plus 31" for total flue height.

Bottom of the appliance ? odd. I'll have to look again at the manual. :eek:hh:

From the top of my stove to the ceiling support is 62" (5' 2" ) and the stove sits on a raised hearth and not the floor.

Chimney is 15' with out the cap measured.
 
Status
Not open for further replies.