Poor Man's Block off plate - II

  • Active since 1995, Hearth.com is THE place on the internet for free information and advice about wood stoves, pellet stoves and other energy saving equipment.

    We strive to provide opinions, articles, discussions and history related to Hearth Products and in a more general sense, energy issues.

    We promote the EFFICIENT, RESPONSIBLE, CLEAN and SAFE use of all fuels, whether renewable or fossil.
Status
Not open for further replies.
Went and picked up some Roxul Safe n Sound this morning. I couldn't figure out how there were 12 3x15.5x47"inch peices of insulation in this bag. I open it and it expanded about twice the size! This stuff was so much easier to work with than fiberglass insulation.

I did this with the stove in place and it was not that bad. I cut sections into 4" strips. Just started stuffing them into the open damper area. I was able to get a 2 full bats of insulation up in the smoke shelf area. Then I cut a section to fit into place on each side of the liner. I then supported this with insulation hangers. These are made of steel so I didn't see any problems with this approach.

Still to warm to test so I'll have to wait until next week when temps fall into the 50's.
 
Whoa, in those photos (not yours, the ones you linked to) it looks like his flexible liner is just pulled down over the stove outlet, without any screws to hold it on. Yours appears to be screwed in place (the right answer).
 
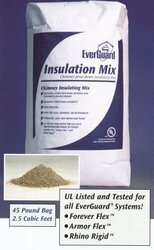
Does anyone know if it would be a good idea to pour some of that chimney insulation mix down from the top? The Rockford Chimney Supply website suggests using a chimney balloon to seal off the bottom of the flue. The mix cures into a lightweight, semi hard mass that supports a liner in the chimney and forms a thermal barrier that keeps the flue gases warm. Looks like it costs the same to fill the whole chimney up, as it does for same length of insulation blanket. Also looks it would reduce the PITA factor considerably. I think some of the other sheet metal lids around the liner, then pour this stuff for a good seal would be better, it might be difficult to get a balloon to seal around the liner.
http://www.chimneylinerinc.com/insulation_kits.php
 

Attachments

  • mix_insulation.jpg
    mix_insulation.jpg
    20.6 KB · Views: 462
I did something like that last year only I used a fire proof board sold at Ace Hardware. I cut it in 2 halves and shaped it to fit against damper frame. I used fire proof insulation to seal it tight.
i used large toggle bolts and made 10 inch brackets that bolts go through and grab top of damper frame to tighten up against.
In first pic, you can see how I enlarged damper frame for 8 inch double liner and chipped out some fire brick as needed.
2764858220041601002S500x500Q85.jpg

2100329640041601002S500x500Q85.jpg


2656207630041601002S500x500Q85.jpg

2009958350041601002S500x500Q85.jpg
 
Insulation mix would work, but again, this thread is the POOR mans block off. I would have needed 3 bags @ $75/bag according to the site.
 
Mr A said:
Does anyone know if it would be a good idea to pour some of that chimney insulation mix down from the top? The Rockford Chimney Supply website suggests using a chimney balloon to seal off the bottom of the flue. The mix cures into a lightweight, semi hard mass that supports a liner in the chimney and forms a thermal barrier that keeps the flue gases warm. Looks like it costs the same to fill the whole chimney up, as it does for same length of insulation blanket. Also looks it would reduce the PITA factor considerably. I think some of the other sheet metal lids around the liner, then pour this stuff for a good seal would be better, it might be difficult to get a balloon to seal around the liner.
http://www.chimneylinerinc.com/insulation_kits.php

My installer used the Everguard that you mention. The way he did it involved removing a few bricks on the outside of the chimney where he could get at the bottom of the last tile. Once he removed the two bricks, he stuffed in Roxul in the last tile around the liner to form the barrior to hold the Everguard mix.

He took a large tarp and spread it out. Poured some mix and water together to make the mix. It looks like wet cat litter when mixed properly. He had another guy on the roof with a bucket. The guy on the ground fills the bucket, the guy on the roof pulls the bucket up with a rope. The first pour is the most important. You need to have the guy on the ground hold the Roxul in place while the guy on the top pours it in. Jiggle/tap the liner to get the mix to drop through the gaps. Let this set for about 1/2 hour and now you can start pouring in more. Again, be sure to tap the liner to vibrate the liner to move the mix down.

Once he was done, they buttoned up the brick work and you would never know. I'm not a mason so I would not feel comfortable cutting into the chimney. If you are not comfortable, maybe you can find a mason to open it up, leave, and come back when you are done. The rest is simple work.

index.php
 
Status
Not open for further replies.