
Hi! I'm aggravated and confused about the whole wood stove process. I apologize ahead of time for being so 'green' in this area, but I would like to know if it is possible to insulate around an external wood stove 22ga. stainless steel pipe. After building our first fire this year, it appears to be leaking some black soot back into the house (crusting up around the stove pipe). We recently extended the height of our external flue and I speculate that the smoke is cooling too fast before it can escape. Any advice would be sincerely appreciated!
Question from a very green newbie
- Thread starter nlwre
- Start date
-
Active since 1995, Hearth.com is THE place on the internet for free information and advice about wood stoves, pellet stoves and other energy saving equipment.
We strive to provide opinions, articles, discussions and history related to Hearth Products and in a more general sense, energy issues.
We promote the EFFICIENT, RESPONSIBLE, CLEAN and SAFE use of all fuels, whether renewable or fossil.
You are using an out of date browser. It may not display this or other websites correctly.
You should upgrade or use an alternative browser.
You should upgrade or use an alternative browser.
- Status
- Not open for further replies.
Welcome Natasha. Can you describe the flue system in detail starting at the stove and proceeding toward the cap? We need to know the kind of flue pipe (not brand), but whether it's single or double-wall pipe on the interior and exterior? If you can possibly post some pictures of the interior and exterior piping we can be of a lot more assistance. It's hard to describe and cover every detail that a picture will show.
Welcome! My first thought is that perhaps the stovepipe was assembled upside-down. The crimped ends of the piping sections (the "male" ends) must all point down toward the stove. It's counter-intuitive until you learn the logic behind it. A properly drafting stovepipe/chimney system will not leak smoke or flue gases out of any slightly non-airtight connections, but rather it will draw air in through those "cracks". As creosote forms in the flue, that residue will have a tendency to travel down the inside of the pipe. If the male ends are all pointing down into the female ends of the pipe sections, the creosote residue will remain contained within the pipe. If the pipe's installed upside down, then when the creosote residue travels down to a joint, it will come out onto the exterior surface of the next pipe section down. Maybe this is what you're seeing. If so, the system needs to be disassembled and reassembled properly. Just a guess. Then you need to address the question of what you can do to minimize the condensation of creosote in the system. Rick
My concern is whether there is single-wall pipe on the exterior. If so, insulating it is not a good idea. But maybe I'm reading the post incorrectly.
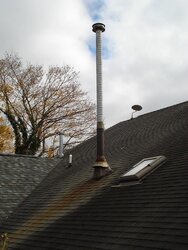
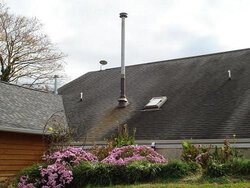
I ran outside to grab a few pictures so you guys could take a look for yourselves. To try to make a long story short, my stepdad (who passed away a couple years ago) did all of this himself. That's the thing, no one really knows what he did! He purchased a new wood stove (before his passing) and shortened the height of the outside flue (with what seems to be a thick metal/steel irrigation pipe of some sort 6.5" in diameter, according to the chimney specialists I spoke with locally) and attached the flue cap to that. Dramatically decreasing the height from 10-12 ft down to 4ft, backdrafting started and the house would fill with smoke. We were advised to extend the height of the flue with a heavy gauge metal (which is what we did). The chimney specialists I spoke with were more baffled and didn't seem to offer any advice other than the triple lined stuff around $120.00/feet. From that, we basically attached/sealed the 10 ft new on what existed. :-|
The basics:
1. stove
2. single wall stove pipe extending straight up
3. thick, insulated pipe extending from ceiling into attic out of roof (sorry for lack of proper details, but I'm not familiar with how to find them)
4. flashing to 4ft 0.5"thick steel pipe (6.5" in diameter)
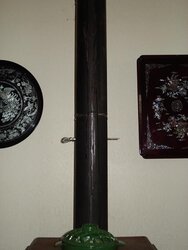
5. 22 gauge, single walled - stainless steel spiral 6" diameter, set into the existing steel pipe (screwed together and cemented) with a metal belt around it (you can see from pic)
I've come to you guys becuase this girl needs some serious help, without having to buy every wood stove product that has been thrown her way.
The basics:
1. stove
2. single wall stove pipe extending straight up
3. thick, insulated pipe extending from ceiling into attic out of roof (sorry for lack of proper details, but I'm not familiar with how to find them)
4. flashing to 4ft 0.5"thick steel pipe (6.5" in diameter)
5. 22 gauge, single walled - stainless steel spiral 6" diameter, set into the existing steel pipe (screwed together and cemented) with a metal belt around it (you can see from pic)
I've come to you guys becuase this girl needs some serious help, without having to buy every wood stove product that has been thrown her way.
Attachments
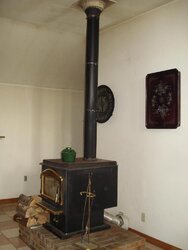
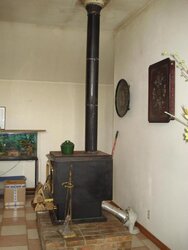
Oh my! First off, what the heck is that fan behind the stove doing...are you running that thing to produce forced-air combustion through an Outside Air Kit hookup? Or does that simply move air in the envelope surrounding the firebox to distribute heated air into the room, in lieu of a factory blower? The whole stovepipe/chimney setup has some problems. Rick
The fan behind the stove only circulates air surrounding the firebox. There is no factory blower.
The sooty leakage seems to start where the single wall pipe meets the triple wall stuff on the inside of the house.
wellbuilt home
Minister of Fire
WOW , That is a very ingenious rig you have there , but I think your building inspector & insurance company would freak out if they saw it . I had a cabin when i was a kid that had a steel stack like that , It had to be cleaned 3 times a week because the creosote would harden in the pipe as it cools . I think you need to work a new chimney into your heating budget . sorry for the bad news. John
Jimbob
Minister of Fire
The pipe above the roofline looks like single-wall pipe. It should be insulated pipe, like this:
http://www.selkirkcorp.com/installation-planners/cfsentinel/index.asp
Click on Cathedral Ceiling support planner 6" for more details.
Brand isn't important, this just gives you an idea as to what your installation should look like.
http://www.selkirkcorp.com/installation-planners/cfsentinel/index.asp
Click on Cathedral Ceiling support planner 6" for more details.
Brand isn't important, this just gives you an idea as to what your installation should look like.
Thanks for posting the pictures. As I was concerned about issues, the answer is "all the above" and then some. This is an illegal installation and quite dangerous. The pipe connection clearances at the ceiling are wrong, but much more seriously, it needs to be class A double wall pipe as soon as it penetrated the ceiling. And it needs to be braced for every 5 ft of exterior pipe.
You've got a lovely house, don't risk it with this creaky unsafe setup and don't burn with it until fixed. The good news is that it can be fixed. We can help you do this and the net result will be that the stove operates much better, safer and cleaner. It will look one whole lot better too.
You've got a lovely house, don't risk it with this creaky unsafe setup and don't burn with it until fixed. The good news is that it can be fixed. We can help you do this and the net result will be that the stove operates much better, safer and cleaner. It will look one whole lot better too.
Jimbob
Minister of Fire
120 dollars a foot for the insulated pipe! The stuff sells for ~ $50/ft. here, and our prices in Canada for building materials are usually WAY higher than they are in the states.
edthedawg
Minister of Fire
Second the OMFG response to the photos. Looks incredibly unsafe. I know your stepdad built it and whatever else - but there's a LOT that isn't just wrong, it's extremely dangerous to you, your family, and your home.
120 dollars a foot for the insulated pipe! The stuff sells for ~ $50/ft. here, and our prices in Canada for building materials are usually WAY higher than they are in the states.
We just paid $125 for 4 ft lengths of DuraTech class A pipe from DynamiteBuys.com. Or about $31/ft.
Jimbob
Minister of Fire
BeGreen said:We just paid $125 for 4 ft lengths of DuraTech class A pipe from DynamiteBuys.com. Or about $31/ft.
That sounds more like it!
Natasha, I think whomever quoted you $120/ft was trying to bend you over and give it to you dry! :gulp:
wellbuilt home
Minister of Fire
O,yea the creosote will drip out and lite on fire when it gets hot.The smoke is cooling when it hits the steal pipe .If you find some double wall pipe that matches the pipe you have you could add it to the top .If your top pipe is no good you could take that one off and add pipe under it . You could burn the stove the way it was when it gets cold you would have more draft .
I would get a quote for a complete flue replacement done by a certified installer. Get several quotes, not just a couple and ask for references. The cost is going to be mostly materials because the holes are already aligned and cut. I'd expect the cost to be about $1500. The net result of this investment besides the obvious safety is going to be a leak free system that makes the stove act like it's new. It will change a serious liability into an asset. By using the correct components, the new flue system should last decades.
Not in a million years did this girl think that she'd be crawling around the attic with a flashlight in the insulation investigating stove pipe LOL. (I learn something new everyday) About 5 inches below the ceiling and extending through the attic, is a triple walled pipe passes through the roof extending about a foot. However, there is no attic/insulation guard(s) in the attic, only some 2x4s around the triple walled pipe about 4-5 inches out, separating the pipe from the surrounding insulation (as depicted in the link that was so kindly provided above). Since it is only my mom here, I'm only here temporary before I leave for school again, I want to make sure she is safe. I don't want to lose sleep listening to the sound of dripping soot or a house filled with smoke due to backdraft (when all you can do is open windows/doors to let the cold air back in...grrrr), and surely not to a house fire or worse. Unfortunately, I'm afraid the so called chimney specialists were trying to pry-pole me knowing the situation. We (my mom & I) discussed the financial aspects and have decided, thanks to many hours of research today and you guys, that we are going to invest in some Class A stuff (and NOT at $120/ft). Hopefully it won't be too big of a job. Right away I saw we'll need the attic/insulaiton guard and hopefully just attach the Class A stuff to the triple walled stuff coming out of the roof. Viola! What could go wrong? LOL.
I can't thank you guys enough for all of ur generous advice. I'll be sure to post some before and after pics.
Thanks a million
I can't thank you guys enough for all of ur generous advice. I'll be sure to post some before and after pics.
Thanks a million
The most likely thing to go wrong will be that the new pipe won't match the existing pipe. Were you able to find a label on the pipe identifying the manufacturer? This is critical. One brand of pipe does not mate with another. If you can't match the existing pipe, it needs to be replaced with new. The other thing that could go wrong is that it could be the wrong type of triple wall. Look for a rating label on the pipe as well. Not all triple wall is rated for use with a wood stove. Take pictures of the attic piping as well, and look for those labels. You are looking for an ID to the pipe mfg. like Selkirk, Simpson, Excel, etc. Also, this might be 8" pipe adapted down to 6" at the ceiling and on the roof. If so, it may be cost effective and prudent to replace everything. The only way to tell is to identify the pre-existing pipe.
Whatever you find, the truth is that this job will go a lot faster and smoother with all new pipe, at least from the ceiling up. It also will likely perform better if that is 8" pipe in the attic. The interior pipe can be wirebrushed and repainted with high-temp stove paint to get some more years out of it as long as it is not rusting out.
On the exterior, the rusted flashing and storm collar should be removed and replaced with stainless. Then you need to calculate how much class A pipe is required to be at least 2 feet higher than the roof at 10 feet away from the pipe. You'll need at least one brace for every 5 feet of height of exterior piping. You might get away with one brace if 9 ft of external piping is sufficient. That is going to take going up on the roof and measuring 10 ft. horizontally from the roof to the current pipe. Note the height of the pipe at that point and add 2 feet.
One last question...... even with a double insulated Class A pipe (externally) would too much height not result in a similar problem of creasote buildup or soot leakage? Lets say if the pipe had to be 15 ft on the outside?
- Status
- Not open for further replies.
Similar threads
- Replies
- 17
- Views
- 2K
- Replies
- 3
- Views
- 1K
- Replies
- 16
- Views
- 2K
- Replies
- 19
- Views
- 4K