Simple Baffle Solution for your old FISHER ! More Heat Less Smoke under $25

  • Active since 1995, Hearth.com is THE place on the internet for free information and advice about wood stoves, pellet stoves and other energy saving equipment.

    We strive to provide opinions, articles, discussions and history related to Hearth Products and in a more general sense, energy issues.

    We promote the EFFICIENT, RESPONSIBLE, CLEAN and SAFE use of all fuels, whether renewable or fossil.

coaly

Fisher Moderator
Staff member
Dec 22, 2007
4,942
NE PA
This 5 minute baffle plate install is the easiest way I've found to reduce smoke and prevent intense heating of the rear outlet elbow or pipe. (20 years late, but better late than never) And possibly the best solution for anyone who can't afford to upgrade to a new stove; Approximate cost under $25.

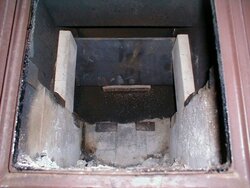
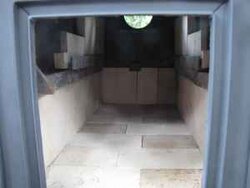
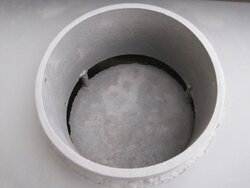
This pertains to a rear vent, but can be altered for a top vent as well. Simply measure across the inside of your stove width. Obtain a piece of steel plate 5/16 thick from a local steel fabricator or supplier 1/2 inch shorter than this measurement. I made mine (15 long X 8 inches wide for a Mama Bear. Mine cost 1.42 / lb. weighing 11 lbs. Cost $15.62) The only other materials required are 2 firebricks available at mason supply or stove retailer. (the type that line your stove 4 1/2 X 9 X 1 1/4 thick) Papa is the same height stove for brick supports, just a little longer plate to reach across the stove.

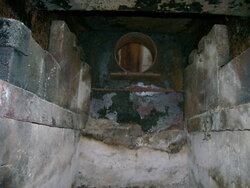
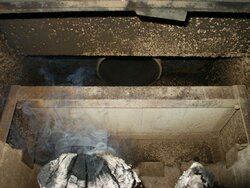
1). Simply set the firebrick on edge against the side walls on top of the first course a couple inches from the rear wall. Upright for a Mama or Papa works great, sideways for Baby.
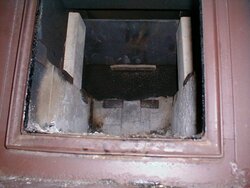
2). Insert the plate through the door, tilt it sideways and rotate until it is between the side walls.
Raise it to the top, and set it on top of the firebrick.
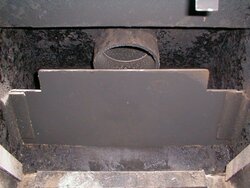
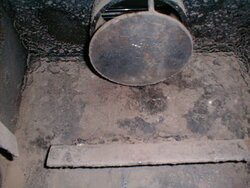
3). By sliding it rearward, you can let it tip down in the back until it's at about a 45* angle in front of the rear vent. Many rear vented stoves have a short shelf under the outlet pipe to set it on as well.
4). Make sure the opening above the plate to stove top is an acceptable size opening.
This can be adjusted by moving the bricks fore and aft to change the angle and opening if required.

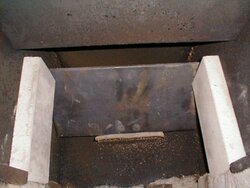
The only technical measurement is the opening above the baffle plate. This must be at least as large as the square inch area of your outlet. (6 inch round formula is pi X r squared or 3.14 X 9 =28.26" square inch opening. An 8 inch Grandma or Grandpa would be 3.14 X 16 or 50.24 square inch opening) This is about 2 inches from the top, all the way across any model Fisher Stove. You can adjust it to your exact size, but I find it doesn't make much difference making the opening exact.

I found once in place, this is quite solid and doesn't want to move. It also doesn't noticeably decrease firebox size.

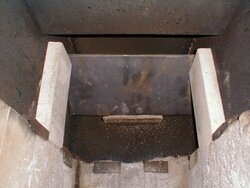
The intense heat that normally would heat the rear outlet elbow now goes up the plate and burns the unburned smoke particles before they get to the outlet. This also directs the heat to the stove top instead of in the direction of the exhaust. (rearward) Huge reduction in smoke. (about 90% reduction as calculated in EPA testing with and without baffle) Nothing permanent is added to the stove. This would also be the perfect area to add a secondary burn tube to admit oxygen at this hottest area.


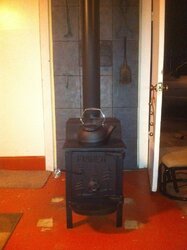
I was going to fabricate an angle iron frame to support a baffle plate, and realized I had some old firebrick laying around that the plate could set on instead. Much cheaper than angle iron, and some single door stoves use this second course of brick above the first at the rear anyway. I positioned the new baffle plate that cost a total of $16 and 2 bricks in the stove in less than 5 minutes. I expected to need to cut the corners of the bricks on angles, but the plate sat right on the full bricks in the Mama Bear shown below. Extremely simple !
 

Attachments

  • Mama Bear Baffle 1.jpg
    Mama Bear Baffle 1.jpg
    48.6 KB · Views: 48,195
  • Mama Bear Baffle 2.jpg
    Mama Bear Baffle 2.jpg
    47.2 KB · Views: 27,265
  • Mama Bear Baffle 3.jpg
    Mama Bear Baffle 3.jpg
    47.2 KB · Views: 35,106
  • Mama Bear Baffle 4.jpg
    Mama Bear Baffle 4.jpg
    47.7 KB · Views: 36,108
Some Fisher's will have the second course of firebrick just waiting to set the baffle on as shown in this Papa Bear. Simply slide the brick ahead and position the baffle plate.
 

Attachments

  • Papa Bear Brick.jpg
    Papa Bear Brick.jpg
    4.5 KB · Views: 15,918
  • Papa with second brick course.jpg
    Papa with second brick course.jpg
    26 KB · Views: 15,142
Can't be any simpler! It will be interesting to see if that plate stays flat for you or not.

pen
 
Make it an inch longer and wider and have the iron works that cuts it for ya use a brake to turn it up on each side and the back. It will be good for several years. I know, not much different than the one in my old stove and it was good for five or six years of hard burning every time. Drill two holes on each side and screw, down four stainless steel screws and you and topside brick retainers. Last one they made for me was in 2006 and it cost me $45. At 500 degrees stove top the sucker would go smoke free.

Like it Coaly. Great idea.
 
Here's the 5/16" thick plate that is still in my double door Goldilocks. They were all top vented. Plate is flat and clean as new. Just sets on angle iron side brackets. I purchased this stove new in January 1985 and have used it every season until this year ! Didn't overheat it too many times, but it's well used. The plate in a Mama or Papa is half this size, so it should stay like new. I debated on using 1/4", but figured Fisher used 5/16 for a reason. I'm sure they would have used something cheaper than the thicker top plate material if they could.
This is the first year for the Mama Bear in the middle of the kitchen where the Goldilocks has been. Goldi has a double heat shield plate on the back for reduced clearance to walls, and I always had it face away from the fridge, so this cold side didn't affect the fridge temps. First thing this fall with the new stove was milk going sour in the door ! Things in the fridge seemed cold, but a fresh half gallon of milk went bad in 2 days. I realized the heat radiating towards the back at the elbow had to be the problem. The plate on a 45* angle directs this intense heat towards the stove top, and no more milk issue. This has to make a tremendous difference in loss up the stack as well. The first thing I noticed firing it with no baffle, was a lot more smoke than the baffled Goldilocks. I see where the term smoke dragon came from. It was bad. Now it's comparable in smoke to the Goldilocks. I never had much smoke, and cleaned the chimney mid season "need it or not". We'll see if creosote formation stays the same.
 

Attachments

  • Goldilocks Baffle.jpg
    Goldilocks Baffle.jpg
    49.6 KB · Views: 56,093
  • Goldilocks Baffle 2.jpg
    Goldilocks Baffle 2.jpg
    41.1 KB · Views: 13,819
Thanks, this was a very timely post. I installed a new chimney and a Mama Bear in my detached 2 car garage/shop this past weekend. Now I can be warm out in the shop. I have a lot of construction debris from remodeling my house as well as a few large stacks of pallets to burn. In the shop I just want quick heat rather then long burns. I burn good wood in my house. All the junk(debris) and second rate stuff will be used in the shop. I can also burn up all of my woodworking scraps which is a considerable amount.

When I was a kid we had either a Grandma Bear or a Grandpa Bear, I suspect it was the Grandpa because it was a rather large stove. I wish that I had that stove today for sentimental reasons. I will have to make a baffle for the Mama Bear and see how much helps the efficiency. I haven't fired it up yet. The next couple of days are supposed to be warm so I may not get a chance to try it out until next week.
 
Baffle for Baby Bear

I have used Baby Bears from probably thirty five years, in the midwest and another stove, home, in Pennsylvania. I have just reinstalled my second (Pennsylvania) stove in a old farmhouse with a new stainless, insulated liner in the basement of an old farmhouse being remodeled, having forty five feet of an efficient chimney. The door seal seems good by the dollar bill test. For the first time ever, I saw the stove pipe glow red with the heat, even with the stove pipe damper closed. I quickly closed down the air supply and was very glad I was hanging around when this happened.

Is this just too much draft? In all my years, I have never (until then) overfired a woodstove. There was nothing special about the wood, a medium load of dry oak. Do anybody have a sense of right burn tempts for this stove. I use 300 F for stove pipe and 500 F as the mid range of my two Regencies. Does this stove burn that much hotter?

Does anybody (Coaly, if you respond you would be in my will), have any experience with constructing a baffle plate, which I would presume would be similar to the Mama Bear install on this thread.

Thanks, Dave, Maryland
 
Stove temps of 500 is hot, 600 very hot (to me). 700 is over firing.

Seems like you have a very good drafting chimney, and had too much air on it. Remember the chimney is the engine that drives the stove. You have a huge engine in a tiny car. The air intake like a throttle is going to be touchy. Even a slight leak is going to allow air in with such a negative pressure in the stove. I would run it with the draft cap closed 1/2 hour, open the pipe damper and spin the draft cap open to see if you can see flames or just a glow. Little to no flame is what you want to see. Things will burst into flame quick, so the instant you can see in shows how much air it's getting with the intake closed. With your experience, you probably know the difference looking behind the draft cap between a glow and flickering yellow flame. As soon as you spin it open you'll know if there's much flame in it.

Yes, a baffle is going to help direct the heat to the stove top, instead of out the back overheating the pipe.

8 inch wide piece of A-36 steel plate. The length of the plate across stove should be about 1/2" shorter than the interior stove width. I think 13" is right, but measure it, that's from memory. A brick standing up on each side supports the plate very well.
 
I have a Fisher insert that has been converted into a free standing stove. it works great but does not have a internal baffle. I have measured for one and it needs to be 18 inches wide but i really don't know how long it needs to be. How far out to the front of the stove does it need to extend.,, Looks like 12 or 14 inches would work, What is your recomendation ? Also, I was wondering if there was any change in the amount of pipe creosote. My instillation wants to creosote in the last couple of feet of the chiminy, at the cap. If I put a baffle in I would expect the exaust to be cooler and that might make my creosote problem worse. Your thoughts please. David
 

Attachments

  • download.jpeg
    download.jpeg
    140.8 KB · Views: 9,075
Less creosote due to burning off more smoke / more creosote due to lower flue temp allowing more condensation. However, I found a drastic reduction in smoke, therefore having less unburned particles to form the creosote I believe outweighs the reduction in temperature. Since where it begins to form would be 250*, you'll know how much temperature reduction you get in the flue by seeing the build up lower in the flue than you have it now. Is this an uninsulated exterior chimney? Insulated Flue liner? That would be the fix to keep temps above condensating.

Fisher experimented with a "Draft Box" as well during EPA testing. For a rear venting 8 inch Fireplace Series, it was a 1/4" plate steel box 9 1/4" square welded on the stove inside back, over the exhaust outlet. The box had 3 sides, closed on the bottom and sides, open on the top. The idea was to evacuate the flue gasses, allow the heat to rise into stove top, and be forced by the draft downward in the box and out the pipe. This box is found on some Grandma and Grandpas and helps retain heat, but does nothing for creating turbulence and rolling the smoke towards the fire. That's why the baffle became the best solution for the new EPA standards being introduced.

To calculate baffle size, the angle of the plate changes the opening as well as plate size. The constant is where the plate contacts the rear wall. You need the front edge of baffle in front of the outlet hole, and 3 inches below the top plate. 3" X 18" wide air space is the approximate square inch area to maintain the same as outlet area. If you lay in there with chalk, you can mark the side 3 inches down from the top, to a point in front of the exhaust hole where you want the baffle edge. You want the heat to go up the baffle and hit the stove top, not the outlet hole. 1 1/2 or 2 is fine. Draw a line from this point towards the back on the angle comfortable for loading and easy to support the plate. Having a couple bricks to set on the ledge will show you what to rest the back end of the plate on. The length of the angled line will be the length of your plate. It doesn't have to be exact, when you position the plate on the side bricks, changing the angle adjusts the air space. I made the plate for the Mama Bear 8 inches, and it could have been 9 with a little less angle and worked.
The flat top Insert is not going to create the turbulence the step top does in the stoves, so you'll be the first to know how much smoke reduction you get with an Insert.
 
I know the baffle placement will differ with my free-standing top exhaust but i was wondering how close to the exhaust opening i could raise my baffle to? I saw some of the factory ones were welded on an inch below the actual opening, could you go that close with a full baffle design as long as your opening in the front of the baffle was the same SQ-in or bigger as the 8" exhaust opening?
 
Yes, as long as square inch area of passageway (smoke-way) is the same or larger than square inch area of outlet. The baffle position is about the same with top or rear vent. The step top is an advantage to roll the heat and smoke downward into the fire. The more turbulence it creates the better.
Not sure which model you're referring to with only an inch of space. They have more than that.
The flat plate pictured below in a Honey Bear has a 1 1/2" space between pipe and plate. This leaves the same square area as the 6 inch outlet. This calculation would be pi X diameter. Or 3.14 X 6 X 1.5 = 28.26, exactly the same as the outlet square inch area.
Your 8 inch pipe would be a 2 inch opening. 3.14 X 8 X 2 = 50.24 which is your outlet square inch area.
The Honey Bear had to use that type of baffle since it's like a miniature Grandma. A smoke shelf baffle would take up too much loading area. This baffle doesn't direct heat to stove top at step area, or roll smoke down.
 

Attachments

  • Honey Bear baffle inside.jpg
    Honey Bear baffle inside.jpg
    47.4 KB · Views: 12,069
  • Honey Bear 9.jpg
    Honey Bear 9.jpg
    38.2 KB · Views: 6,760
Thank you for the correction! I was thinking that baffle was on a Grandma, thats great to know, i need 2" gap to the baffle. I'm going to try to split/cut the firebrick in half so the thinner bricks will take up even less of the stove. My goal is to make the baffle to fit in the "top" of the "step-top" so its not even visible while burning with the doors open.
 
Coaly...this is a great idea. We are lucky to have you around here.
Question:
My grandpa knock-off has a small ~12x12 baffle welded about 8" below the outlet. Rather than use fire bricks to prop up a larger baffle, do you think i could lay a larger piece on top of the existing baffle and set a fire brick on top of it to weight it down and keep it in place?
 
I just replaced a too big for the room soap stone H-II with a Fisher Baby Bear for a ~650 sq foot cottage. So far it has been heating the space comfortably. Considering the improvised brick and steel plate baffle, but I think that it may take up too much space. The honey bear baffle seems like a good plan for the baby bear.
 

Attachments

  • fisher.jpg
    fisher.jpg
    100.2 KB · Views: 6,785
Sorry about that Grannyknot. There for a while the Forum wasn't sending an email to subscribed threads (I know it was delayed and I believe some were missed) so I didn't see your post!
I would set the baffle on top of the plate you have, but prop bricks under it at the sides. It gets quite hot under the outlet, and the extra weight could pull it down. It's not very strong if you should overfire and get the bottom plate inside a dull red.

iceisasolid;
A Mama and Papa front top plate is about even with the bottom of outlet, so it doesn't affect their loading height. The baffle can be about the same angle opposite the step in the top. You would need shorter wood on top, I know 18" pieces are short enough ! I've drawn on the side of these stove models with chalk to get an idea where the baffle would be to judge how much space it looses. The Baby Bear is the only problem model for a smoke shelf baffle. There is not enough stove height so it encroaches on the firebox space.
The Honey Bear is a top vent only, so the flat plate is horizontal, not vertical. Your vertical plate would have an opening on the bottom, where you want it closed. If you close the bottom half in, you need to extend the baffle plate away from the pipe end 3 inches instead of 1 1/2" to keep the same open square inch area. 28.26 sq. in. (Open 3 inch space around the top half of the semi circle) You want the heat to rise past the flue outlet to the stove top, and be drawn down into the pipe.
 
So, the Baby Bear has been in use for about 1 week now in my guest home. My brother has been reaping the benefits of this stove and we have figured out that we can get about 6-7 hour burn times by loading it up, running to 500-550 and then reducing the intake to about 3/4 of a turn open. Not bad for a small stove
 
I got inspired last night after reading about the baffles some are using. I built a baffle a year or so from angle iron and firebrick but it was just too big and thick and i probably should have made the legs a bit longer. ultimately it took up too much of my firebox i got fed up removed it and carried on. pretty sure that was last year. so this morning i went to a local machine shop operated by a friend and customer of mine and got him to cut me piece of 1/4" plate 19 1/4" wide by 16" long/deep with his water jet(that thing is awesome). would have been ideal to have had it wider but 19 1/4 is corner to corner of my door opening. and now i just got home from work and wouldnt ya know it my wife had a decent fire going so im here waiting with the doors on the stove open and windows on the house open letting it burn down so i can put it in. yes im that obsessed.
 
I made one for my Grandma Bear last year using some old angle iron and fire bricks. It definitely puts out more heat.
 

Attachments

  • baffle.jpg
    baffle.jpg
    174.7 KB · Views: 11,746
Coaly and others kind enough to respond,

What are your thoughts about butterfly dampers in the stove pipe? I look at a lot of pictures in this thread but do not see them. I have always used them in my unbaffled Baby Bear, placed where it is safest to reach over the stove, to the chimney pipe.

If you have a baffle, do you use both or does the baffle replace the damper. I am thinking that there is no downside to having both.

Thanks, Dave, Western Maryland
 
I've got one it's more of a backup just in case of a chimney fire.
 
I use a damper with a baffled stove.
Depends on chimney draw. The exhaust damper regulates draft and changes how much comes in the air intakes. If you don't have a good draft to start with, or need more loss up the chimney due to a cold or oversize chimney flue, the damper may not be needed.
The first Bear Series single door stoves did not call for a damper in the manual. They were also built before insulated chimneys. The Fireplace Series required one to control the draft during open door burning with a screen in place. The baffled Grandma and Grandpa Fireplace Series III did not call for a damper in the manual. However, the double door Goldilocks does require a damper. Probably due to being a mobile home certified stove with insulated proper size chimney. (having a known strong draft)
Since mine is a Dura-vent stainless insulated indoor straight up chimney, I can close my exhaust damper half way soon after lighting. Normal home heating works fine fully closed. To cook, we open the damper half way, and one turn of the air intakes is about right for cooking most foods. To slow the cooking, we close the damper like a throttle and for simmering run it closed with the air intakes about 1/2 turn open. Draft changes these adjustments with chimney size, weather, and outdoor temperature.
The hole size in the damper center is critical as well. Some have small holes across the center at the shaft. The closer to the stove in the first section of pipe the better to keep the metered holes clean and the correct size in any damper.
 
coaly said:
I use a damper with a baffled stove.
Depends on chimney draw. The exhaust damper regulates draft and changes how much comes in the air intakes. If you don't have a good draft to start with, or need more loss up the chimney due to a cold or oversize chimney flue, the damper may not be needed.
The first Bear Series single door stoves did not call for a damper in the manual. They were also built before insulated chimneys. The Fireplace Series required one to control the draft during open door burning with a screen in place. The baffled Grandma and Grandpa Fireplace Series III did not call for a damper in the manual. However, the double door Goldilocks does require a damper. Probably due to being a mobile home certified stove with insulated proper size chimney. (having a known strong draft)
Since mine is a Dura-vent stainless insulated indoor straight up chimney, I can close my exhaust damper half way soon after lighting. Normal home heating works fine fully closed. To cook, we open the damper half way, and one turn of the air intakes is about right for cooking most foods. To slow the cooking, we close the damper like a throttle and for simmering run it closed with the air intakes about 1/2 turn open. Draft changes these adjustments with chimney size, weather, and outdoor temperature.
The hole size in the damper center is critical as well. Some have small holes across the center at the shaft. The closer to the stove in the first section of pipe the better to keep the metered holes clean and the correct size in any damper.

That last sentence you said that there are sometimes small metered holes in most dampers that can be used to help control the draft, on our Fisher Insert, the back 1/4 or so of the damper was left or cut off during manufacture as seen in a past post of yours, is this to ensure there is still some flow even when in the closed position or would it be safe to say when up and running correctly that the closed position is where it's supposed to be?? Also our opening is 7 1/2 inches across, been very difficult finding an adapter to fit that our flex pipe will connect to and still allow the damper rod to pass thru it and still keep a tight fit.. Great ideas on the baffle and we are making one for our insert today!! Thanks much!!

T
 
Yes, some Insert dampers have a flat spot for a bypass when closed to prevent closing off entirely.
With a liner connected directly to outlet, closing fully should be right for the longest burn. With no liner, the larger the flue, the more the damper needs to be open.
Simpson Rectangle to Round Boot notched for damper rod ? (used with Dura-Flex liners covers 10 1/4 X 18")
 

Attachments

  • Simpson Rectangle to Round Boot.jpg
    Simpson Rectangle to Round Boot.jpg
    17.4 KB · Views: 8,116
Per the advice of good people here, I put 9 by 13 inch plate in my Baby Bear, and found that it sat neatly on the fire brick at the back of the stove and the angle iron clips that hold the firebrick to the sides. It left about 2 inch gap between the front of the baffle and the interior top of the stove. It did not seem to take up any firewood space. By good fortune this worked out well with approx 26 square inches of space for gases to exit into the 28 square inch chimney pipe. The stove fired up easily and drew well, even in 45 degree temperatures.

Would it be worthwhile to put a simple baffle inside the air inlet, on the inside of the door to direct the intake air up towards the top of the door, or perhaps to the interior side of the stove. This would replace the more linear flow of air with the present air inlet. Is there any advantage to this? My thought is that the most turbulent air flow possible within the stove is conducive to higher efficiency.

Dave, Maryland
 
  • Like
Reactions: jjs777_fzr