Stove in Place; Still Struggling with Stove Pipe NEW PHOTOS.....HELP!

  • Active since 1995, Hearth.com is THE place on the internet for free information and advice about wood stoves, pellet stoves and other energy saving equipment.

    We strive to provide opinions, articles, discussions and history related to Hearth Products and in a more general sense, energy issues.

    We promote the EFFICIENT, RESPONSIBLE, CLEAN and SAFE use of all fuels, whether renewable or fossil.
Status
Not open for further replies.

wmarazita

Member
Jun 15, 2011
117
Southern California
I have posted a couple times trying to figure through this, but keep coming up with questions. I am hoping I can finally order some stove pipe soon!

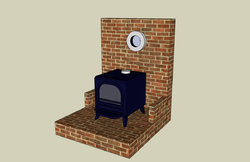
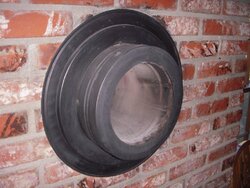
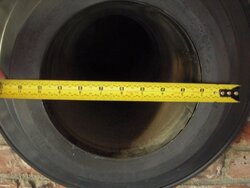
Recap: I just put in place my new Englander 30. (Sorry, I didn't take any photos yet, but the drawing should be sufficient for the questions). It has a 6" flue and I need to attach to an 8" thimble. My clearances allow for single wall pipe. I would like to use Heat Fab. The stove is placed on the hearth directly in-line vertically with the thimble. It is 9 inches from the brick wall. Two options have been suggested by forum members, but I have questions with both options still, and can't decide if there is a "best" option.

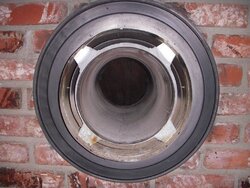
Option #1: 6" X 12" pipe coming out of the flue, into a 90 degree elbow, into a 6" x 24" pipe that goes into the 8" thimble and protrudes an inch into the vertical flue of the chimney. Insulate with "rock wool" around pipe in thimble. Add a 6" trim collar.

Question: The 6" Heat Fab trim collar has an outside diameter that is greater than the outside diameter of the thimble. So, the collar will hang over on the sides of the thimble which I don't think will look great. If I use a trim collar from another manufacturer, will the Heat Fab pipe potentially not fit through the collar from another manufacturer? Other ideas on this?

Option #2: 6" x 12" pipe coming out of the flue, into a 90 degree elbow, into a 6" to 8" increaser that fits into the thimble.

Question: How would the increaser attach to the thimble? There doesn't appear to be any way to screw it onto the thimble. Is it safe to simply push the crimped end into the thimble and not positively attach it? How do I attach this safely and securely?

Any thoughts on which option is better? My #1 priority (after safety, obviously), is ease of disassembly/reassembly and cleaning of the stove pipe. Which actually brings me to my last question: The Heat Fab 90 degree elbows are corrugated. Are these difficult to clean?

Thanks in advance,
Bill
 

Attachments

  • Wood Stove 2.png
    Wood Stove 2.png
    127.7 KB · Views: 1,048
Is this an open unlined chimney?

I'm guessing you don't know the manufacturer of the thimble? You really should be using the adapter designed for that particular thimble.
I'm no expert on stove pipe combinations but I'm willing to bet the experts will tell you to use the correct fitting increaser. If I was doing this I would be asking the same question... does it need any mechanical attachment or is furnace cement after pushing it in and aligning it sufficient?

I'm thinking you might be able to install screws from the inside once it's pushed in. I looked up increasers... some of them come with screws.

Here is a listing of Heat Fab increasers. http://www.build.com/heat-fab-2628b-6-inch-crimp-8-inch-non-crimp-adapter/p651532

It almost looks like some of these overlap the thimble.

I was always under the impression that you wanted all pipe connections to overlap so the creosote runs stay within the pipe. By installing an increaser inside your thimble, that would break that rule. In your case, if it's an open chimney, it may not matter.

I probably made you confused and now you even have more questions.

It would be nice to have a decent picture of the thimble opening.
 
Is this a clay crock? If so, I think a short 8" extension on the increaser needs to be added. When installed it should reach flush to the interior liner of the chimney.
 
The brick backing is covering logs (log cabin). The thimble goes through the brick, through the logs, to the outside of the cabin to the chimney. The chimney then goes vertically for about 15' feet to above the roof line.
 
We need to know more about the thimble and chimney. Are they class A pipe? How that thimble passes through the logs, clearances and the thimble construction are very important. If you can post a picture of the outside side of the thimble, that would help.
 
joecool85 said:
Am I the only one impressed with his cad-style drawing?

No Joe I thought it is a pretty good cad drawing.. Probably done with Google SketchUp a free program.. My son designed a desk he built with it.. I am used to traditional cad so I find SketchUp confusing.. I should spend more time with it.. Maybe this winter sometime..

Ray
 
I don't know if I have all of the answers that have been asked, and I can't get any good photos for a couple weeks, unfortunately. Here is what I do know, which will hopefully help, and I have attached a picture of what has been replaced.

A reputable sweep just cleaned and inspected the chimney system and thimble and said all was up to code and in good shape. The thimble is 8" in diameter (exactly) and runs through the brick and then through the logs into the chimney. The outside of the chimney runs vertically up the side of the house for 15 feet. It appears (from memory) to be double walled, stainless steel piping (I don't know if that is Class A or not or if you need more info?). There is a sliding door cleanout at the bottom of the 15' chimney that is accessed from outside.

The old stove had an 8" flue and 8" stove pipe. The stove pipe and thimble joint was the crimped end of the 8" stove pipe and was stuck into the thimble (about 1.5"). There was no screws or joint glue of any kind. The Sweep didn't say this was "improper" or "unsafe".

Yes, the drawing is made with Google Sketchup.
 

Attachments

  • Cabin 004.jpg
    Cabin 004.jpg
    72.1 KB · Views: 861
  • Stove 3.jpg
    Stove 3.jpg
    135.1 KB · Views: 809
wmarazita said:
I don't know if I have all of the answers that have been asked, and I can't get any good photos for a couple weeks, unfortunately. Here is what I do know, which will hopefully help, and I have attached a picture of what has been replaced.

A reputable sweep just cleaned and inspected the chimney system and thimble and said all was up to code and in good shape. The thimble is 8" in diameter (exactly) and runs through the brick and then through the logs into the chimney. The outside of the chimney runs vertically up the side of the house for 15 feet. It appears (from memory) to be double walled, stainless steel piping (I don't know if that is Class A or not or if you need more info?). There is a sliding door cleanout at the bottom of the 15' chimney that is accessed from outside.

The old stove had an 8" flue and 8" stove pipe. The stove pipe and thimble joint was the crimped end of the 8" stove pipe and was stuck into the thimble (about 1.5"). There was no screws or joint glue of any kind. The Sweep didn't say this was "improper" or "unsafe".

Yes, the drawing is made with Google Sketchup.

Nice loghome, hearth and XL CDW stove!

Ray
 
Yes, are there any labels on the outside pipe identifying the type and manufacturer? There may be an adapter piece for tying in the single-wall to the thimble. I am trying to do is ID the brand of pipe. An outside picture of the thimble and maybe the flue cap would also help.
 
Ok, I will check and see what I can find and take some good pictures of everything. It will be a couple weeks and I will re-post.

Thanks!
 
I was able to take some pictures of my stove, thimble and flue/chimney. I am hoping to get some help on how to run single wall pipe from the stove (6") to the thimble (8").

Thanks!
 

Attachments

  • Cabin 002.jpg
    Cabin 002.jpg
    85 KB · Views: 605
  • Cabin 006.jpg
    Cabin 006.jpg
    121.5 KB · Views: 630
  • Cabin 009.jpg
    Cabin 009.jpg
    84.7 KB · Views: 616
  • Cabin 011.jpg
    Cabin 011.jpg
    146.8 KB · Views: 605
  • Cabin 013.jpg
    Cabin 013.jpg
    83.7 KB · Views: 598
  • Cabin 014.jpg
    Cabin 014.jpg
    69.7 KB · Views: 631
  • Cabin 019.jpg
    Cabin 019.jpg
    61.8 KB · Views: 629
  • Cabin 025.jpg
    Cabin 025.jpg
    81.7 KB · Views: 606
That's the older style Amerivent pipe which appears to have the stove pipe adapter already in place. If so, the 6" x 8" increaser would go 8" (crimped) end directly into the thimble.
 
Ok, that makes sense from what I can see. How does the increaser attach though? There is no way that I can see to attach it with screws. It seems like there is a possibility that it could come loose and disconnected while there is a fire going, no?

What about the idea of having a 6" pipe enter the thimble and extend into the vertical portion of the chimney? I think I found a trim collar that would work.
 
I knew you were going to ask that. You are correct. It's just a pressed in, friction fit.
 
Here was another idea from another Member that I liked:

"You can get by WITHOUT an increaser.
Run a straight section of 22ga Heat Fab into the chimney.
Run it AT LEAST one inch into the vertical flue so that
if you get any build up it’ll run into the chimney rather
than down the outside wall.
Then you can insulate between the OD of the 6†& ID of the *†with rock wool.
Add a 6†trim collar & you’re good to go."

What do you think of that idea? Is it as safe? It seems that it would cleaner because there would be no bulky increaser.

Bill
 
I don't see why not. No safety issue that I can see.
 
Great! That gives me two options.

One last thing: What purpose does the "rock wool" serve in the alternate installation?

Thanks!
 
BeGreen said:
I don't see why not. No safety issue that I can see.
In that post I theorized about the buildup of creosote on the insulation itself. Since that could not be cleaned, couldn't that be a chimney fire hazard after some time? I worry about this, especially because it's right at the point of entry to the chimney and more likely to be a location of mild turbulence and theoretically cooler gasses.

Seems like this is being done to get the pipe further into the chimney to prevent slip-out, no? If that is the case, then screw another 6" long section of the larger 8" pipe and push it through?
 
I don't think there will be much buildup on the insulation, especially if it is not packed or wrapped all the way to the chimney throat. The 6" pipe should just be flush with the tile. But for extra safety, pull out and replace the insulation annually during spring/summer cleaning.
 
BeGreen said:
I don't think there will be much buildup on the insulation, especially if it is not packed or wrapped all the way to the chimney throat. The 6" pipe should just be flush with the tile. But for extra safety, pull out and replace the insulation annually during spring/summer cleaning.
I agree that if you don't wrap it to the chimney throat that you should be fine. I know my opinion doesn't weigh in like BG's does, as it should be, but since I was the only "Devil's advocate" on this method, I thought it important to concede, so other readers understand that we all agree.

Could there be an additional option for pseudo-facing the insulation, like by wadding up aluminum foil for a tight pipe fit, then placing the insulation after that?

wmarazita said:
Excellent! Thanks for all the info.

I will post final pictures when complete.

Please do post them!
 
Prevent air leak that could reduce exhaust efficiency, and it can also keep gasses hot to help with speed, too.

If I got that wrong, I'm sure you'll read about it in about 20 seconds.
 
Status
Not open for further replies.