
E
elkimmeg
Guest
I’ m sure some of the digital pictures will follow: Here is some of the steps concerning Turner-n-burner’s install and some of the decision making process
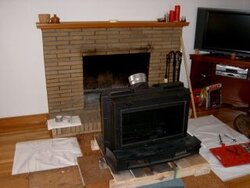
When I first arrived, I noted how Turner’s home appeared the oak floors looked as good as the day they were installed.. All trim had been replaced in the home and the painting job one of the neatest I ever have seen. The older home also has the modern European kitchen cabinet looks. Everything inside that home has beer redone recently, including his furnace 3 zones all on separate circulatory pumps. Probably 3 cords of processed stacked wood. We quickly discovered Turner is into woodworking. He has a table saw ,I would die for, in his garage and band saw and equally a lathe.
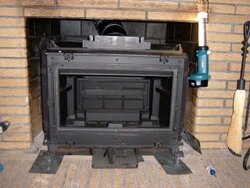
First task was to remove the glass fire doors to his fireplace opening. Next I removed the damper plate ,this was the only part that went according to plan. The fire box was very deep 26” 3' wide and about 30” high, plenty of room the get that monster insert in. The hearth is raised about 4 “. The brick work appearance is still in great shape.
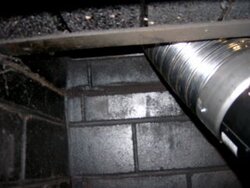
Finally with the damper plate removed, it was time to size up what we had to work with. The front had double angle iron support with the damper located farthest to the rear. The throat smoke shelf area, was expansive a where the flue started about 4’ above the damper. At that point it took a sharp 45-degree bend to the front of the home. His original damper opening was surprisingly larger, than most common 4.5 “ ones found today, his opening was nearly 5.25” The front of the damper box, was filled up with concrete and bricks, so close to the lip ,that it was useless to cut. There was a little that could be cut in the rear, but where and why, bringing the pipe more to the rear and coming in from the side It was not easily to determine where to cut and if it would help us. Next we cut a scrap of wood 6.25” and attached it to a telescoping pole, to test our clearance distances, to figure out, if we could even make it past the 45 degree bend. It scraped by but made it. We knew then, the insulation wrap and mesh would never afford clearance. The first big break came ,when I measured the actual liner. Whether by design or altered by shipping ,the first 3’ of the liner was slightly ovalized and only 5”. Could it be possible it could make it threw the damper area without further moderation?
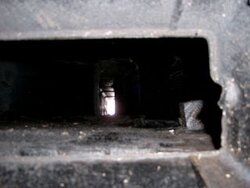
Time to find out we fully extended the 28’ ladder, just enough to make it beyond the chimney and started to remove the existing chimney cap. Surprise surprise, there was no concrete chimney cap crown just this aluminum vent cap held on by 4 screws and caulking. That it Just a huge void! The top rows of bricks were held I together by the caulking and chimney cap the two flues moved and sold bricking was really 15 rows down from the top
GVA brought harness and safety belt and straps and fastened then to the chimney base as he worked the top. By this time, we had moved the stove from the garage and it rested in front of the hearth. Mind you, up the front 6 steps using 4 of us, one of his friends, staging planks and 2/4 wedging it up each step of the way..
Back to the liner, we rolled it out to straighten the coil then fished a 50" rope down the center. Turner has a 50’ coil electrical snake the made the task much easier. With metal snips, I cut slits about 6” up and placed another rope onside attaching a huge washer. I folded the slit end in and duct taped the crap out of it making a cone. I attached a socket to the other end of the rope to be dropped down the chimney. The plan was if we got stuck we had a rope to be able to pull it back out. The rope in front was to help pull it down. Truner and GVA got the liner to the roof and dropped the socket down.
Turner fed the liner to GVA and I in turn helped pull it down from the inside with the rope.
I soon found out why I was wearing safety goggles, all kinds of crap falling on me and around me. About 6' down we hit a mortar snot between the flues and got stuck. GVA pull it back up and I tried to use the rope to direct it away from the mortar chunk up and down a few time, then all of a sudden the mortar chunk breaks off and falls about an inch from my right ear. Chunks of creosote ash also falling on my face. Between the push /pull we get to the 45 degree angle transition area. A little shifting with the rope position and pulling ,it went threw. N
Next task was to get threw the damper area. Naturally the ovalized section did not line up. I am now able to get both hands on the liner and GVA and I were able to rotate it, so that the ovalization lined up with the damper opening. GVA pushing me pulling it when threw, huge break it went threw. GVA with his grinder cut off the makeshift cone area, but we were there.
To be continued
When I first arrived, I noted how Turner’s home appeared the oak floors looked as good as the day they were installed.. All trim had been replaced in the home and the painting job one of the neatest I ever have seen. The older home also has the modern European kitchen cabinet looks. Everything inside that home has beer redone recently, including his furnace 3 zones all on separate circulatory pumps. Probably 3 cords of processed stacked wood. We quickly discovered Turner is into woodworking. He has a table saw ,I would die for, in his garage and band saw and equally a lathe.
First task was to remove the glass fire doors to his fireplace opening. Next I removed the damper plate ,this was the only part that went according to plan. The fire box was very deep 26” 3' wide and about 30” high, plenty of room the get that monster insert in. The hearth is raised about 4 “. The brick work appearance is still in great shape.
Finally with the damper plate removed, it was time to size up what we had to work with. The front had double angle iron support with the damper located farthest to the rear. The throat smoke shelf area, was expansive a where the flue started about 4’ above the damper. At that point it took a sharp 45-degree bend to the front of the home. His original damper opening was surprisingly larger, than most common 4.5 “ ones found today, his opening was nearly 5.25” The front of the damper box, was filled up with concrete and bricks, so close to the lip ,that it was useless to cut. There was a little that could be cut in the rear, but where and why, bringing the pipe more to the rear and coming in from the side It was not easily to determine where to cut and if it would help us. Next we cut a scrap of wood 6.25” and attached it to a telescoping pole, to test our clearance distances, to figure out, if we could even make it past the 45 degree bend. It scraped by but made it. We knew then, the insulation wrap and mesh would never afford clearance. The first big break came ,when I measured the actual liner. Whether by design or altered by shipping ,the first 3’ of the liner was slightly ovalized and only 5”. Could it be possible it could make it threw the damper area without further moderation?
Time to find out we fully extended the 28’ ladder, just enough to make it beyond the chimney and started to remove the existing chimney cap. Surprise surprise, there was no concrete chimney cap crown just this aluminum vent cap held on by 4 screws and caulking. That it Just a huge void! The top rows of bricks were held I together by the caulking and chimney cap the two flues moved and sold bricking was really 15 rows down from the top
GVA brought harness and safety belt and straps and fastened then to the chimney base as he worked the top. By this time, we had moved the stove from the garage and it rested in front of the hearth. Mind you, up the front 6 steps using 4 of us, one of his friends, staging planks and 2/4 wedging it up each step of the way..
Back to the liner, we rolled it out to straighten the coil then fished a 50" rope down the center. Turner has a 50’ coil electrical snake the made the task much easier. With metal snips, I cut slits about 6” up and placed another rope onside attaching a huge washer. I folded the slit end in and duct taped the crap out of it making a cone. I attached a socket to the other end of the rope to be dropped down the chimney. The plan was if we got stuck we had a rope to be able to pull it back out. The rope in front was to help pull it down. Truner and GVA got the liner to the roof and dropped the socket down.
Turner fed the liner to GVA and I in turn helped pull it down from the inside with the rope.
I soon found out why I was wearing safety goggles, all kinds of crap falling on me and around me. About 6' down we hit a mortar snot between the flues and got stuck. GVA pull it back up and I tried to use the rope to direct it away from the mortar chunk up and down a few time, then all of a sudden the mortar chunk breaks off and falls about an inch from my right ear. Chunks of creosote ash also falling on my face. Between the push /pull we get to the 45 degree angle transition area. A little shifting with the rope position and pulling ,it went threw. N
Next task was to get threw the damper area. Naturally the ovalized section did not line up. I am now able to get both hands on the liner and GVA and I were able to rotate it, so that the ovalization lined up with the damper opening. GVA pushing me pulling it when threw, huge break it went threw. GVA with his grinder cut off the makeshift cone area, but we were there.
To be continued


") so we had to take our chances with any adjustments we could make from the bottom. I figured if all else failed, I'd get another chance to make adjustments from the top when the mason staged it for the repair work.
so we had to take our chances with any adjustments we could make from the bottom. I figured if all else failed, I'd get another chance to make adjustments from the top when the mason staged it for the repair work.") I hope you installed it as far out as possible.
I hope you installed it as far out as possible.